Difference between revisions of "IR Remote Controller Configuration for OSMC"
| Line 1: | Line 1: | ||
=='''Prepare:'''== | =='''Prepare:'''== | ||
| − | In this guide, the lirc library is used. | + | In this guide, the lirc library is used.<br> |
| − | 1. An IR receiver and an IR remote control. (you can get it from www.sunfounder.com) | + | Here we use<br> |
| − | 2. A Raspberry Pi with OSMC. | + | 1. An IR receiver and an IR remote control. (you can get it from www.sunfounder.com)<br> |
| − | 3. A screen with HDMI port or other ports with a converter to HDMI. | + | 2. A Raspberry Pi with OSMC.<br> |
| − | 4. A Wi-Fi adapter or a cable to connect your Raspberry Pi to the Internet | + | 3. A screen with HDMI port or other ports with a converter to HDMI.<br> |
| + | 4. A Wi-Fi adapter or a cable to connect your Raspberry Pi to the Internet<br> | ||
5. A PC or a laptop, with Linux, which is connected to the Internet with wire or | 5. A PC or a laptop, with Linux, which is connected to the Internet with wire or | ||
| − | wirelessly. | + | wirelessly.<br> |
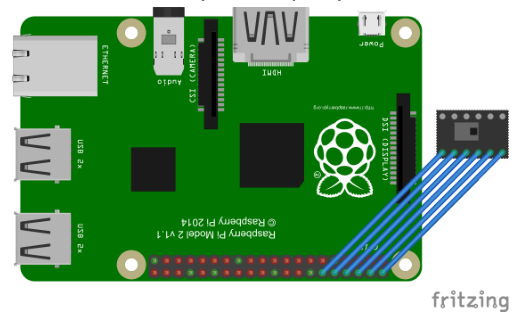
| − | + | Connect the IR receiver like this: (no wire required)<br> | |
| − | Connect the IR receiver like this: (no wire required) | + | [[File:PI1.png]] |
| − | + | ||
=='''1. Find out the IP address of the Raspberry Pi on OSMC'''== | =='''1. Find out the IP address of the Raspberry Pi on OSMC'''== | ||
| − | On OSMC, with your keyboard, go through '''My OSMC''' → '''Network''' → '''Wire or Wireless'''. | + | On OSMC, with your keyboard, go through '''My OSMC''' → '''Network''' → '''Wire or Wireless'''.<br> |
Then on the right side the IP appears. | Then on the right side the IP appears. | ||
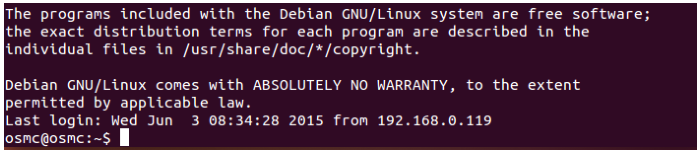
=='''2. Log in OSMC via ssh'''== | =='''2. Log in OSMC via ssh'''== | ||
| − | Open a terminal (T1) on your PC or laptop. Log in OSMC through '''ssh''' from another Linux. | + | Open a terminal (T1) on your PC or laptop. Log in OSMC through '''ssh''' from another Linux.<br> |
| − | ''''''ssh osmc@192.168.0.137 ''''''(Replace the IP address with your own in your OSMC) | + | ''''''ssh osmc@192.168.0.137 ''''''(Replace the IP address with your own in your OSMC)<br> |
| − | + | [[File:PI2.png]] | |
| − | Type in '''yes''' and press Enter | + | Type in '''yes''' and press Enter<br> |
| − | + | [[File:PI3.png]] | |
Type in the password: '''osmc''' (Note: Both the user name and password in OSMC is osmc, in | Type in the password: '''osmc''' (Note: Both the user name and password in OSMC is osmc, in | ||
| − | lower case) | + | lower case)<br> |
| − | + | [[File:PI4.png]] | |
| − | There you go. | + | There you go.<br> |
=='''3. Change the pins. Plug a keyboard into your Raspberry Pi'''== | =='''3. Change the pins. Plug a keyboard into your Raspberry Pi'''== | ||
On OSMC, with your keyboard, go through '''My OSMC''' → '''Pi Config''' → '''Hardware Support''' → | On OSMC, with your keyboard, go through '''My OSMC''' → '''Pi Config''' → '''Hardware Support''' → | ||
| Line 28: | Line 28: | ||
support and press Enter) and press the key left or right arrow to change it to 23. Then press | support and press Enter) and press the key left or right arrow to change it to 23. Then press | ||
the down arrow key to turn to -gpio_in_pin, also press left or right to change it to 18 | the down arrow key to turn to -gpio_in_pin, also press left or right to change it to 18 | ||
| − | Like this: | + | Like this:<br> |
--------------------------------------------------------------------------------- | --------------------------------------------------------------------------------- | ||
| − | |Enable LIRC GPIO support █ | | + | |Enable LIRC GPIO support █ |<br> |
| − | | -gpio_out_pin 23 | | + | | -gpio_out_pin 23 |<br> |
| − | | -gpio_in_pin 18 | | + | | -gpio_in_pin 18 |<br> |
--------------------------------------------------------------------------------- | --------------------------------------------------------------------------------- | ||
| − | Select OK and press Enter to confirm. | + | Select OK and press Enter to confirm.<br> |
=='''4. Configure the auto startup of lirc'''== | =='''4. Configure the auto startup of lirc'''== | ||
| − | On your PC or laptop (remote access window): | + | On your PC or laptop (remote access window):<br> |
<pre> | <pre> | ||
$ sudo vi /etc/modules | $ sudo vi /etc/modules | ||
</pre> | </pre> | ||
| − | Press the "i" key to enter the edit mode and add the following lines | + | Press the "i" key to enter the edit mode and add the following lines<br> |
<pre> | <pre> | ||
lirc_dev | lirc_dev | ||
lirc_rpi gpio_in_pin=18 | lirc_rpi gpio_in_pin=18 | ||
</pre> | </pre> | ||
| − | Then press "Esc" to exit the edit mode, enter the command to save and exit | + | Then press "Esc" to exit the edit mode, enter the command to save and exit<br> |
<pre> | <pre> | ||
:wq | :wq | ||
| Line 61: | Line 61: | ||
$pgrep –l lircd | $pgrep –l lircd | ||
</pre> | </pre> | ||
| − | Then the following will be printed: | + | Then the following will be printed:<br> |
| − | + | [[File:PI6.png]] | |
| − | So the number before lircd is its pid. | + | So the number before lircd is its pid.<br> |
=='''8. Kill the licd sever (replace "290" below with the pid you just searched out)'''== | =='''8. Kill the licd sever (replace "290" below with the pid you just searched out)'''== | ||
| Line 74: | Line 74: | ||
</pre> | </pre> | ||
=='''10. On your PC or laptop:'''== | =='''10. On your PC or laptop:'''== | ||
| − | Open another terminal (T2). Download our configuration file from Github. | + | Open another terminal (T2). Download our configuration file from Github.<br> |
<pre> | <pre> | ||
$git clone https://github.com/sunfounder/Sunfounder_IR_Media_Remote_Control_Lirc_config.git | $git clone https://github.com/sunfounder/Sunfounder_IR_Media_Remote_Control_Lirc_config.git | ||
</pre> | </pre> | ||
| − | Go to ''Sunfounder_IR_Media_Remote_Control_Lirc_config/'': | + | [[File:PI7.png]] |
| + | Go to ''Sunfounder_IR_Media_Remote_Control_Lirc_config/'':<br> | ||
<pre> | <pre> | ||
$cd Sunfounder_IR_Media_Remote_Control_Lirc_config/ | $cd Sunfounder_IR_Media_Remote_Control_Lirc_config/ | ||
</pre> | </pre> | ||
| − | Copy the ''lircd.conf'' file to OSMC via the scp command (change the IP to your OSMC's) | + | Copy the ''lircd.conf'' file to OSMC via the scp command (change the IP to your OSMC's)<br> |
<pre> | <pre> | ||
$scp ./lircd.conf osmc@192.168.0.112:/home/osmc/ | $scp ./lircd.conf osmc@192.168.0.112:/home/osmc/ | ||
</pre> | </pre> | ||
| − | In terminal T1: | + | [[File:PI8.png]] |
| + | In terminal T1:<br> | ||
Copy ''lircd.conf to /etc/lirc/'': | Copy ''lircd.conf to /etc/lirc/'': | ||
<pre> | <pre> | ||
Revision as of 08:05, 28 January 2016
Contents
- 1 Prepare:
- 2 1. Find out the IP address of the Raspberry Pi on OSMC
- 3 2. Log in OSMC via ssh
- 4 3. Change the pins. Plug a keyboard into your Raspberry Pi
- 5 4. Configure the auto startup of lirc
- 6 5. Reboot
- 7 6. Log in OSMC again via ssh (the IP may change)
- 8 7. Search for the pid of the lirc sever
- 9 8. Kill the licd sever (replace "290" below with the pid you just searched out)
- 10 9. Add the root permission for licd
- 11 10. On your PC or laptop:
- 12 11. Run the licd sever
Prepare:
In this guide, the lirc library is used.
Here we use
1. An IR receiver and an IR remote control. (you can get it from www.sunfounder.com)
2. A Raspberry Pi with OSMC.
3. A screen with HDMI port or other ports with a converter to HDMI.
4. A Wi-Fi adapter or a cable to connect your Raspberry Pi to the Internet
5. A PC or a laptop, with Linux, which is connected to the Internet with wire or
wirelessly.
Connect the IR receiver like this: (no wire required)

1. Find out the IP address of the Raspberry Pi on OSMC
On OSMC, with your keyboard, go through My OSMC → Network → Wire or Wireless.
Then on the right side the IP appears.
2. Log in OSMC via ssh
Open a terminal (T1) on your PC or laptop. Log in OSMC through ssh from another Linux.
'ssh osmc@192.168.0.137 '(Replace the IP address with your own in your OSMC)
 Type in yes and press Enter


Type in the password: osmc (Note: Both the user name and password in OSMC is osmc, in
lower case)

There you go.
3. Change the pins. Plug a keyboard into your Raspberry Pi
On OSMC, with your keyboard, go through My OSMC → Pi Config → Hardware Support →
-gpio_out_pin, (if there is no –gpio_out_pin in Hardware Support, select Enable LIRC GPIO
support and press Enter) and press the key left or right arrow to change it to 23. Then press
the down arrow key to turn to -gpio_in_pin, also press left or right to change it to 18
Like this:
|Enable LIRC GPIO support █ |
| -gpio_out_pin 23 |
| -gpio_in_pin 18 |
Select OK and press Enter to confirm.
4. Configure the auto startup of lirc
On your PC or laptop (remote access window):
$ sudo vi /etc/modules
Press the "i" key to enter the edit mode and add the following lines
lirc_dev
lirc_rpi gpio_in_pin=18
Then press "Esc" to exit the edit mode, enter the command to save and exit
:wq
5. Reboot
$ sudo reboot
6. Log in OSMC again via ssh (the IP may change)
$ssh osmc@192.168.0.133
7. Search for the pid of the lirc sever
$pgrep –l lircd
Then the following will be printed:


So the number before lircd is its pid.
8. Kill the licd sever (replace "290" below with the pid you just searched out)
$sudo kill 290
9. Add the root permission for licd
$sudo lircd --permission 666
10. On your PC or laptop:
Open another terminal (T2). Download our configuration file from Github.
$git clone https://github.com/sunfounder/Sunfounder_IR_Media_Remote_Control_Lirc_config.git
 Go to Sunfounder_IR_Media_Remote_Control_Lirc_config/:
$cd Sunfounder_IR_Media_Remote_Control_Lirc_config/
Copy the lircd.conf file to OSMC via the scp command (change the IP to your OSMC's)
$scp ./lircd.conf osmc@192.168.0.112:/home/osmc/
 In terminal T1:
Copy lircd.conf to /etc/lirc/:
$cd ~
$sudo cp lircd.conf /etc/lirc/
11. Run the licd sever
$sudo /run/lirc/lircd-lirc0.sh
Since we've set "PREV" as the previous song, "NEXT" as the next song, "PLAY/PAUSE" as to play/pause, "+" as volume up, "-" as volume down, "EQ" as mute, "2" as up, "8" as down, "4" as left, "6" as right, "5" as OK, "7" as back. Finally it is all done! Now you can try pressing the buttons on your remote control!