Difference between revisions of "5 Inch LCD Touch Screen Monitor for Raspberry Pi"
| Line 3: | Line 3: | ||
[[File:inch1.jpg]]<br> | [[File:inch1.jpg]]<br> | ||
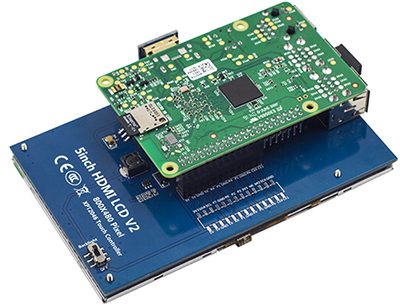
| − | + | This is a 5inch HDMI resistive touch screen designed for Raspberry Pi with a resolution of 800x480. | |
| + | The backlight can be controlled by a switch on the back, which can be turned on or off as needed. | ||
| + | All versions of Raspberry Pi are compatible with it, but the Raspberry Pi Zero / Zero 2 W requires its own HDMI cable. | ||
| + | The monitor can also be used as a computer monitor, but then the touch functionality will not work. | ||
| + | |||
If you have any problem, please feel free to contact us, by email to service@sunfounder.com or posts on our FORUM. We'll reply you ASAP. Thanks for support!<br> | If you have any problem, please feel free to contact us, by email to service@sunfounder.com or posts on our FORUM. We'll reply you ASAP. Thanks for support!<br> | ||
| Line 15: | Line 19: | ||
==Features== | ==Features== | ||
| − | * | + | * Resolution of 800×480 |
| − | * | + | * Resistive touch |
| − | * | + | * Compatible and can be plugged into any Raspberry Pi (Raspberry Pi Zero / Zero 2 W requires its own HDMI cable) |
| − | * | + | * Supports Raspberry Pi OS / Ubuntu / Kali and Retropie systems |
| − | * | + | * Can be used as a computer monitor without touch function (additional HDMI cable is required to connect to computer) |
| − | * | + | * Only for display, does not occupy any I/O resources (use touch function, occupy I/O) |
| − | * | + | * Support backlight control, more power saving. |
| − | |||
| − | + | ==Hardware Connection== | |
| + | |||
| + | With the HDMI bridge board, connect the Raspberry Pi to the HDMI port of the display, and turn on the backlight control switch. | ||
[[File:inch5.jpg]] | [[File:inch5.jpg]] | ||
| − | + | <font color="red">Note:</font><br>the Raspberry Pi Zero / Zero 2 W requires its own HDMI cable | |
| − | == | + | ==Install Raspberry Pi OS== |
An operating system needs to be installed onto the Micro SD card before inserting it into the Raspberry Pi. | An operating system needs to be installed onto the Micro SD card before inserting it into the Raspberry Pi. | ||
| − | <font color="red">Note:</font><br> | + | <font color="red">Note:</font><br>Skip this chapter if the Raspberry Pi already has an operating system installed. |
| − | + | ||
| − | Skip this chapter if the Raspberry Pi already has an operating system installed. | + | |
| Line 45: | Line 48: | ||
Browse to the Raspberry Pi Imager site and download the version that matches the computer or laptop\'s operating system (www.raspberrypi.org/software). When the download is complete, launch the installer program and follow the prompts to install the Raspberry Pi Imager. | Browse to the Raspberry Pi Imager site and download the version that matches the computer or laptop\'s operating system (www.raspberrypi.org/software). When the download is complete, launch the installer program and follow the prompts to install the Raspberry Pi Imager. | ||
| − | |||
[[File:3d1.png]] | [[File:3d1.png]] | ||
| Line 56: | Line 58: | ||
In the Raspberry Pi Imager, click '''CHOOSE OS''' -> '''Raspberry Pi OS'''. | In the Raspberry Pi Imager, click '''CHOOSE OS''' -> '''Raspberry Pi OS'''. | ||
| − | [[File: | + | [[File:3d33.png]] |
| Line 63: | Line 65: | ||
[[File:3d4.png]] | [[File:3d4.png]] | ||
| − | Click the | + | Click the '''WRITE''' button. |
[[File:3d5.png]] | [[File:3d5.png]] | ||
| − | + | After writing, open the config.txt file in the \boot directory of the TF card. | |
| + | |||
| + | [[File:3d5.png]] | ||
| + | |||
| + | Add the following code at the end of <code>config.txt</code>, then save and eject the TF card. | ||
| + | |||
| + | <font color="red">Note:</font><br>No spaces on either side of the = sign. | ||
<pre> | <pre> | ||
| Line 77: | Line 85: | ||
</pre> | </pre> | ||
| − | + | When you insert the TF card into the Raspberry Pi, power it up, and wait for a while, the Raspberry Pi will start normally. In this case, the touch may be faulty and needs to be calibrated. | |
| − | == | + | ==Touch Calibration== |
| − | + | The display can be calibrated with <code>xinput-calibrator</code>. | |
| − | + | Execute the following command to install the relevant software. | |
<pre> | <pre> | ||
| + | sudo apt-get update | ||
sudo apt-get install xserver-xorg-input-evdev xinput-calibrator | sudo apt-get install xserver-xorg-input-evdev xinput-calibrator | ||
</pre> | </pre> | ||
| − | + | Copy the contents of <code>10-evdev.conf</code> to <code>45-evdev.conf</code>, then open the <code>99-calibration.conf</code> file. | |
| − | + | ||
| − | + | ||
<pre> | <pre> | ||
| Line 99: | Line 106: | ||
</pre> | </pre> | ||
| − | + | Add the following code to the <code>99-calibration.conf file</code>. | |
<pre> | <pre> | ||
| Line 113: | Line 120: | ||
</pre> | </pre> | ||
| − | + | Touch will work normally after '''restarting''' the Raspberry Pi. With different resistive screens, the accuracy may not be very good using the default calibration parameters, so you need to follow the guide below. | |
| − | On the touch screen, | + | On the touch screen, click on '''Menu''' -> '''Preference''' -> '''Calibrate Touchscreen'''. |
[[File:inch2.jpg]] | [[File:inch2.jpg]] | ||
| Line 123: | Line 130: | ||
[[File:inch3.jpg]] | [[File:inch3.jpg]] | ||
| − | + | You will get the following results after calibration. Please copy the contents of the red box. | |
[[File:inch4.jpg]] | [[File:inch4.jpg]] | ||
| − | + | Open the <code>99-calibration.conf</code> file again. | |
<pre> | <pre> | ||
| Line 133: | Line 140: | ||
</pre> | </pre> | ||
| − | Paste | + | Paste the copied text into the file. You can save the file by pressing ''''Ctrl+X'''', selecting ''''Y'''', and then pressing ''''Enter''''. |
| − | + | ||
| − | + | ||
| − | + | ||
| − | + | ||
| − | + | ||
| − | + | ||
| − | + | ||
| − | + | ||
| − | + | Reboot the Raspberry Pi again and you will see that the touch screen is working properly. | |
Revision as of 06:38, 28 July 2022
Contents
Intrduction

This is a 5inch HDMI resistive touch screen designed for Raspberry Pi with a resolution of 800x480. The backlight can be controlled by a switch on the back, which can be turned on or off as needed. All versions of Raspberry Pi are compatible with it, but the Raspberry Pi Zero / Zero 2 W requires its own HDMI cable. The monitor can also be used as a computer monitor, but then the touch functionality will not work.
If you have any problem, please feel free to contact us, by email to service@sunfounder.com or posts on our FORUM. We'll reply you ASAP. Thanks for support!
Pin Description

Features
- Resolution of 800×480
- Resistive touch
- Compatible and can be plugged into any Raspberry Pi (Raspberry Pi Zero / Zero 2 W requires its own HDMI cable)
- Supports Raspberry Pi OS / Ubuntu / Kali and Retropie systems
- Can be used as a computer monitor without touch function (additional HDMI cable is required to connect to computer)
- Only for display, does not occupy any I/O resources (use touch function, occupy I/O)
- Support backlight control, more power saving.
Hardware Connection
With the HDMI bridge board, connect the Raspberry Pi to the HDMI port of the display, and turn on the backlight control switch.

Note:
the Raspberry Pi Zero / Zero 2 W requires its own HDMI cable
Install Raspberry Pi OS
An operating system needs to be installed onto the Micro SD card before inserting it into the Raspberry Pi.
Note:
Skip this chapter if the Raspberry Pi already has an operating system installed.
Raspberry Pi Imager is a quick and easy way to install the Raspberry Pi operating system to a Micro SD card from a computer or laptop.
Browse to the Raspberry Pi Imager site and download the version that matches the computer or laptop\'s operating system (www.raspberrypi.org/software). When the download is complete, launch the installer program and follow the prompts to install the Raspberry Pi Imager.

If the Windows operating system prevents the application from launching, click on More info and then click on Run anyway to install the Raspberry Pi Imager.

Insert the Micro SD card into the computer or laptop's SD card slot. If the computer or laptop only has a full-size port for SD cards, use a Micro SD card adapter. In the Raspberry Pi Imager, click CHOOSE OS -> Raspberry Pi OS.

Select the SD card you are using.

Click the WRITE button.

After writing, open the config.txt file in the \boot directory of the TF card.
Add the following code at the end of config.txt, then save and eject the TF card.
Note:
No spaces on either side of the = sign.
hdmi_group=2
hdmi_mode=87
hdmi_cvt 800 480 60 6 0 0 0
hdmi_drive=1
dtoverlay=ads7846,cs=1,penirq=25,penirq_pull=2,speed=50000,keep_vref_on=0,swapxy=0,pmax=255,xohms=150,xmin=200,xmax=3900,ymin=200,ymax=3900
When you insert the TF card into the Raspberry Pi, power it up, and wait for a while, the Raspberry Pi will start normally. In this case, the touch may be faulty and needs to be calibrated.
Touch Calibration
The display can be calibrated with xinput-calibrator.
Execute the following command to install the relevant software.
sudo apt-get update
sudo apt-get install xserver-xorg-input-evdev xinput-calibrator
Copy the contents of 10-evdev.conf to 45-evdev.conf, then open the 99-calibration.conf file.
sudo cp -rf /usr/share/X11/xorg.conf.d/10-evdev.conf /usr/share/X11/xorg.conf.d/45-evdev.conf
sudo nano /usr/share/X11/xorg.conf.d/99-calibration.conf
Add the following code to the 99-calibration.conf file.
Section "InputClass"
        Identifier      "calibration"
        MatchProduct    "ADS7846 Touchscreen"
        Option  "Calibration"   "208 3905 288 3910"
        Option  "SwapAxes"      "0"
        Option "EmulateThirdButton" "1"
        Option "EmulateThirdButtonTimeout" "1000"
        Option "EmulateThirdButtonMoveThreshold" "300"
EndSection
Touch will work normally after restarting the Raspberry Pi. With different resistive screens, the accuracy may not be very good using the default calibration parameters, so you need to follow the guide below.
On the touch screen, click on Menu -> Preference -> Calibrate Touchscreen.

Then the screen will show 4 points. You need to tap them one by one to calibrate.

You will get the following results after calibration. Please copy the contents of the red box.

Open the 99-calibration.conf file again.
sudo nano /etc/X11/xorg.conf.d/99-calibration.conf
Paste the copied text into the file. You can save the file by pressing 'Ctrl+X', selecting 'Y', and then pressing 'Enter'.
Reboot the Raspberry Pi again and you will see that the touch screen is working properly.