5 Inch LCD Touch Screen Monitor for Raspberry Pi
Intrduction

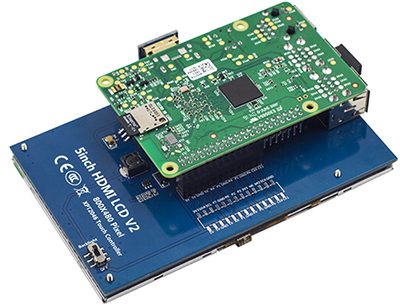
Designed for Raspberry Pi, the 5 inch HDMI display screen monitor holds a resistive touch screen with a resolution of 800x480. It supports back-light control with a button on the backside to control. With the HDMI interface, it doesn’t occupy any I/O port of Raspberry Pi. This touch screen monitor supports touch screen control and 800 x480 resolution, providing a perfect visual experience for you.
If you have any problem, please feel free to contact us, by email to service@sunfounder.com or posts on our FORUM. We'll reply you ASAP. Thanks for support!
Pin Description

Features
- 硬件分辨率为800×480
- 电阻式触摸控制
- 兼容并可直接插入任何版本树莓派(树莓派Zero / Zero 2 W需另配HDMI连接线)
- 支持Raspberry Pi OS / Ubuntu / Kali和Retropie系统
- 可作为计算机显示器,无触摸功能(接入计算机须另配HDMI线)
- 仅用于显示,不占用任何I/O资源(使用触摸功能,占用I/O)
- 支持背光控制,更省电
硬件连接
将树莓派插入到显示屏上,把HDMI桥接板接入屏幕和主板的HDMI接口,并把LCD背后的Backlight拨到“ON”。

注:树莓派Zero / Zero 2 W需另配HDMI连接线进行连接。
软件设置
An operating system needs to be installed onto the Micro SD card before inserting it into the Raspberry Pi.
Note:
Skip this chapter if the Raspberry Pi already has an operating system installed.
Raspberry Pi Imager is a quick and easy way to install the Raspberry Pi operating system to a Micro SD card from a computer or laptop.
Browse to the Raspberry Pi Imager site and download the version that matches the computer or laptop\'s operating system (www.raspberrypi.org/software). When the download is complete, launch the installer program and follow the prompts to install the Raspberry Pi Imager.

If the Windows operating system prevents the application from launching, click on More info and then click on Run anyway to install the Raspberry Pi Imager.

Insert the Micro SD card into the computer or laptop's SD card slot. If the computer or laptop only has a full-size port for SD cards, use a Micro SD card adapter. In the Raspberry Pi Imager, click CHOOSE OS -> Raspberry Pi OS.

Select the SD card you are using.

Click the **WRITE** button.

烧写完成后,打开TF卡根目录的config.txt文件,在config.txt最后加入以下代码,保存并安全弹出TF卡。
hdmi_group=2
hdmi_mode=87
hdmi_cvt 800 480 60 6 0 0 0
hdmi_drive=1
dtoverlay=ads7846,cs=1,penirq=25,penirq_pull=2,speed=50000,keep_vref_on=0,swapxy=0,pmax=255,xohms=150,xmin=200,xmax=3900,ymin=200,ymax=3900
将TF卡插入树莓派,给树莓派上电,正常等待十几秒后可正常显示。但此时触摸的是有问题的,需要对触摸进行校准。
触摸校准
该显示屏可以通过xinput-calibrator进行校准。
执行以下命令,安装相关软件:
sudo apt-get install xserver-xorg-input-evdev xinput-calibrator
如果执行失败可以查看这里能遇到的问题
执行以下命令:
sudo cp -rf /usr/share/X11/xorg.conf.d/10-evdev.conf /usr/share/X11/xorg.conf.d/45-evdev.conf
sudo nano /usr/share/X11/xorg.conf.d/99-calibration.conf
在99-calibration.conf添加下以代码:
Section "InputClass"
        Identifier      "calibration"
        MatchProduct    "ADS7846 Touchscreen"
        Option  "Calibration"   "208 3905 288 3910"
        Option  "SwapAxes"      "0"
        Option "EmulateThirdButton" "1"
        Option "EmulateThirdButtonTimeout" "1000"
        Option "EmulateThirdButtonMoveThreshold" "300"
EndSection
重启树莓派
On the touch screen, use a mouse, to click Menu -> Preference -> Calibrate Touchscreen.

Then the screen will show 4 points. You need to tap them one by one to calibrate.

After calibration, you will get the following. Copy the contents in the red box.

In the terminal, type in
sudo nano /etc/X11/xorg.conf.d/99-calibration.conf
Paste what you have copied just now to the file
Press Ctrl + X, select Y, and then press Enter to save the file。
5.In the terminal, type in
sudo reboot
After rebooting, the calibration will be done.