PN532 NFC Module for Raspberry Pi
Contents
[hide]Premise
Note: If you have configured libnfc before, please delete the config file.
sudo rm -rf /etc/nfc
Introduction
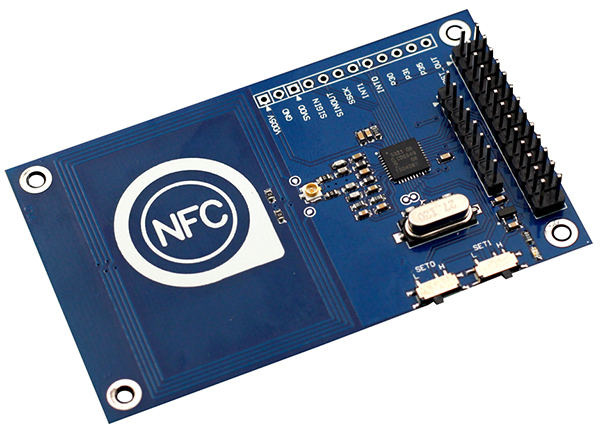
Raspberry Pi PN532 NFC module, as its name implies, is based on PN532 chip and used to 13.56 MHz near field communication. This module is equipped with on-board antenna, so there is no external antenna coil. It is compatible with SPI, IIC interfaces to communicate. With the support of NFC library, Raspberry Pi can connect products with the function of NFC, thus it is easy to use.

I2C Communication Instructions for Raspberry Pi
1. Open I2C of the Raspberry Pi :
sudo raspi-config
Select 5 Interfacing Options -> I2C -> yes.
2. Install some dependent packages
sudo apt-get update
sudo apt-get install libusb-dev libpcsclite-dev i2c-tools
3. Download and unzip the source code package of libnfc
cd ~
wget http://dl.bintray.com/nfc-tools/sources/libnfc-1.7.1.tar.bz2
tar -xf libnfc-1.7.1.tar.bz2
4. Compile and install
cd libnfc-1.7.1
./configure --prefix=/usr --sysconfdir=/etc
make
sudo make install
5. Write the configuration file for NFC communication
cd /etc
sudo mkdir nfc
sudo nano /etc/nfc/libnfc.conf
Check the following details of the file etc/nfc/libnfc.conf:
# Allow device auto-detection (default: true)
# Note: if this auto-detection is disabled, user has to set manually a device
# configuration using file or environment variable
allow_autoscan = true

# Allow intrusive auto-detection (default: false)
# Warning: intrusive auto-detection can seriously disturb other devices
# This option is not recommended, user should prefer to add manually his device.
allow_intrusive_scan = false

# Set log level (default: error)
# Valid log levels are (in order of verbosity): 0 (none), 1 (error), 2 (info), 3 (debug)
# Note: if you compiled with --enable-debug option, the default log level is "debug"
log_level = 1

# Manually set default device (no default)
# To set a default device, you must set both name and connstring for your device
# Note: if autoscan is enabled, default device will be the first device available in device list.
#device.name = "_PN532_SPI"
#device.connstring = "pn532_spi:/dev/spidev0.0:500000"
device.name = "_PN532_I2c"
device.connstring = "pn532_i2c:/dev/i2c-1"
6. Wiring
Toggle the switch to the I2C mode
| SEL0 | SEL1 |
| H | L |
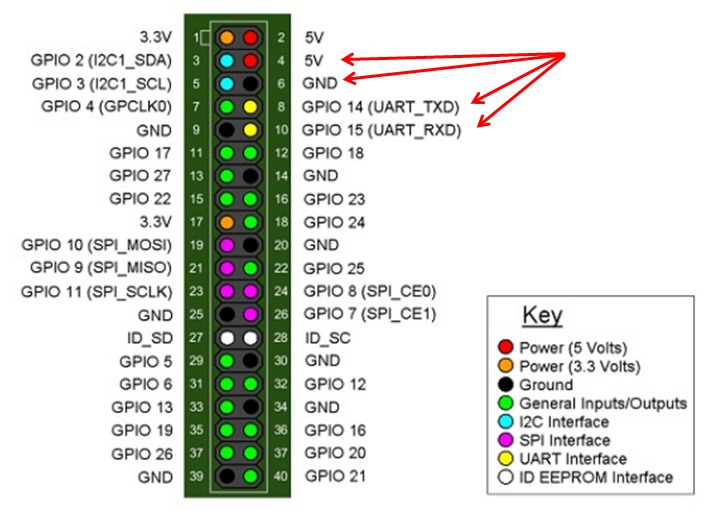
Pin diagram of Raspberry pi

Connect the devices:
| PN532 | Raspberry |
| 5V | 5V |
| GND | GND |
| SDA | SDA0 |
| SCL | SCL0 |
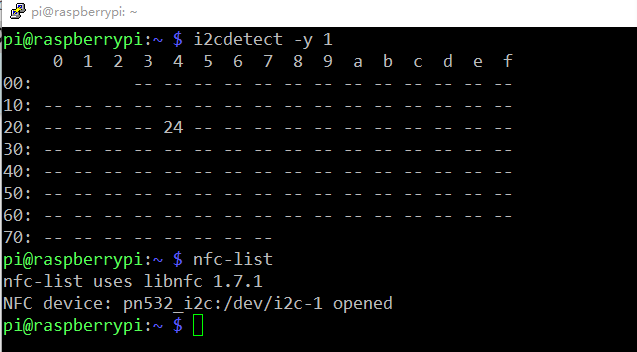
7. Run i2cdetect –y 1 to check whether the I2C device is recognized.
If yes, it means both the module and the wiring work well.
Then type in nfc-list to check the NFC module:

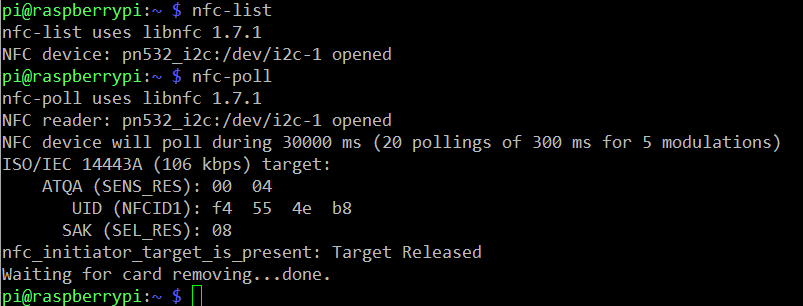
Run nfc-poll to scan the RFID tag and you can read information on the card:

SPI Communication Instructions for Raspberry Pi
1. Open SPI of the Raspberry Pi:
sudo raspi-config
Select 9 Advanced Options -> SPI -> yes.
2. Install some dependent packages
sudo apt-get update
sudo apt-get install libusb-dev libpcsclite-dev i2c-tools
3. Download and unzip the source code package of libnfc
cd ~
wget http://dl.bintray.com/nfc-tools/sources/libnfc-1.7.1.tar.bz2
tar -xf libnfc-1.7.1.tar.bz2
4. Compile and install
cd libnfc-1.7.1
./configure --prefix=/usr --sysconfdir=/etc
make
sudo make install
5. Write the configuration file for NFC communication
cd /etc
sudo mkdir nfc
sudo nano /etc/nfc/libnfc.conf
Check the following details of the file etc/nfc/libnfc.conf:
# Allow device auto-detection (default: true)
# Note: if this auto-detection is disabled, user has to set manually a device
# configuration using file or environment variable
allow_autoscan = true

# Allow intrusive auto-detection (default: false)
# Warning: intrusive auto-detection can seriously disturb other devices
# This option is not recommended, user should prefer to add manually his device.
allow_intrusive_scan = false

# Set log level (default: error)
# Valid log levels are (in order of verbosity): 0 (none), 1 (error), 2 (info), 3 (debug)
# Note: if you compiled with --enable-debug option, the default log level is "debug"
log_level = 1

# Manually set default device (no default)
# To set a default device, you must set both name and connstring for your device
# Note: if autoscan is enabled, default device will be the first device available in device list.
device.name = "_PN532_SPI"
device.connstring = "pn532_spi:/dev/spidev0.0:500000"
#device.name = "_PN532_I2c"
#device.connstring = "pn532_i2c:/dev/i2c-1"
6. Wiring
Toggle the switch to the SPI mode
| SEL0 | SEL1 |
| L | H |
Connect the devices:
| PN532 | Raspberry |
| 5V | 5V |
| GND | GND |
| SCK | SCKL |
| MISO | MISO |
| MOSI | MOSI |
| NSS | CE0 |
7. Run ls /dev/spidev0.* to check whether the SPI is opened or not.
If yes, it means both the module and the wiring work well.
Then type in nfc-list to check the NFC module:
/dev/spidev0.0 /dev/spidev0.1
If two devices are detected, it means the SPI is already opened.
Then type in nfc-list to check the NFC module:

</font color="red">For Raspberry Pi 3, you may be appear the following error:</font>

You should modifiy the libnfc.conf
sudo nano /etc/nfc/libnfc.conf
then modify 500000 to 50000:
device.connstring = "pn532_spi:/dev/spidev0.0:50000"
Run nfc-poll to scan the RFID tag and you can read information on the card:
