Difference between revisions of "Bluetooth 4.0 HM-10 Master Slave Module"
(→Resources) |
(→Test method) |
||
| Line 28: | Line 28: | ||
'''TXD''': serial interface, transmitting terminal.<br> | '''TXD''': serial interface, transmitting terminal.<br> | ||
'''RXD''': serial interface, receiving terminal.<br> | '''RXD''': serial interface, receiving terminal.<br> | ||
| − | == | + | ==Using SunFounder Uno== |
| − | + | '''Step 1:''' Compile and upload the code before building the circuit | |
| − | + | </pre>/****************************************/ | |
| − | '''Step 1''' | + | |
| − | <pre> | + | |
| − | /****************************************/ | + | |
| − | + | ||
| − | + | ||
| − | + | ||
| − | + | ||
| − | + | ||
| − | + | ||
| − | + | ||
| − | + | ||
| − | + | ||
| − | + | ||
| − | + | ||
| − | + | ||
| − | + | ||
| − | + | ||
| − | + | ||
| − | + | ||
| − | + | ||
| − | + | ||
| − | + | ||
| − | + | ||
| − | + | ||
| − | + | ||
| − | + | ||
| − | + | ||
| − | + | ||
| − | + | ||
| − | + | ||
| − | + | ||
| − | + | ||
| − | + | ||
| − | + | ||
| − | + | ||
| − | + | ||
| − | + | ||
| − | + | ||
| − | + | ||
| − | + | ||
| − | + | ||
| − | + | ||
| − | + | ||
| − | + | ||
| − | + | ||
| − | + | ||
| − | + | ||
| − | + | ||
| − | + | ||
| − | + | ||
| − | + | ||
| − | + | ||
| − | + | ||
| − | + | ||
| − | + | ||
| − | + | ||
| − | + | ||
| − | + | ||
| − | + | ||
| − | + | ||
| − | + | ||
| − | + | ||
| − | + | ||
| − | + | ||
| − | + | ||
| − | + | ||
| − | + | ||
| − | + | ||
| − | + | ||
| − | + | ||
| − | + | ||
| − | + | ||
| − | + | ||
| − | + | ||
| − | + | ||
| − | + | ||
| − | + | ||
| − | + | ||
| − | + | ||
#include <SoftwareSerial.h> | #include <SoftwareSerial.h> | ||
| Line 138: | Line 59: | ||
} | } | ||
} | } | ||
| − | </pre> | + | /****************************************/</pre> |
| + | |||
| + | |||
| + | |||
| + | '''Step 2:''' Connect the circuit:<br> | ||
| + | [[File:Bt02.png]]<br><br> | ||
| + | [[File:Bt03.png]]<br><br> | ||
| + | |||
| + | |||
| + | ===Using Android=== | ||
| + | If you are using an Android phone, please follow the steps below: <br> | ||
| + | '''Step 3:''' You need to download a Bluetooth 4.0 debugging assistant onto the mobile phone to connect it with the Bluetooth 4.0 module. We've provided the tool in Android. Just download '''BleSerialPort.zip''' on your smart phone and decompress. Then you can see a file '''BleSerialPort'''. Enable Bluetooth on your phone and install it. <br> | ||
| + | |||
| + | [[File:Bt04.png]]<br><br> | ||
| + | |||
| + | Open the installed app, as shown in '''Fig 1'''. On first use, there will be a prompt reminding you to enable the Bluetooth. Since this is a necessary step and no more prompt will appear in later use, you're recommended to enable it now in case of missing it.<br> | ||
| + | Tap the vertical ellipsis button at the top right corner. Then tap '''connect (Fig 2)'''. Find '''HMSoft''' and hit. <br> | ||
| + | |||
| + | [[File:Bt05.png]]<br><br> | ||
| + | |||
| + | After connecting a mobile phone or other Bluetooth devices and the Bluetooth module successfully ('''Fig 4'''), the LED indicator on the module will be steadily on. Otherwise, the LED indicator will keep blinking.<br> | ||
| + | Tap '''serial monitor''' in Arduino IDE, and type in '''Hello!''', then you will receive it in the mobile phone. Similarly, SunFounder send by the phone will appear in the serial monitor. <br> | ||
| + | |||
| + | [[File:Bt06.png]]<br><br> | ||
| + | |||
| + | ===Use iOS=== | ||
| + | If you are using an iPhone or MacBook, please follow the steps below (iPhone as an example): <br> | ||
| + | '''Step 3:''' Go to the App store, search for the application - '''LightBlue''' and install.<br> | ||
| + | '''Step 4:''' Click/Hit '''Settings''' -> '''Bluetooth''', enable the Bluetooth and then open the LightBlue. <br> | ||
| + | |||
| + | [[File:Bt07.png]]<br><br> | ||
| + | |||
| + | '''Step 5:''' If the Bluetooth is connected successfully, you will see '''HMSoft''' as shown in '''Fig 5'''. Click HMSoft to connect, then it redirects to the interface in '''Fig 6'''. Now, let’s send data. Click www.jnhuamao.cn then it redirects to the interface in ('''Fig 7'''). Maybe yours is not www.jnhuamao.cn but 0xFFE1 instead, and they're the same thing in fact. Click '''Hex''' in the top right corner to set the character type. <br> | ||
| + | |||
| + | [[File:Bt08.png]]<br><br> | ||
| + | |||
| + | '''Step 6:''' Among the types ('''Fig 8'''), choose '''UTF-8 String'''. Hit '''Listen for notifications''' to read the value, then '''Write new Value''' to send data to Arduino as shown in '''Fig 9'''. <br> | ||
| + | |||
| + | [[File:Bt09.png]]<br><br> | ||
| + | |||
| + | '''Step 7:''' Click the Serial Monitor icon in Arduino IDE, and type in "'''Hello!'''". Then you will receive it in the mobile phone. Similarly, the characters "'''SunFounder'''" sent by the phone will appear in the window.<br> | ||
| + | |||
| + | [[File:Bt10.png]]<br><br> | ||
| − | === | + | ===Mega2560 Code=== |
| − | Here the wiring changed:<br> | + | Here the wiring is changed:<br> |
| − | + | [[File:Bt11.png]]<br><br> | |
| − | + | ||
| − | + | ||
| − | + | ||
| − | + | ||
| − | + | ||
| − | + | ||
| − | + | ||
| − | + | ||
| − | + | ||
| − | + | ||
| − | + | ||
| − | + | ||
| − | + | ||
| − | + | ||
| − | + | ||
| − | <pre> | + | <pre>//Bluetooth Module MEGA2560 |
| − | //Bluetooth Module | + | RXD TXD1(pin18) |
| − | RXD | + | TXD RXD1(pin19) |
| − | TXD | + | VCC 5V |
| − | VCC | + | GND GND |
| − | GND | + | |
void setup() { | void setup() { | ||
| Line 188: | Line 135: | ||
} | } | ||
</pre> | </pre> | ||
| + | ==Using AT Commands== | ||
| + | '''Step 1:''' Wiring<br> | ||
| + | Connect TXD of the Bluetooth 4.0 Module to RXD of the FTDI Module, RXD to TXD, GND to GND, and VCC to VCC. The FTDI Module is a USB-to-serial bridge controller.<br> | ||
| − | + | [[File:Bt12.png]]<br><br> | |
| − | + | [[File:Bt13.png]]<br><br> | |
| − | + | ||
| − | < | + | |
| − | + | ||
| − | + | ||
| − | + | ||
| − | + | ||
| − | + | ||
| − | + | ||
| − | + | ||
| − | + | ||
| − | + | ||
| − | + | ||
| − | + | ||
| − | + | ||
| − | + | ||
| − | + | ||
| − | + | ||
| − | + | ||
| − | + | '''Step 2:''' Set parameters<br> | |
| − | < | + | After wiring, open the serial port debug tool '''sscom32'''. Set parameters at first.<br> |
| + | 1) Open the serial port, click '''Open Com'''. Select the correct port, as shown below.<br> | ||
| − | + | [[File:COM0321.png]]<br><br> | |
| − | + | ||
| − | + | ||
| − | + | 2) Select the correct baud rate. Here select 9600 bps (default), as shown below.<br> | |
| + | '''Note:''' You need to tick '''SendNew''' to lock it as shown below, otherwise the command cannot be sent successfully. <br> | ||
| − | + | [[File:Bt15.png]]<br><br> | |
| − | + | ||
| − | + | '''Step 3:''' Now, you can start to send commands. Type in “'''AT'''” in the text box. If the Bluetooth 4.0 Module goes well, '''OK''' will be sent, as shown below:<br> | |
| − | + | [[File:AT.png]]<br><br> | |
| − | [[ File:AT.png]] <br> | + | |
| − | + | ||
| − | + | Also you can send '''AT+NAME?''', then '''OK+NAME: HMSoft''' will be returned. | |
| − | Send '''AT+BAUD?''', '''OK+Get:0''' will be returned. Default: 0(9600) | + | [[File:Name.png]]<br><br> |
| + | |||
| + | Send '''AT+BAUD?''', then '''OK+Get: 0''' will be returned. Default: 0 (9600) | ||
| − | [[File:Baud.png]]<br> | + | [[File:Baud.png]]<br><br> |
| − | For more information about Bluetooth 4.0 AT | + | For more information about the Bluetooth 4.0 AT commands, please refer to '''Bluetooth 4.0 BLE module datasheet.pdf''' |
=='''Resources'''== | =='''Resources'''== | ||
Revision as of 02:58, 22 March 2017
Contents
[hide]Introduction
Bluetooth 4.0 HM-10 Master Slave Module use TI CC2541, Master and slave
roles in one, transmission version and remote control version and PIO state acquisition functions in one, Support the AT command modify module parameters, Convenient and flexible.
Transmission version can be used to transmit data between two Bluetooth devices.
Remote Control version can be used to Control PIO ports output high or low level without any other MCU.
PIO state acquisition version can be used to acquisition PIO ports state without any other MUC. (Only support Bluetooth V2.1)

Parameter
Bluetooth Protocol: Bluetooth Specification V4.0 BLE
USB Protocol: USB V2.0
Operating Frequency: 2.4GHz ISM band
Modulation Mode: GFSK (Gaussian Frequency Shift Keying)
Transmitting Power: ≤4dBm
Sensitivity: ≤-84dBm at 0.1% BER
Transmission Rate: Asynchronous: 6 kbps
Synchronous: 6 kbps
Security Feature: Authentication and encryption
Support Service: Central & Peripheral UUID FFE0, FFE1
Power Supply: +5VDC 50mA
Operating Temperature: -5 ~ +65 Centigrade
Physical Dimension: 27mm x 13mm x 2.2 mm.
Pin Description:
STATE: state test pins, connected to internal LED, generally keep it unconnected.
BRK: break connect, it means breaking Bluetooth connection, generally keep it unconnected.
VCC: positive pole of the power source.
GND: Ground.
TXD: serial interface, transmitting terminal.
RXD: serial interface, receiving terminal.
Using SunFounder Uno
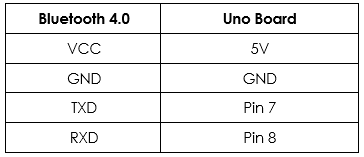
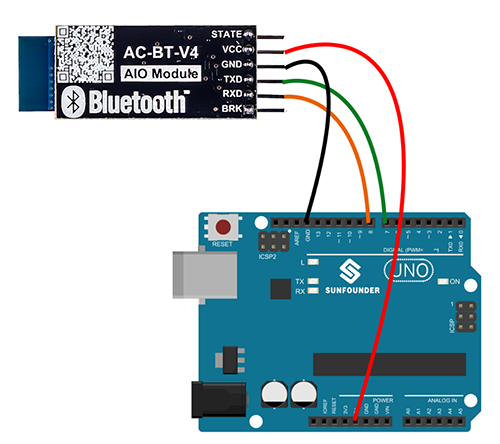
Step 1: Compile and upload the code before building the circuit </pre>/****************************************/
- include <SoftwareSerial.h>
SoftwareSerial mySerial(7, 8); // RX, TX // Connect HM10 Arduino Uno // TXD Pin 7 // RXD Pin 8
void setup() {
 Serial.begin(9600);
 // If the baudrate of the HM-10 module has been updated,
 // you may need to change 9600 by another value
 // Once you have found the correct baudrate,
 // you can update it using AT+BAUDx command
 // e.g. AT+BAUD0 for 9600 bauds
 mySerial.begin(9600);
}
void loop() {
 char c;
 if (Serial.available()) {
   c = Serial.read();
   mySerial.print(c);
 }
 if (mySerial.available()) {
   c = mySerial.read();
   Serial.print(c);
 }
} /****************************************/</pre>
Using Android
If you are using an Android phone, please follow the steps below:
Step 3: You need to download a Bluetooth 4.0 debugging assistant onto the mobile phone to connect it with the Bluetooth 4.0 module. We've provided the tool in Android. Just download BleSerialPort.zip on your smart phone and decompress. Then you can see a file BleSerialPort. Enable Bluetooth on your phone and install it.
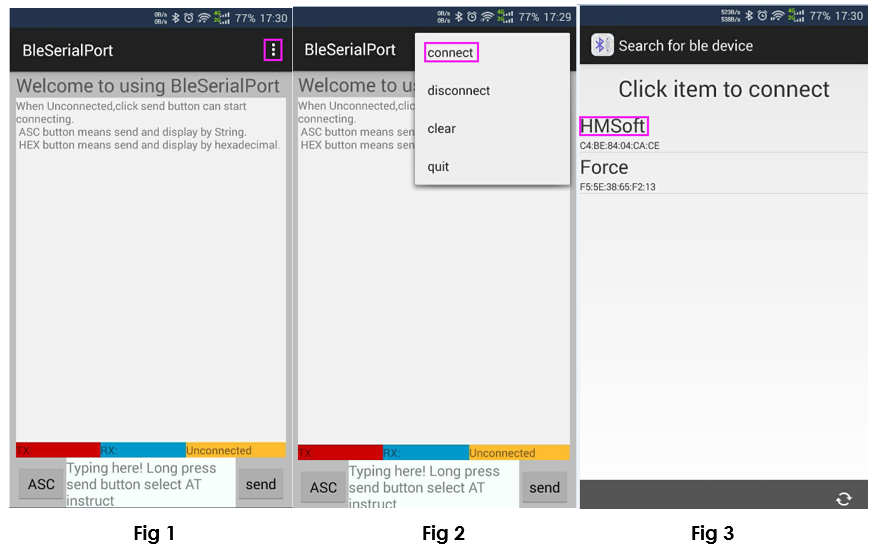
Open the installed app, as shown in Fig 1. On first use, there will be a prompt reminding you to enable the Bluetooth. Since this is a necessary step and no more prompt will appear in later use, you're recommended to enable it now in case of missing it.
Tap the vertical ellipsis button at the top right corner. Then tap connect (Fig 2). Find HMSoft and hit.
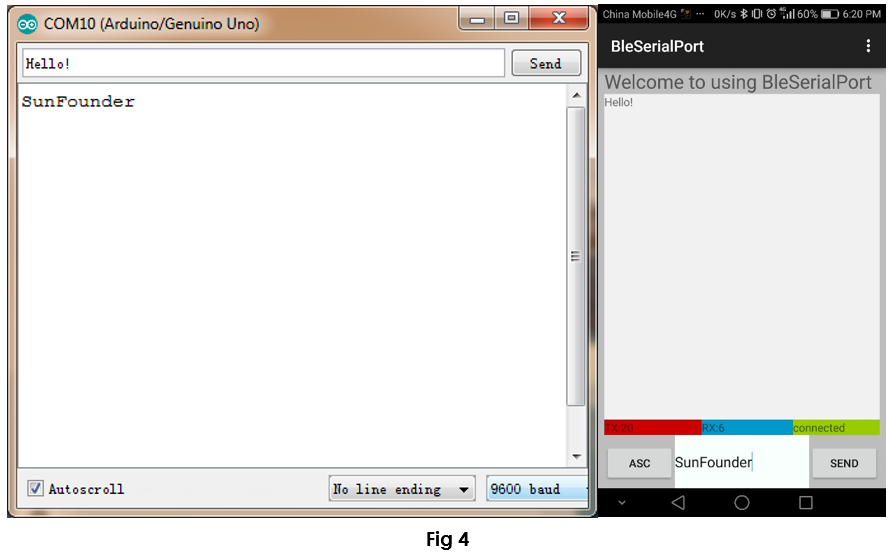
After connecting a mobile phone or other Bluetooth devices and the Bluetooth module successfully (Fig 4), the LED indicator on the module will be steadily on. Otherwise, the LED indicator will keep blinking.
Tap serial monitor in Arduino IDE, and type in Hello!, then you will receive it in the mobile phone. Similarly, SunFounder send by the phone will appear in the serial monitor.
Use iOS
If you are using an iPhone or MacBook, please follow the steps below (iPhone as an example):
Step 3: Go to the App store, search for the application - LightBlue and install.
Step 4: Click/Hit Settings -> Bluetooth, enable the Bluetooth and then open the LightBlue.
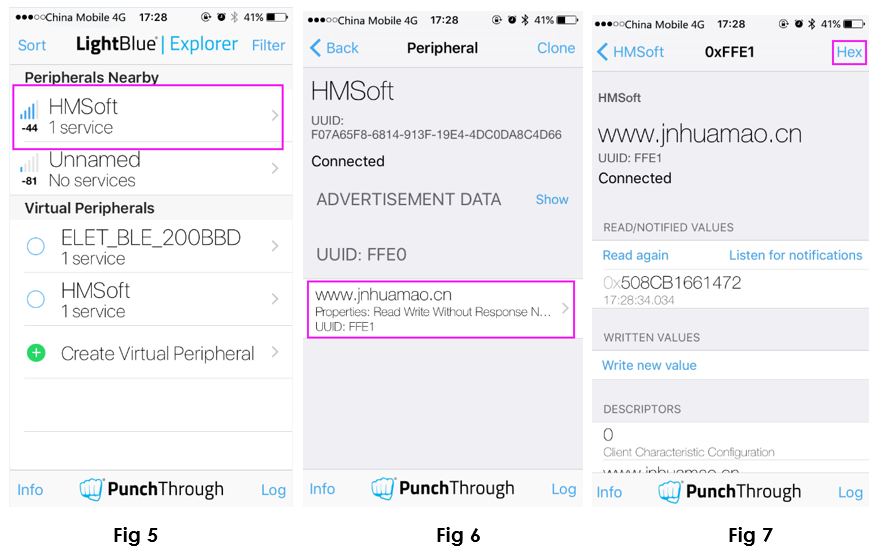
Step 5: If the Bluetooth is connected successfully, you will see HMSoft as shown in Fig 5. Click HMSoft to connect, then it redirects to the interface in Fig 6. Now, let’s send data. Click www.jnhuamao.cn then it redirects to the interface in (Fig 7). Maybe yours is not www.jnhuamao.cn but 0xFFE1 instead, and they're the same thing in fact. Click Hex in the top right corner to set the character type.
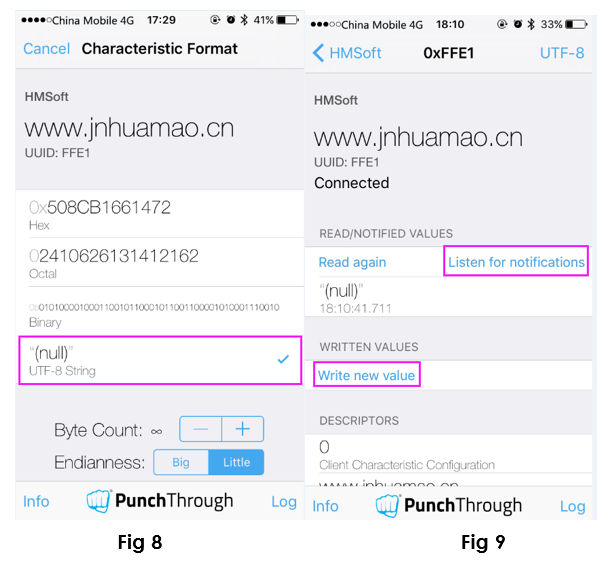
Step 6: Among the types (Fig 8), choose UTF-8 String. Hit Listen for notifications to read the value, then Write new Value to send data to Arduino as shown in Fig 9.
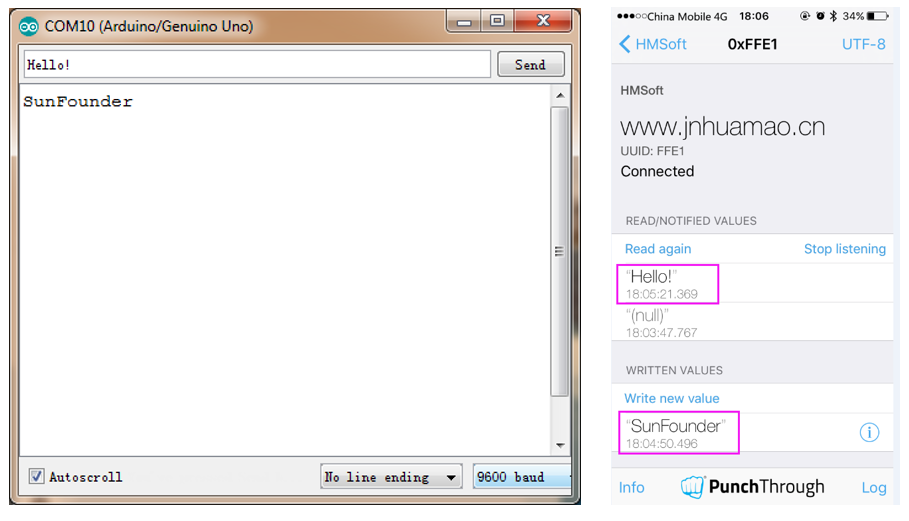
Step 7: Click the Serial Monitor icon in Arduino IDE, and type in "Hello!". Then you will receive it in the mobile phone. Similarly, the characters "SunFounder" sent by the phone will appear in the window.
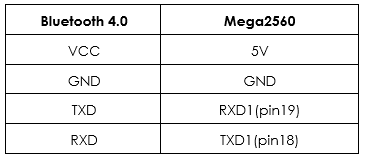
Mega2560 Code
Here the wiring is changed:
//Bluetooth Module    MEGA2560
  RXD                 TXD1(pin18)
  TXD                  RXD1(pin19)
  VCC                 5V
  GND                 GND

void setup() {
  //define 2 serial port
  Serial.begin(9600);
  Serial1.begin(9600);

}

void loop() {
  char c;
  //the IDE send,phone receive
  if (Serial.available()) {
    c = Serial.read();
     Serial1.print(c);
  }
  //the phone send ,IDE receive
  if (Serial1.available()) {
    c = Serial1.read();
    Serial.print(c);
  }
}
Using AT Commands
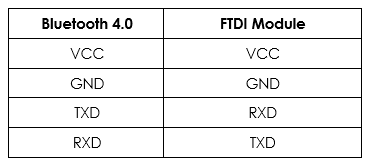
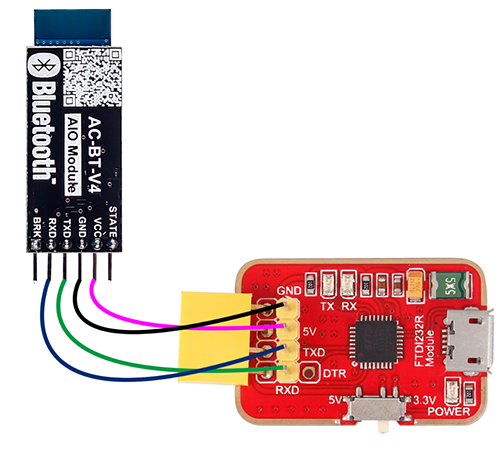
Step 1: Wiring
Connect TXD of the Bluetooth 4.0 Module to RXD of the FTDI Module, RXD to TXD, GND to GND, and VCC to VCC. The FTDI Module is a USB-to-serial bridge controller.
Step 2: Set parameters
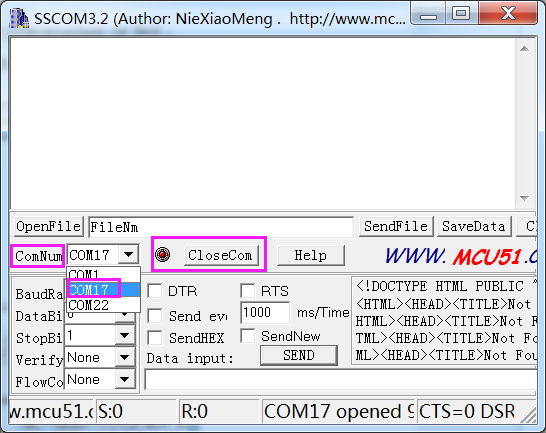
After wiring, open the serial port debug tool sscom32. Set parameters at first.
1) Open the serial port, click Open Com. Select the correct port, as shown below.
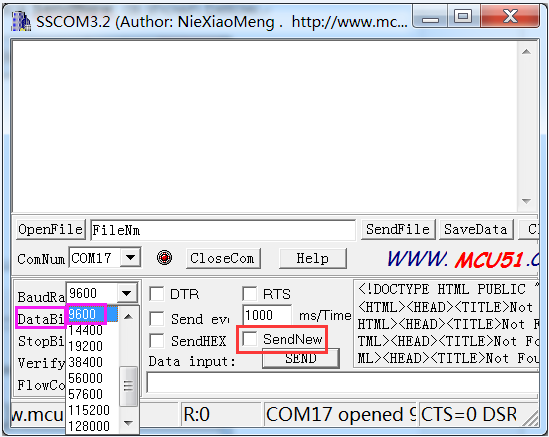
2) Select the correct baud rate. Here select 9600 bps (default), as shown below.
Note: You need to tick SendNew to lock it as shown below, otherwise the command cannot be sent successfully.
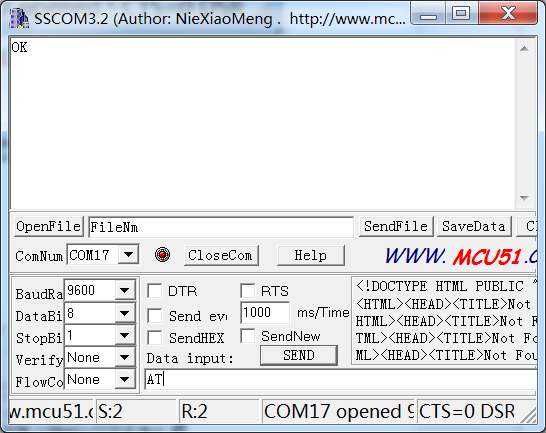
Step 3: Now, you can start to send commands. Type in “AT” in the text box. If the Bluetooth 4.0 Module goes well, OK will be sent, as shown below:
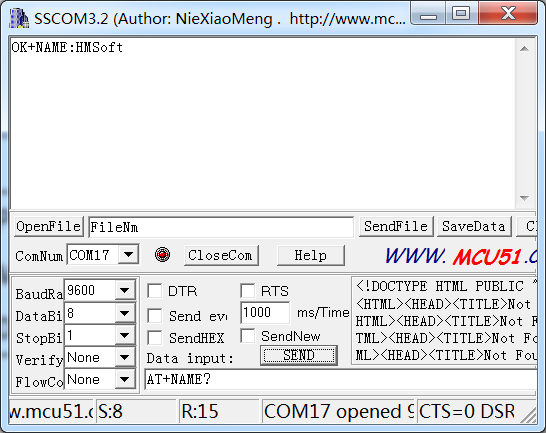
Also you can send AT+NAME?, then OK+NAME: HMSoft will be returned.
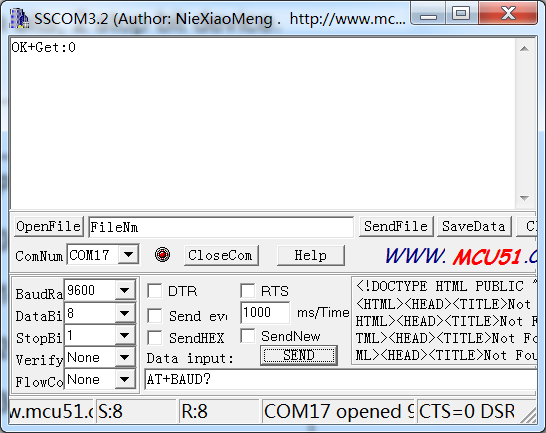
Send AT+BAUD?, then OK+Get: 0 will be returned. Default: 0 (9600)
For more information about the Bluetooth 4.0 AT commands, please refer to Bluetooth 4.0 BLE module datasheet.pdf
