Difference between revisions of "LCD1602/I2C LCD1602 FAQ"
(Created page with " =='''About LCD1602'''== '''Q: Display of checks instead of characters on LCD1602, though it is lighted on''' <font color="blue">'''A:'''</font> It happens to most LCD1602 u...") |
(No difference)
|
Latest revision as of 08:11, 25 July 2016
About LCD1602
Q: Display of checks instead of characters on LCD1602, though it is lighted on
A: It happens to most LCD1602 users so no worry! You can check the LCD based on the following checklists:
1.First make sure the code is uploaded successfully. If you see "Done uploading" displayed on the IDE window and there's no error message at the bottom, it means the code has been uploaded normally. Otherwise, upload the code again.
2.If the code has been uploaded successfully and the white checks appear on the display, it can be contrast is not good so the characters cannot be displayed normally. You need to adjust the potentiometer on the LCD, clockwise and counterclockwise, till the characters are displayed clearly.
3.If it still does not work, press down the RESET button to reset the control board.
4.If the above steps can't help, the wiring may be wrong. Check the connection – basically wrong pins or loose contact, by the elimination method. That is, if the screen lights on, it means pin A and pin K are connected correctly. VDD should be connected to 5V, VSS to GND, OV to the middle pin of the potentiometer, and RW to GND. For the rest pins, connect them based on your code definition.
5.If you've tried every method above and still can't figure it out, the possible reason is that the pins of the LCD1602 are not soldered well. You may need to check and add more soldering. Check the pins especially D4-D7, RS, and E and see whether there is any false soldering.
Q: Mess code – characters displayed, but unreadable
A: 1.Usually, it's the false soldering of pins.
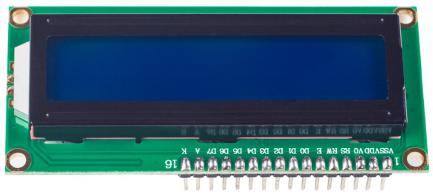
When you get the LCD1602 with our kit, the pins are not soldered. To accomplish it for later usage, you may encounter some problems. Therefore, we made a video tutorial about how to soldering pins on an LCD on YouTube and you can check it out: https://youtu.be/uzxw1yl1s_M. It should be like as shown in the following figure after soldering – each pin is wrapped with solder. You can use a little more during the soldering; it's OK as long as pins next to each other are not mixed soldering together, even if you think it not nice looking. Pay attention that you should not leave any pin falsely soldered.
2.Then try to press down the RESET button. It can be that the characters displayed last time are not cleared out. So the target is overlapped with the previous contents.
3.Check the supply power gives steady voltage or not.
Q: Run program of the Lesson 8 LCD1602 in Super Kit, "SunFounder" flows from right to left in the top row but followed by strange characters
A: If you type in the code word by word, it can be errors which cause the mess code.
In the following array "SunFounder ", the number of characters (SunFounder + spaces) is 26; it's the same number in the other array arrary2[]. In the code, we make the LCD1602 display 26 characters. So if you define an array of less than 26 ones, strange characters will supplement the shortage, which is mess code then.
char array1[]=" SunFounder               ";  //the string to print on the LCD
char array2[]="hello, world!             ";  //the string to print on the LCD
About I2C LCD1602
Q: The code for I2C LCD1602 cannot be uploaded successfully; errors occur
A: If you see the following error messages when uploading the code for the I2C CDL1602, you may have not added the LiquidCrystal_I2C library.
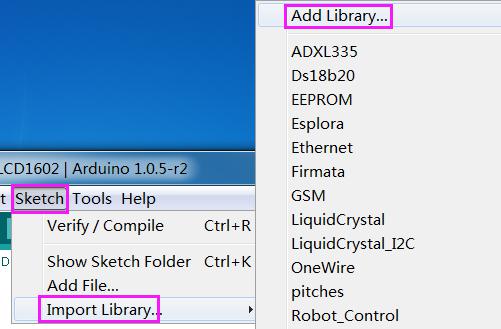
Click Sketch->Import Library->Add Library, find the download package of the your kit and unzip, in the folder go to the library, click LiquidCrystal_I2C
Then click Open and you'll be promted "Library added to your libraries". Check the Import library menu. Now upload the code again.
Q: Only the first letter is displayed.
A: When you run the code related to I2C LCD1602 in the latest version of Arduino Software (IDE), it may happen that only the first letter is displayed on the LCD. It's because of the compatibility issue. Take the following steps to solve the issue.
1.Modify the LiquidCrystal_I2C library
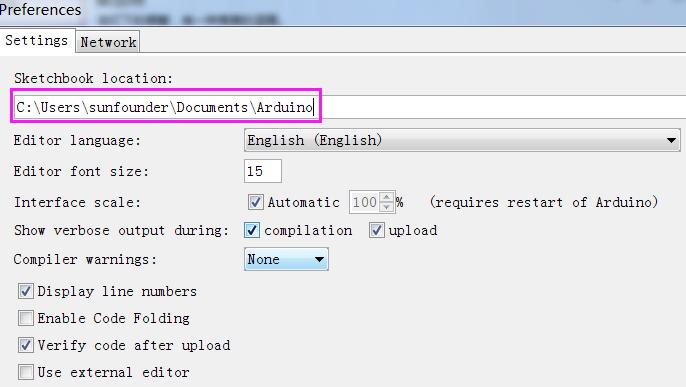
Open the IDE, click to File ->Preferences and a window will be shown as blow. The path in the pink box below is that for the libraries.
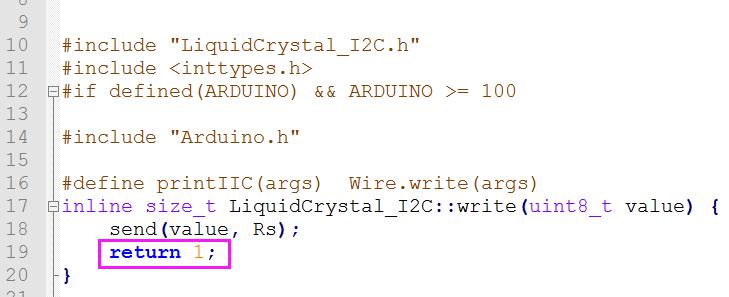
Go to this folder. Then libraries -> LiquidCrystal_I2C and open the LiquidCrystal_I2C.cpp file. Go to Line19 and change return 0 into return 1, save the file and close. Then compile the code again.
2.Also you can use an older version of the Arduino IDE like the Arduino 1.0.5 or 1.0.6.
Q: How is I2C LCD1602 connected to the Mega2560
A: In the user manual of our kits, we use the SunFounder Uno board. Therefore the connection between the LCD and the Uno should be: GND to GND, VCC to 5V, SDA to A4, and SCL to A5. Though the Uno shares many pins with the Mega2560, two pins, that is, SDA and SCL are different on the two.
On the UNO, A4 is SDA and A5 is SCL, when on the Mega2560, pin20 is the SDA and pin 21 is the SCL. Therefore, the SDA and SCL on the I2C CDL1602 should be connnected to the pin 20 and pin 21, instead of A4 and A5.
Q: Display of white checks instead of characters when it is lighted on
A: Usually as long as the code is uploaded successfully and the wiring is correct, the LCD can display normally. But abnormity happens.
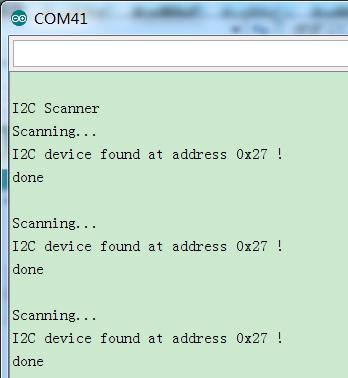
If you see only white checks displayed in the upper row, it can be caused by I2C address not being 0x27. So now you need read the I2C address of your I2C LCD1602. Copy the following code into the IDE and upload it to your board. Then open the Serial Monitor and the address will be printed.
When you just power the circuit, did the LCD light on? And white checks were displayed instead of what you intended it to? It can be that the I2C address is not 0x27. You need to find the real one out by a code. Copy the following code in a new IDE window and upload it to your board. When it's successfully done, open Serial Monitor and the I2C address will be displayed then. Then replace the address in this line in your code: "LiquidCrystal_I2C lcd(0x27,16,2);" with the one you just get. The code:
Then change the address "0x27" in LiquidCrystal_I2C lcd(0x27,16,2); in your code into that printed on the Serial Monitor.
/*****************************************************
* name:I2C_ Scanner
* function:read the address of the I2C lcd1602
* Connection:
* I2C                 UNO
* GND                 GND
* VCC                  5V
* SDA                  A4(pin20 in mega2560)
* SCL                  A5(pin21 in mega2560)
********************************************************/
#include <Wire.h>
void setup()
{
 Wire.begin();
 Serial.begin(9600);
 Serial.println("\nI2C Scanner");
}
void loop()
{
 byte error, address;
 int nDevices;
 Serial.println("Scanning...");
 nDevices = 0;
 for(address = 1; address < 127; address++ )
 {
   // The i2c_scanner uses the return value of
   // the Write.endTransmisstion to see if
   // a device did acknowledge to the address.
   Wire.beginTransmission(address);
   error = Wire.endTransmission();
   if (error == 0)
   {
     Serial.print("I2C device found at address 0x");
     if (address<16)
       Serial.print("0");
     Serial.print(address,HEX);
     Serial.println(" !");
     nDevices++;
   }
   else if (error==4)
   {
     Serial.print("Unknow error at address 0x");
     if (address<16)
       Serial.print("0");
     Serial.println(address,HEX);
   }
 }
 if (nDevices == 0)
   Serial.println("No I2C devices found\n");
 else
   Serial.println("done\n");
 delay(5000); // wait 5 seconds for next scan
}

