Difference between revisions of "NRF24L01 Test with Arduino"
(→Step 2. Wiring) |
|||
| Line 68: | Line 68: | ||
To make NRF24L01 work more steady, add a 10uF capacitor between 3.3V of Uno (Mega2560) and GND.<br> | To make NRF24L01 work more steady, add a 10uF capacitor between 3.3V of Uno (Mega2560) and GND.<br> | ||
<center> | <center> | ||
| − | {|border="1" class="wikitable" | + | {|border="1" class="wikitable" style="text-align: center;" |
!scope="col" |nRF24L01 Module | !scope="col" |nRF24L01 Module | ||
!scope="col" |SunFounder Uno (SunFounder Mega2560 ) | !scope="col" |SunFounder Uno (SunFounder Mega2560 ) | ||
| Line 99: | Line 99: | ||
[[File:MEGA2560.png]]<br> | [[File:MEGA2560.png]]<br> | ||
[[File:UNO bb.png ]] | [[File:UNO bb.png ]] | ||
| + | |||
===Step 3. Compile=== | ===Step 3. Compile=== | ||
Connect the SunFounder Uno R3 and the SunFounder Mega2560 to your computer, open two files under NRF24L01. For the SunFounder Mega2560, run the master.ino file; for the SunFounder Uno R3, run the node.ino file.<br> | Connect the SunFounder Uno R3 and the SunFounder Mega2560 to your computer, open two files under NRF24L01. For the SunFounder Mega2560, run the master.ino file; for the SunFounder Uno R3, run the node.ino file.<br> | ||
Revision as of 02:31, 3 February 2016
Contents
Introduction
NRF24L01 is a single chip transceiver working under general ISM frequency band 2.4-2.5GHz. The wireless transceiver includes frequency generator, enhanced SchockBurstTM mode controller, power amplifier, crystal amplifier, modulator and demodulator. The output power channel selection and protocol can be set by SPI interface. It has very low current consumption. Under the transmitting mode, its transmitting power is 6dBm and the current consumption is 9.0mA. Under the receiving mode, the current is 12.3mA. The consumption is even lower under the power down mode and standby mode.
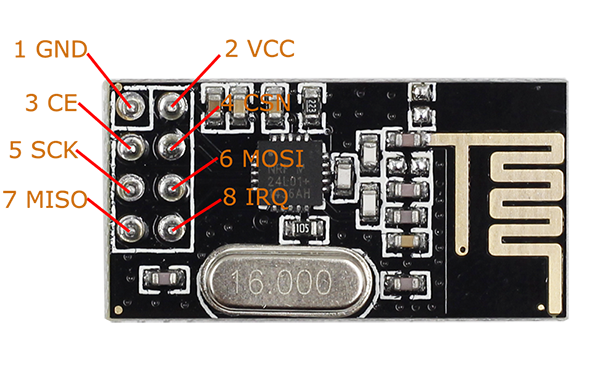
The pin functions of NRF24L01 are as shown:
| Pin | Name | Description |
|---|---|---|
| 1 | GND | Ground (0V) |
| 2 | VCC | Power Supply (3.3V) |
| 3 | CE | Mode Enable Activates RX or TX mode |
| 4 | CSN | Chip Select |
| 5 | SCK | Serial Clock |
| 6 | MOSI | Master Output, Slave Input |
| 7 | MISO | Master Input, Slave Output |
| 8 | IRQ | Interrupt Request. Under wireless communication, MCU communicates with NRF24L01 by IRQ. |
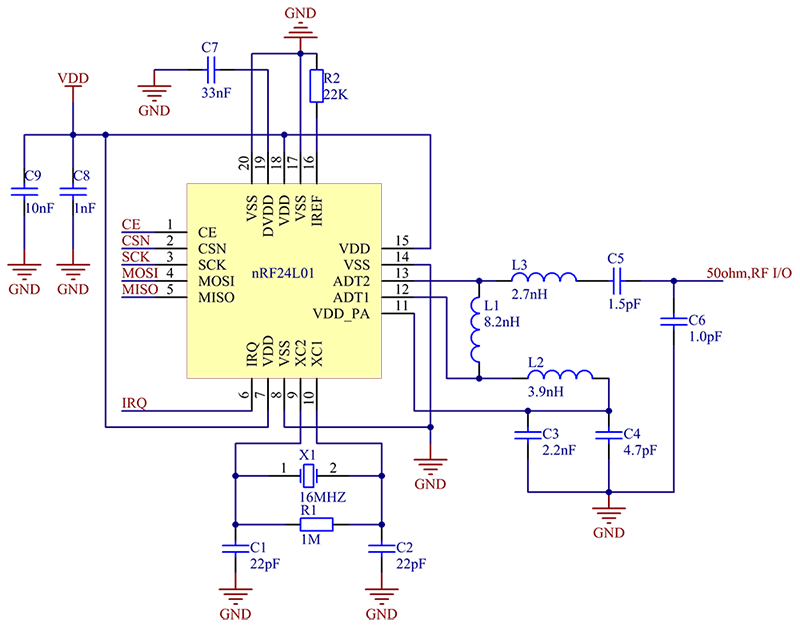
The schematic diagram of the module is shown as below:
Features
1) Supporting 6-channel receiving
2) Low operation voltage: 1.9~3.6V
3) High speed: 2Mbps. Since the time spent on the transmisson in the air is short, it greatly reduces collision in wireless transmission.
4) Multi-frequency point: With 125 frequency points, it can meet multipoint communication and frequency hopping communication requirements.
5) Ultra-Small: With a built-in 2.4 GHz antenna, it's small size – 15x29mm (including the antenna).
6) Low power consumption: When working under answer mode, it greatly reduces current consumption with fast transmission in air and startup time.
7) Low application cost: NRF24L01 integrates all high speed signal processing related with RF protocol. For example, it automatically resends packets lost and generates answer signal. The SPI interface of NRF24L01 can be connected by the hardware SPI port of MCU or simulated with the I/O ports of SCM. With the built-in FIFO, it can connect with all kinds of high and low speed microprocessor, thus it is easy to use low cost SCM.
8) Easy to develop: It is easy to develop because the link layer is fully integrated on the module.
Test Experiment
In this experiment, we need to use two nRF24L01 modules and two control boards (SunFounder UNO and SunFounder Mega2560). Connect one NRF24L01 to Uno R3 and the other to Mega2560. The nRF24L01 module on the UNO constantly sends data, and that on the Mega2560 receives data. Open the IDE and then Serial Monitor for the two boards respectively, and then compare the data sent and received to test whether it succeeds.
Step 1. Preparation
1) 2 * nRF24L01 module
2) 2 * Control board (here we use 1 x UNO and 1 x Mega2560)
3) 1 * PC
4) Serval jump wires
5) 2 * Capacitor
6) 2 * USB Cable
7) 2 * Breadboard
Step 2. Wiring
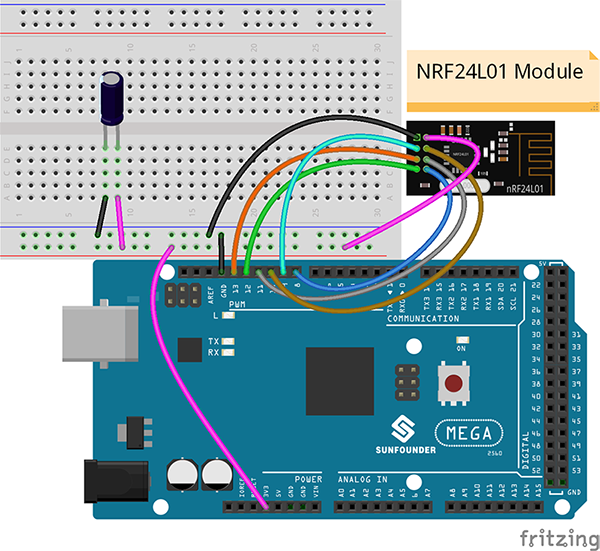
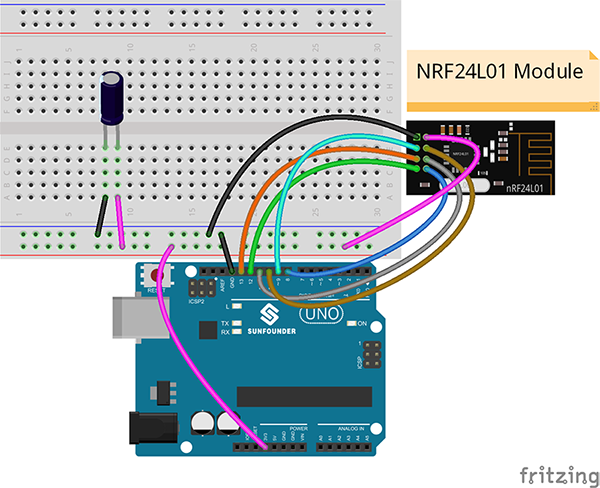
Wire the NRF24L01 to the SunFounder Uno baord (the same to Mega2560) as follows.
To make NRF24L01 work more steady, add a 10uF capacitor between 3.3V of Uno (Mega2560) and GND.
| nRF24L01 Module | SunFounder Uno (SunFounder Mega2560 ) |
|---|---|
| GND | GND |
| VCC | 3.3V |
| CE | D9 |
| CSN | D10 |
| SCK | D13 |
| MOSI | D11 |
| MISO | D12 |
| IRQ |
Step 3. Compile
Connect the SunFounder Uno R3 and the SunFounder Mega2560 to your computer, open two files under NRF24L01. For the SunFounder Mega2560, run the master.ino file; for the SunFounder Uno R3, run the node.ino file.
Driver functions used here for the NRF24L01 module:
NRF_Init(): Initialization function of the NRF24L01 module
NRF_SetRxMode(): Set the NRF24L01 module as reveiving mode, that is, RX mode.
NRF_SetTxMode(): Set the NRF24L01 module as sending mode, that is, TX mode.
NRF_Receive(unsigned char *buf_rx): If data is received, save it to buf_rx array, it'll return 1; or else, it will return 0.
NRF_Send(unsigned char *buf_tx): Send the data in the array buf_tx out by the NRF24L01 module.
NRF_CheckAck(): NRF24L01 checks whether it has received response from the receiving terminal after sending data; if so, it'll return 1; if not, it'll return 0.
Step 4. Test
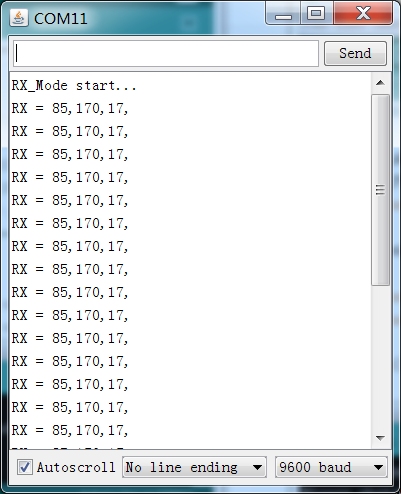
Open Serial Monitor on the IDE window for Mega2560, and you can see the received data printed every 500ms, that is, Rx = 85, 170, 17. It indicates both NRF24L01 modules work.
