Difference between revisions of "I2C OLED For Raspberry Pi"
(→Description) |
|||
| Line 20: | Line 20: | ||
* 1 x 0.9'' OLED Display | * 1 x 0.9'' OLED Display | ||
| + | |||
| + | == Hardware operation == | ||
| + | Connect the module to the Raspberry Pi, plug it to the left<br> | ||
| + | [[File:as015 1.jpg]]<br> | ||
| + | Plug and play without any driver. The screen can display cpu using rate, cpu temperature, internal storage, disk using rate, RPi ip etc.<br> | ||
| + | |||
| + | == Software Operation == | ||
| + | Firstly, you need to switch on the i2c function RPi. | ||
| + | <ol> | ||
| + | <li>sudo apt-get install -y python-smbus</li> | ||
| + | <li>sudo apt-get install -y i2c-tools</li> | ||
| + | <li>sudo raspi-config</li> | ||
| + | </ol> | ||
| + | [[File:as015 2.png]]<br> | ||
| + | [[File:as015 2.png]]<br> | ||
| + | [[File:as015 2.png]]<br> | ||
| + | [[File:as015 2.png]]<br> | ||
| + | [[File:as015 2.png]]<br> | ||
| + | Restart the RPi. | ||
| + | <ol> | ||
| + | <li>sudo reboot</li> | ||
| + | </ol> | ||
| + | Install Adafruit-SSD1306 library.<br> | ||
| + | Finish your installation as indicated in the command. | ||
| + | <ol> | ||
| + | <li>sudo python -m pip install --upgrade pip setuptools wheel</li> | ||
| + | </ol> | ||
| + | Note: In this step, if there is an error prompt "TypeError: unsupported operand type(s) for -=: ‘Retry’ and ‘int’", you can try to reinstall pip to solve this problem. | ||
| + | <ol> | ||
| + | <li>sudo apt-get remove python-pip python3-pip</li> | ||
| + | <li>sudo apt-get install python-pip python3-pip</li> | ||
| + | </ol> | ||
| + | Install the PIL library and some image processing programs use this. | ||
| + | <ol> | ||
| + | <li>sudo apt-get install python-pil python3-pil</li> | ||
| + | </ol> | ||
| + | Use pip to install adafruit-ssd1306 library. | ||
| + | <ol> | ||
| + | <li>sudo pip install Adafruit-SSD1306</li> | ||
| + | </ol> | ||
| + | Save for downloading a code library containing examples. | ||
| + | <ol> | ||
| + | <li>cd ~</li> | ||
| + | <li>git clone https://github.com/adafruit/Adafruit_Python_SSD1306.git</li> | ||
| + | </ol> | ||
| + | In the sample directory, you can see that there is some ready code, after the screen is connected, you can run directly to see the effect. | ||
| + | <ol> | ||
| + | <li>cd ~/Adafruit_Python_SSD1306/examples/</li> | ||
| + | </ol> | ||
| + | |||
| + | == Final Effect == | ||
| + | [[File:as015_7.png]] | ||
Latest revision as of 08:24, 9 April 2020
Contents
[hide]Description

Just 1/4th the size of an RPi, the SunFounder 0.9" OLED is an extension to make your projects easier. White-on-blue OLED display is made of 128x32 individual white OLED pixels, each of which is turned on or off by the controller chip - SSD1306 IC. A great way to display debug information and to visualize data without the need of a serial terminal.
The driver chip SSD1306 communicates via I2C, so only 6 pins are required to communicate with Raspberry Pi and you can insert the chip into in all versions of RPis. To make things super interesting, because the display makes its own light, you will not require any backlight. This reduces the power required to run the OLED and is why the display has such a high contrast.
Please note that OLED displays are made of hundreds of...OLEDs! That means each pixel is a little organic LED, and if it's kept on for over 1000 hours it'll start to dim. If you want to keep the display uniformly bright, please turn off the display (set the pixels off) when it isn't needed to keep them from dimming.
Feature
- Size: 0.9 inch
- Resolution: 128 x32
- Type: OLED
- Color: Single white
- Communication Interface: I2C
Package Including
- 1 x 0.9 OLED Display
Hardware operation
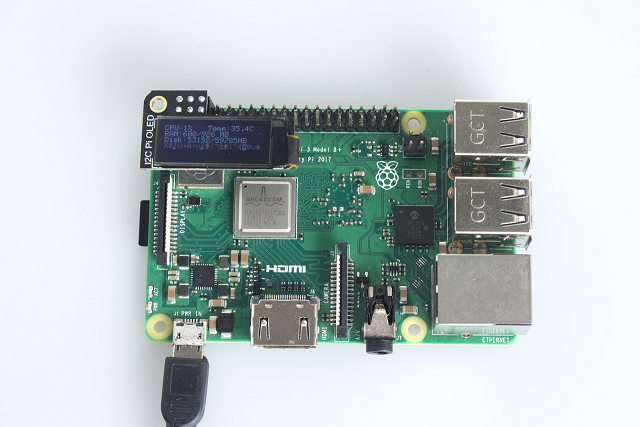
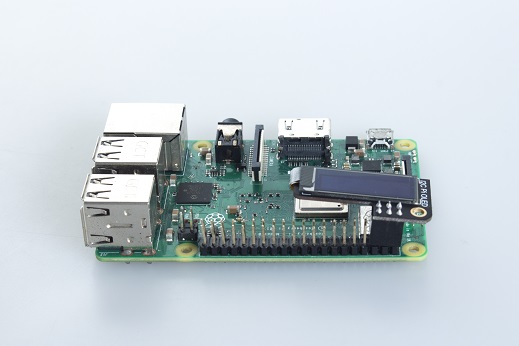
Connect the module to the Raspberry Pi, plug it to the left

Plug and play without any driver. The screen can display cpu using rate, cpu temperature, internal storage, disk using rate, RPi ip etc.
Software Operation
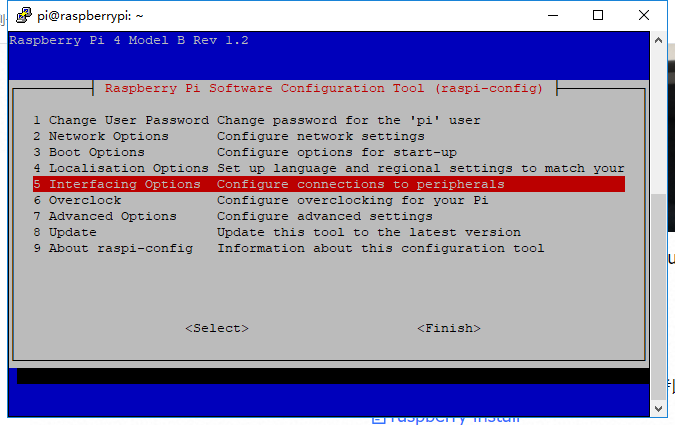
Firstly, you need to switch on the i2c function RPi.
- sudo apt-get install -y python-smbus
- sudo apt-get install -y i2c-tools
- sudo raspi-config
- sudo reboot
Install Adafruit-SSD1306 library.
Finish your installation as indicated in the command.
- sudo python -m pip install --upgrade pip setuptools wheel
Note: In this step, if there is an error prompt "TypeError: unsupported operand type(s) for -=: ‘Retry’ and ‘int’", you can try to reinstall pip to solve this problem.
- sudo apt-get remove python-pip python3-pip
- sudo apt-get install python-pip python3-pip
Install the PIL library and some image processing programs use this.
- sudo apt-get install python-pil python3-pil
Use pip to install adafruit-ssd1306 library.
- sudo pip install Adafruit-SSD1306
Save for downloading a code library containing examples.
- cd ~
- git clone https://github.com/adafruit/Adafruit_Python_SSD1306.git
In the sample directory, you can see that there is some ready code, after the screen is connected, you can run directly to see the effect.
- cd ~/Adafruit_Python_SSD1306/examples/
