Difference between revisions of "4x4 Membrane Switch Keypad"
(Created page with " == '''Introduction''' ==") |
(→Experimental Procedures for Arduino) |
||
| (6 intermediate revisions by the same user not shown) | |||
| Line 1: | Line 1: | ||
== '''Introduction''' == | == '''Introduction''' == | ||
| + | [[File:4x4 Membrane Switch Keypad_1.jpg]] | ||
| + | '''Matrix Keyboard'''<br> | ||
| + | Matrix Keyboard is a kind of keyboard whose layout is like a matrix and it’s used as a peripheral equipment of MCU. The structure of matrix keyboard is more complex than that of other common keyboards, and the condition is similar to that of the recognition. The column line is connected with the anode of the power supply through resistors and let the I/O port of MCU connected with the row line work as an output terminal. The I/O port connected with the column line will be the input. | ||
| + | <br><br> | ||
| + | Because during the circuit design, there is much more need of external input. It will consume much IO source if we control a button separately, we have the matrix keyboard. The most common types are 4*4 and 8*8. Among them, the type 4*4 is even more common than 8*8. | ||
| + | <br><br> | ||
| + | On a keyboard, if there are too many buttons, we will arrange them into the form of matrix to decrease the using of the I/O port. In the internal structure of the matrix keyboard, each horizontal line and each vertical line are not connected directly at the intersection, but at the button. | ||
| + | Therefore, a port (eg. P1) can form 4*4=16 buttons, and the number is twice as much as that of the button whose port cable is connected with keyboard. | ||
| + | <br> | ||
| + | The larger the number of the wires, the clearer the difference. For example, if there is an additional wire, we can get a keyboard with 20 buttons; using the port cable directly, we can get one additional key (key 9). So if there is much need of buttons, it is wise to use matrix analysis. | ||
| + | <br><br> | ||
| + | '''membrane keyboard''' | ||
| + | Membrane keypad is an application case of membrane switch with arrayed buttons. Membrane keypad is a kind of currently widespread operation system in the world that has the advantages of both practicality and beauty. It is composed of panel, upper circuit, isolation layer and bottom circuit. Due to these advantages: nice appearance, modern design, tiny in size, light weight, strong sealing (moisture proof, dust proof, oil pollution prevention, acid and alkali resistance), quake resistance and long service life, etc., it is commonly used in these fields, like medical instrument, computer control, digital machine tool, electronic weighing device, post and telecommunication, photocopier, refrigerator, microwave oven, electric fan, washing machine, electronic gaming machines. | ||
| + | |||
| + | == '''Main Features''' == | ||
| + | <ol> | ||
| + | <li>'''Advantages''' | ||
| + | <ul> | ||
| + | <li>Artistic appearance, original</li> | ||
| + | <li>Small in size, thin and light, helps the keyboard to optimize to the level of being light, thin, short, small, and of high intelligence.</li> | ||
| + | <li>Dampproof, dustproof, oil-resistant, preventing noxious gas, strong sealing, acid-resistant, and vibration proof.</li> | ||
| + | <li>Long service life, bend-resistant</li> | ||
| + | </ul> | ||
| + | </li> | ||
| + | |||
| + | <li>'''Electronic Properties''' | ||
| + | <ul> | ||
| + | <li>Rated Current: 35V (DC), 100mA, 1W.</li> | ||
| + | <li>Contact Resistance: 10Ω~500Ω</li> | ||
| + | <li>Insulation Resistance: 100MΩ100V</li> | ||
| + | <li>Dielectric Strength: 250VRms (50~60Hz 1min)</li> | ||
| + | <li>Electric Shock Shake: <5ms</li> | ||
| + | <li>Longevity: touch type: ≥ 1 million times </li> | ||
| + | </ul> | ||
| + | </li> | ||
| + | |||
| + | <li>'''Mechanical Property''' | ||
| + | <ul> | ||
| + | <li>Working Voltage: touch: 170~397g(6~14oz)</li> | ||
| + | <li>Switching Path: T-Touch: 0.6~1.5mm </li> | ||
| + | </ul> | ||
| + | </li> | ||
| + | |||
| + | <li>'''Environmental Parameter''' | ||
| + | <ul> | ||
| + | <li>Working Temperature: -40 ~ +80</li> | ||
| + | <li>Storage Temperature: -40 ~ +80</li> | ||
| + | <li>Temperature: 40,90% ~ 95%, 240h</li> | ||
| + | <li>Vibration: 20G, maximum (10~200Hz, Mil-SLD-202 M204. condition B)</li> | ||
| + | </ul> | ||
| + | </li> | ||
| + | </ol> | ||
| + | |||
| + | |||
| + | == '''Principle''' == | ||
| + | |||
| + | Here, when the buttons are not pressed, the output terminal is high level, and it means that there is no button pressed. The output of the row line is low level. Once there is a press on the button, the input line will be lowered; therefore, by reading in the state of the input line, we can get to know whether there is a press on any button or not. <br> | ||
| + | [[File:4x4 Membrane Switch Keypad_2.jpg]]<br> | ||
| + | |||
| + | == '''Experimental Procedures for Arduino''' == | ||
| + | '''Step 1:''' Connect the circuit: | ||
| + | [[File:4x4 Membrane Switch Keypad_3.jpg]]<br> | ||
| + | '''Step 2:''' Compile and upload the code. | ||
| + | Before uploading the codes, please import the Library files. Click “Sketch” => “Include Library” =>“Manage Libraries…” | ||
| + | [[File:4x4 Membrane Switch Keypad_4.jpg]]<br> | ||
| + | Search “Keypad”, unfold the options, and click “Install”. <br> | ||
| + | [[File:4x4 Membrane Switch Keypad_5.jpg]]<br> | ||
| + | <pre> | ||
| + | #include <Keypad.h> | ||
| + | |||
| + | const byte ROWS = 4; | ||
| + | const byte COLS = 4; | ||
| + | |||
| + | char keys[ROWS][COLS] = { | ||
| + | {'1','2','3','A'}, | ||
| + | {'4','5','6','B'}, | ||
| + | {'7','8','9','C'}, | ||
| + | {'*','0','#','D'} | ||
| + | }; | ||
| + | |||
| + | byte rowPins[ROWS] = {9, 8, 7, 6}; | ||
| + | byte colPins[COLS] = {5, 4, 3, 2}; | ||
| + | |||
| + | Keypad keypad = Keypad( makeKeymap(keys), rowPins, colPins, ROWS, COLS ); | ||
| + | |||
| + | void setup(){ | ||
| + | Serial.begin(9600); | ||
| + | } | ||
| + | |||
| + | void loop(){ | ||
| + | char key = keypad.getKey(); | ||
| + | |||
| + | if (key != NO_KEY){ | ||
| + | Serial.println(key); | ||
| + | } | ||
| + | } | ||
| + | |||
| + | </pre> | ||
| + | [[File:4x4 Membrane Switch Keypad_6.jpg]]<br> | ||
| + | Enter the serial port, and press the keyboard, then the relative name of the pressed button will appear. | ||
Latest revision as of 06:02, 19 September 2019
Introduction
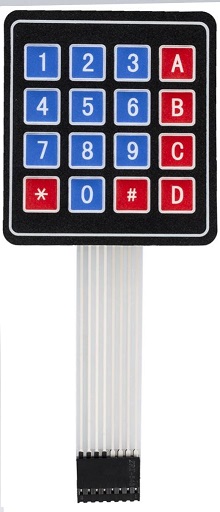 Matrix Keyboard
Matrix Keyboard is a kind of keyboard whose layout is like a matrix and it’s used as a peripheral equipment of MCU. The structure of matrix keyboard is more complex than that of other common keyboards, and the condition is similar to that of the recognition. The column line is connected with the anode of the power supply through resistors and let the I/O port of MCU connected with the row line work as an output terminal. The I/O port connected with the column line will be the input.
Because during the circuit design, there is much more need of external input. It will consume much IO source if we control a button separately, we have the matrix keyboard. The most common types are 4*4 and 8*8. Among them, the type 4*4 is even more common than 8*8.
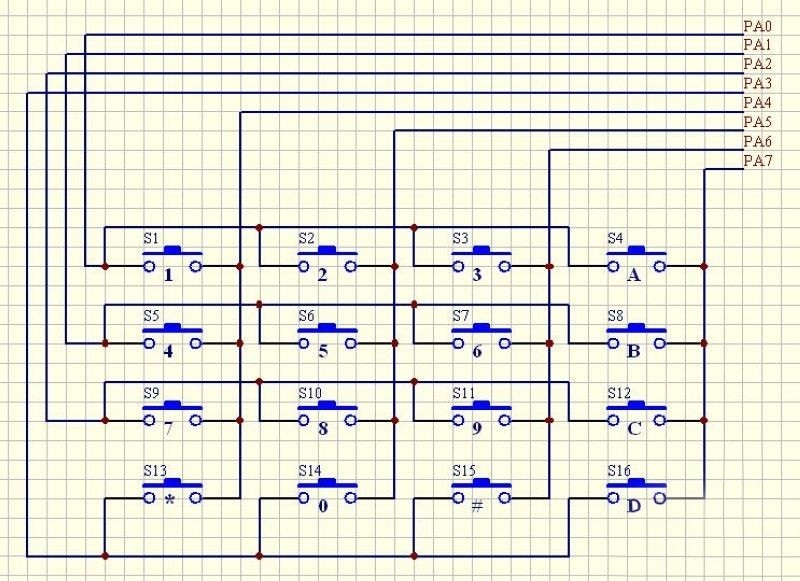
On a keyboard, if there are too many buttons, we will arrange them into the form of matrix to decrease the using of the I/O port. In the internal structure of the matrix keyboard, each horizontal line and each vertical line are not connected directly at the intersection, but at the button.
Therefore, a port (eg. P1) can form 4*4=16 buttons, and the number is twice as much as that of the button whose port cable is connected with keyboard.
The larger the number of the wires, the clearer the difference. For example, if there is an additional wire, we can get a keyboard with 20 buttons; using the port cable directly, we can get one additional key (key 9). So if there is much need of buttons, it is wise to use matrix analysis.
membrane keyboard
Membrane keypad is an application case of membrane switch with arrayed buttons. Membrane keypad is a kind of currently widespread operation system in the world that has the advantages of both practicality and beauty. It is composed of panel, upper circuit, isolation layer and bottom circuit. Due to these advantages: nice appearance, modern design, tiny in size, light weight, strong sealing (moisture proof, dust proof, oil pollution prevention, acid and alkali resistance), quake resistance and long service life, etc., it is commonly used in these fields, like medical instrument, computer control, digital machine tool, electronic weighing device, post and telecommunication, photocopier, refrigerator, microwave oven, electric fan, washing machine, electronic gaming machines.
Main Features
- Advantages
- Artistic appearance, original
- Small in size, thin and light, helps the keyboard to optimize to the level of being light, thin, short, small, and of high intelligence.
- Dampproof, dustproof, oil-resistant, preventing noxious gas, strong sealing, acid-resistant, and vibration proof.
- Long service life, bend-resistant
- Electronic Properties
- Rated Current: 35V (DC), 100mA, 1W.
- Contact Resistance: 10Ω~500Ω
- Insulation Resistance: 100MΩ100V
- Dielectric Strength: 250VRms (50~60Hz 1min)
- Electric Shock Shake: <5ms
- Longevity: touch type: ≥ 1 million times
- Mechanical Property
- Working Voltage: touch: 170~397g(6~14oz)
- Switching Path: T-Touch: 0.6~1.5mm
- Environmental Parameter
- Working Temperature: -40 ~ +80
- Storage Temperature: -40 ~ +80
- Temperature: 40,90% ~ 95%, 240h
- Vibration: 20G, maximum (10~200Hz, Mil-SLD-202 M204. condition B)
Principle
Here, when the buttons are not pressed, the output terminal is high level, and it means that there is no button pressed. The output of the row line is low level. Once there is a press on the button, the input line will be lowered; therefore, by reading in the state of the input line, we can get to know whether there is a press on any button or not.
Experimental Procedures for Arduino
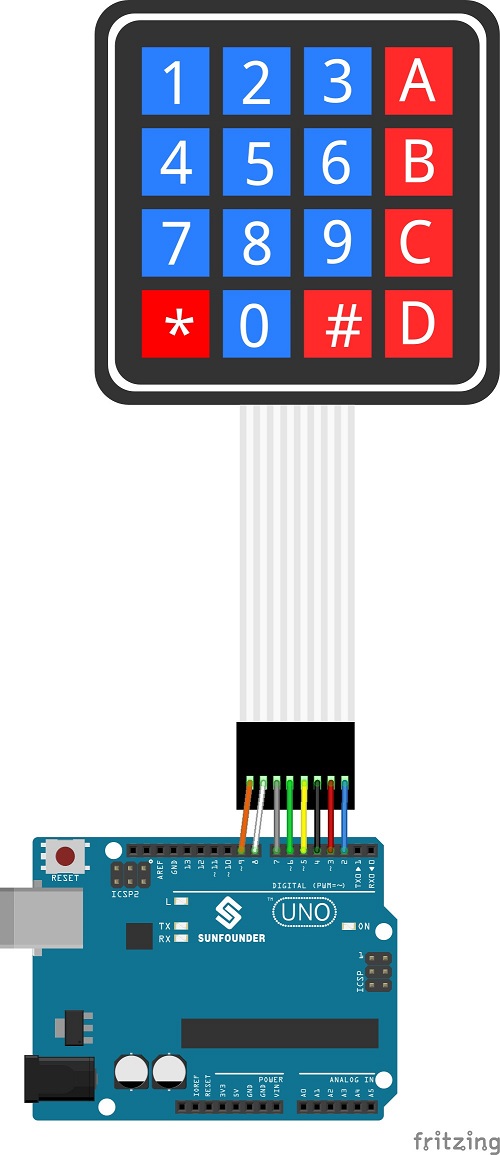
Step 1: Connect the circuit:
Step 2: Compile and upload the code.
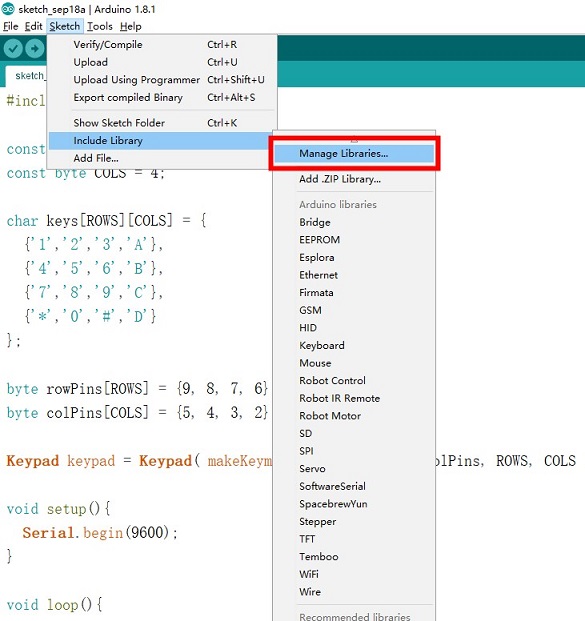
Before uploading the codes, please import the Library files. Click “Sketch” => “Include Library” =>“Manage Libraries…”
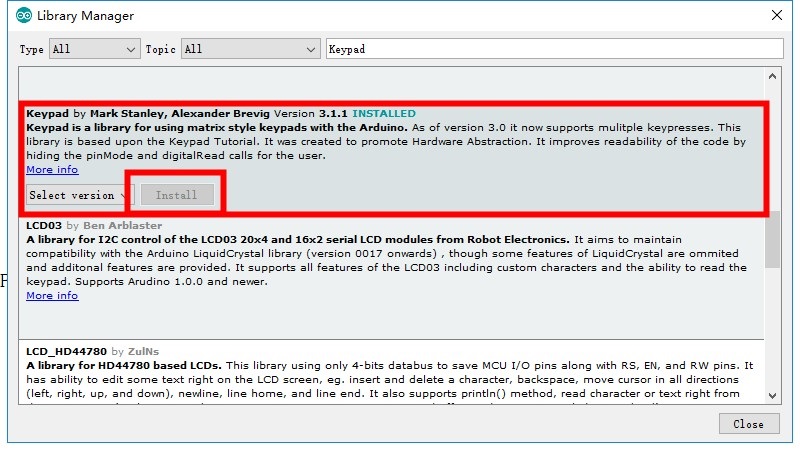
Search “Keypad”, unfold the options, and click “Install”.
#include <Keypad.h>

const byte ROWS = 4;
const byte COLS = 4;

char keys[ROWS][COLS] = {
  {'1','2','3','A'},
  {'4','5','6','B'},
  {'7','8','9','C'},
  {'*','0','#','D'}
};

byte rowPins[ROWS] = {9, 8, 7, 6};
byte colPins[COLS] = {5, 4, 3, 2};

Keypad keypad = Keypad( makeKeymap(keys), rowPins, colPins, ROWS, COLS );

void setup(){
  Serial.begin(9600);
}

void loop(){
  char key = keypad.getKey();

  if (key != NO_KEY){
    Serial.println(key);
  }
}
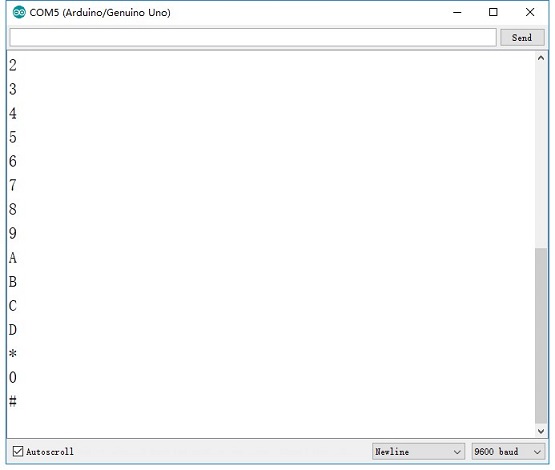
Enter the serial port, and press the keyboard, then the relative name of the pressed button will appear.