Difference between revisions of "24x8 LED Dot Matrix Module - Emo"
(→Using the Emo with Dragit) |
(→Code Explanation) |
||
| (9 intermediate revisions by the same user not shown) | |||
| Line 1: | Line 1: | ||
| − | + | ||
| − | + | ||
==Introduction== | ==Introduction== | ||
[[File:Emo01.png]] | [[File:Emo01.png]] | ||
| Line 56: | Line 55: | ||
===Step 2: Type in sudo raspi-config to open the Raspberry Pi’s SPI:=== | ===Step 2: Type in sudo raspi-config to open the Raspberry Pi’s SPI:=== | ||
sudo raspi-config | sudo raspi-config | ||
| − | Then select <span style="color:red"> | + | Then select <span style="color:red">3 Interfacing Options -> P4 SPI -> yes</span> |
| − | ===Step 3: | + | ===Step 3: Install SPI-Py:=== |
cd ~ | cd ~ | ||
| − | git clone https://github.com/ | + | git clone https://github.com/lthiery/SPI-Py.git |
| − | + | cd SPI-Py | |
| − | cd | + | sudo python3 setup.py install |
| − | + | ||
| − | + | ||
| − | + | ||
| − | === | + | ===Step 4: Install Emo:=== |
| − | + | cd~ | |
| − | + | git clone https://github.com/sunfounder/SunFounder_Emo.git | |
| − | + | cd SunFounder_Emo | |
| − | + | sudo python3 setup.py install | |
| − | + | ||
| − | + | ||
| − | + | ===Run the example=== | |
| − | + | cd ~/SunFounder_Emo/examples | |
| − | + | python3 animate.py | |
| − | + | ||
| − | + | ||
| − | + | ||
| − | + | ||
| − | + | ||
| − | + | ||
| − | + | ||
| − | + | ||
| − | + | ||
| − | + | ||
| − | + | ||
| − | + | ||
| − | + | ||
| − | + | ||
| − | + | ||
| − | + | ||
| − | + | ||
| − | + | ||
| − | + | ||
| − | + | ||
| − | + | ||
| − | + | ||
| − | + | ||
| − | + | ||
| − | + | ||
| − | + | ||
| − | + | ||
| − | + | ||
| − | + | ||
| − | + | ||
| − | + | ||
| − | + | ||
| − | + | ||
| − | + | ||
| − | + | ||
| − | + | ||
| − | + | ||
==Using the Emo with Dragit== | ==Using the Emo with Dragit== | ||
| − | You can object oriented programming on the visual programming language software Dragit to the Emo. For tutorial please refer to[http://wiki.sunfounder.cc/images/d/d5/Using_Emo_with_Dragit.pdf '''Using Emo with Dragit.pdf'''][[File:PDF.jpg]]<br> | + | You can object oriented programming on the visual programming language software Dragit to the Emo. For tutorial please refer to [http://wiki.sunfounder.cc/images/d/d5/Using_Emo_with_Dragit.pdf '''Using Emo with Dragit.pdf'''][[File:PDF.jpg]]<br> |
==Using the Emo with Arduino== | ==Using the Emo with Arduino== | ||
| Line 123: | Line 80: | ||
====Step 1. Download the library==== | ====Step 1. Download the library==== | ||
| − | Download the library [http://wiki.sunfounder.cc/images/1/1c/SunFounder_Emo.zip SunFounder_Emo]<br> | + | Download the library [http://wiki.sunfounder.cc/images/1/1c/SunFounder_Emo.zip SunFounder_Emo][[File:ZIP.jpg]]<br> |
| + | |||
====Step 2. Install the library==== | ====Step 2. Install the library==== | ||
Open the Arduino software, and select <strong>Sketch -> Include Library ->Add .ZIP Library.</strong><br> | Open the Arduino software, and select <strong>Sketch -> Include Library ->Add .ZIP Library.</strong><br> | ||
| Line 219: | Line 177: | ||
==Using Emo with Mixly== | ==Using Emo with Mixly== | ||
| − | You can object oriented programming by visual programming language software Mixly to Emo, for tutorial you can refer to [http://wiki.sunfounder.cc/images/8/85/Using_Emo_with_Mixly.pdf'''Using Emo with Mixly.pdf''']<br> | + | You can object oriented programming by visual programming language software Mixly to Emo, for tutorial you can refer to [http://wiki.sunfounder.cc/images/8/85/Using_Emo_with_Mixly.pdf'''Using Emo with Mixly.pdf'''][[File:PDF.jpg]]<br> |
Library download: | Library download: | ||
| − | [http://wiki.sunfounder.cc/images/c/cb/Sunfounder_emo_Mixly.zip Sunfounder_emo_Mixly.zip] | + | [http://wiki.sunfounder.cc/images/c/cb/Sunfounder_emo_Mixly.zip Sunfounder_emo_Mixly.zip][[File:ZIP.jpg]] |
Latest revision as of 03:35, 30 June 2021
Contents
Introduction
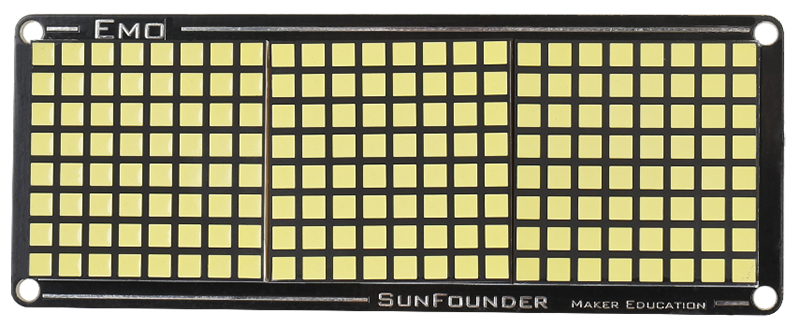
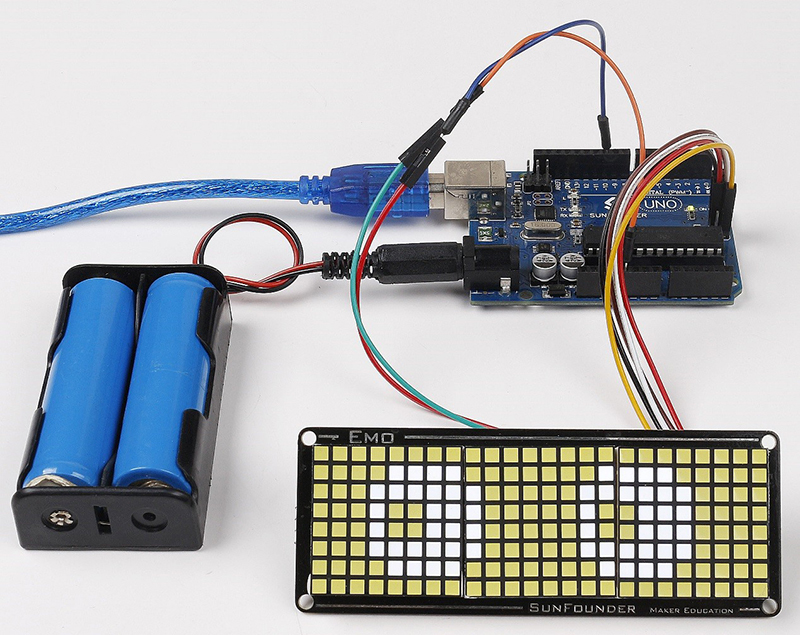
Controlled by MCU, the EMO is an 24x8 LED dot matrix display module in white color. It obeys the protocol of SPI and will refresh the module automatically which could avoid occupying the refresh interruption of the control board.
The EMO provides two acrylic sheets. One of the acrylic stick at the LED is used for shading. The other acrylic sheet can be used as a holder.
Note: When the Emo dot matrix display is working, don't touch the hot pin header at the back side. It's normal of the pin header being hot because the work rate is high-energy consumption.
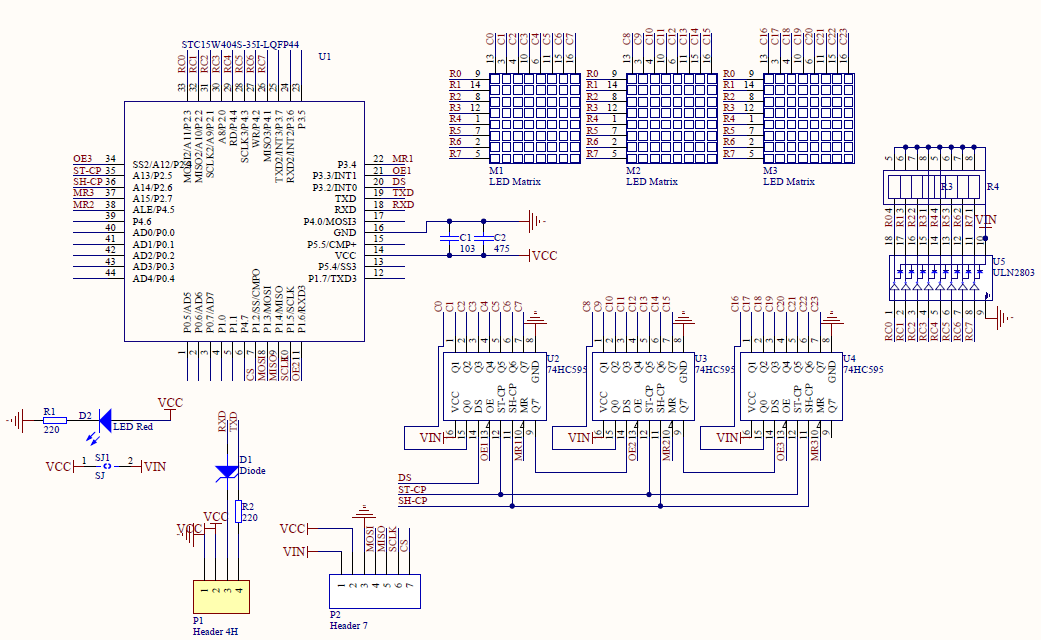
Schematic diagram
Using the Emo with Raspberry Pi
Note:The Emo is high-energy consumption. Before using it ,you may need to prepare an external power. When applying the external power, you need to connect the GND of power to that of the Raspberry Pi.
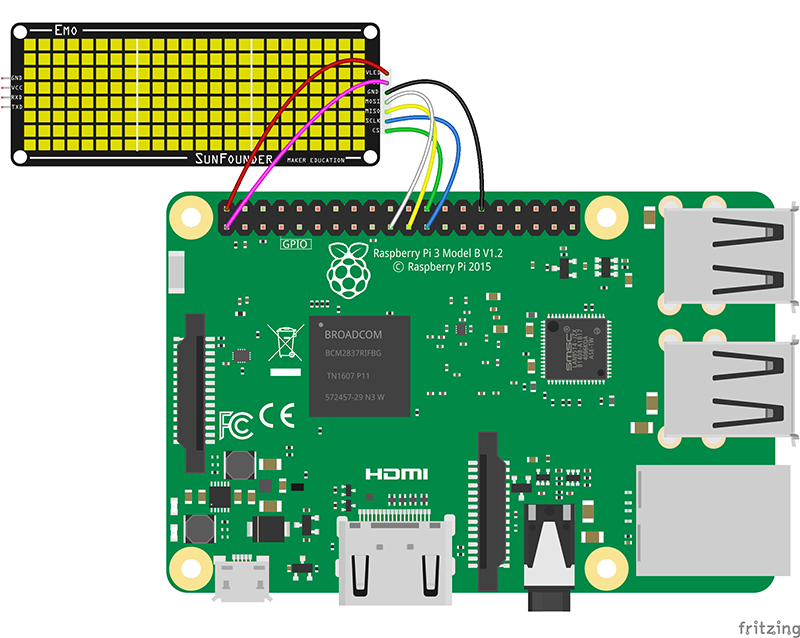
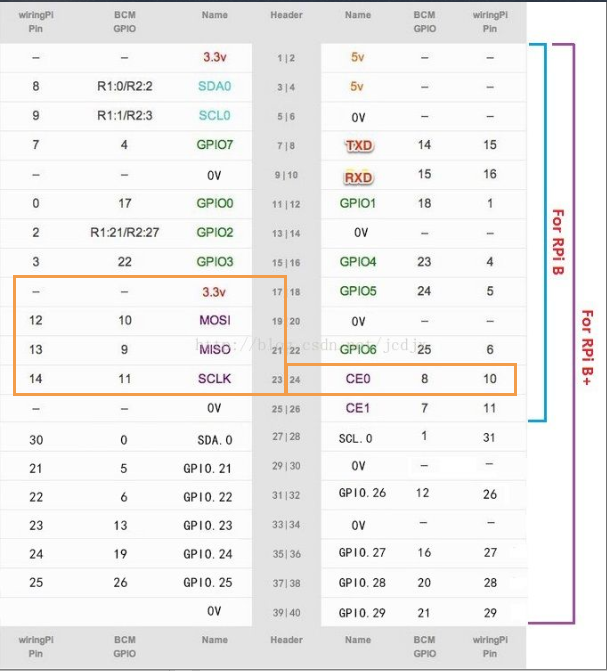
Step 1: Connect the Emo and the Raspberry Pi
| Emo | Raspberry Pi |
|---|---|
| VCC | 3.3V |
| GND | GND |
| MOSI | MOSI |
| MISO | MISO |
| SCLK | SCLK |
| CS | CE0 |
| VLED | 5V |
| GND | GND |
Step 2: Type in sudo raspi-config to open the Raspberry Pi’s SPI:
sudo raspi-config
Then select 3 Interfacing Options -> P4 SPI -> yes
Step 3: Install SPI-Py:
cd ~
git clone https://github.com/lthiery/SPI-Py.git
cd SPI-Py
sudo python3 setup.py install
Step 4: Install Emo:
cd~
git clone https://github.com/sunfounder/SunFounder_Emo.git
cd SunFounder_Emo
sudo python3 setup.py install
Run the example
cd ~/SunFounder_Emo/examples
python3 animate.py
Using the Emo with Dragit
You can object oriented programming on the visual programming language software Dragit to the Emo. For tutorial please refer to Using Emo with Dragit.pdf![]()
Using the Emo with Arduino
Connect the Emo to the Arduino board may lead to the shortage of power supply. So it is better if an external power supply is added, such as battery holder, power adapter or input from the black power jack.
Step 1. Download the library
Download the library SunFounder_Emo![]()
Step 2. Install the library
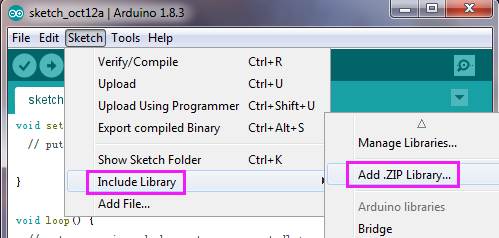
Open the Arduino software, and select Sketch -> Include Library ->Add .ZIP Library.
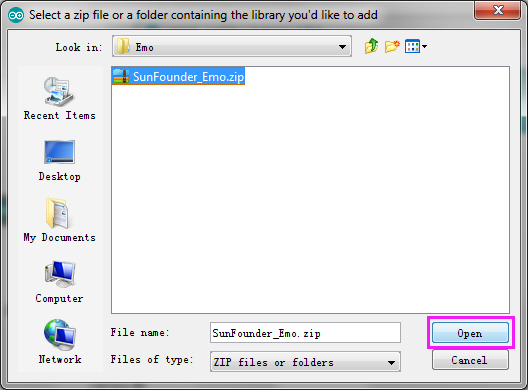
Go to the directory where you stored the package file, select the SunFounder_Emo.zip and click Open.
Step 3. Open the example
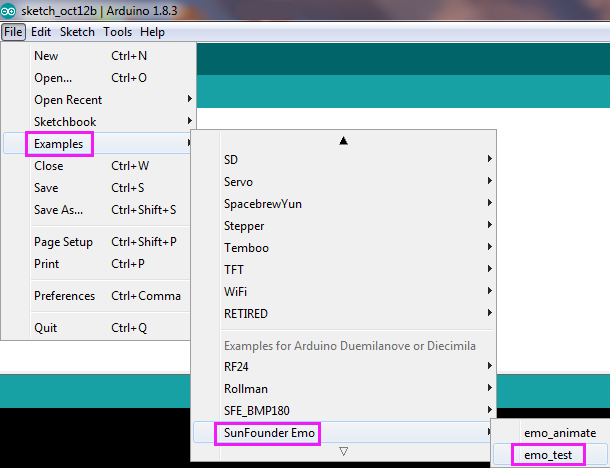
Go to File -> Examples -> Sunfounder Emo -> emo_animate
Click Upload to burn the code to the Arduino board.
After the code is uploaded successfully to the board, you can see the emoji on the Emo.
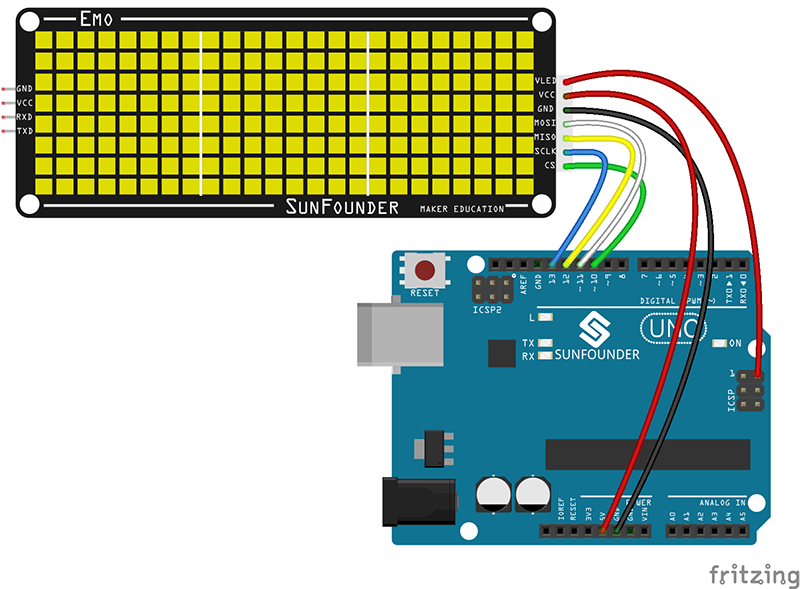
Step 4: Connect the Emo to the Arduino Uno
| Emo | Arduino Uno |
|---|---|
| VLED | 5V |
| VCC | 5V |
| GND | GND |
| MOSI | MOSI(Pin11) |
| MISO | MISO(Pin12) |
| SCLK | SCLK(Pin13) |
| CS | Pin10 |
| GND | GND |
Tips:
You can connect pin CS to any digital output pin. Here pin 10 is selected. Remember to change the pin number in the code if you use other pins.
The position of pin SPI is different from various Arduino boards. Refer to the following page for details:
https://www.arduino.cc/en/Reference/SPI
Then you will see many emoji display on the Emo.
Code explanation:
#include <SunFounder_Emo.h>
#include <emo_maps.h>  // some emotions
At the beginning of coding, include the Emo library and the data of emoji expressions.
The emo_maps.h file includes some pre-set emoji available for the Emo. Data of each emoji is stored via an array of hexadecimal numbers. You can also design the emoji by yourself. Please refer to the DIY emoji tutorial as shown below.
Emo my_emo(10); // CS pin
When the Emo instance is created, the parameter is the number of the CS pin. In the example, pin CS connects to pin 10. If you connect to any other pin, DO CHANGE the pin number here accordingly.
 void loop() {
   my_emo.show_emo(sleepy1);  // sleepy1 is emotion data in emo_maps.h
   Serial.println("sleepy1");
   delay(500);
   my_emo.show_emo(sleepy2);
   Serial.println("sleepy2");
   delay(800);
   my_emo.show_emo(sleepy3);
   Serial.println("sleepy3");
   delay(800);
Use the show_emo() method in the my_emo instance, and the emoji can be shown on the Emo.
The parameter this method function needs to transfer is the name of emoji stored in the emoji package emo_maps.h. You can open the file to check the name of the pre-set emoji.
DIY emoji tutorial
Now let’s learn how to do the emoji or characters in accordance with your own idea. Open the file of emo_maps.h in library SunFounder Emo. This is the file for saving emoji. Then find the array const byte sleepy1[24].
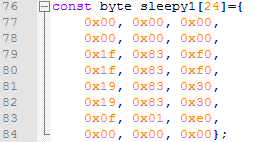
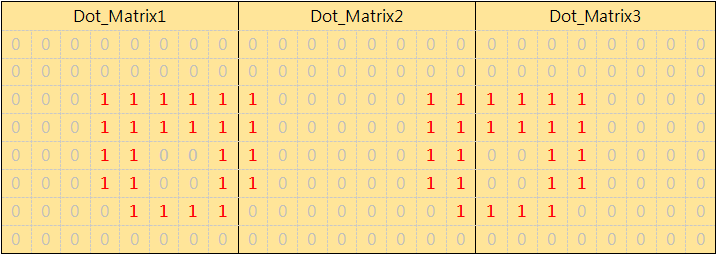
You will see it has 3 column and 8 line, 3 column stands for 3 LED dot matrix, 8 line means there are 8 lines of the dot matrix. Now rewrite them at the form of binary.
Then you will see the picture as shown above.
You can draw a chart with 24 column and 8 line, and then point the dot as shown in the picture. The place that need to be displayed is 1, otherwise is 0. Then change into hexadecimal and save into emo_maps.h. Open my_emo.show_emo(sleepy1) if you want to display it. Easy, right? Let’s try it now.
Using Emo with Mixly
You can object oriented programming by visual programming language software Mixly to Emo, for tutorial you can refer to Using Emo with Mixly.pdf![]()
Library download:
Sunfounder_emo_Mixly.zip![]()
