Difference between revisions of "OLED-SSD1306 Module"
(→Test) |
(→To use the OLED with Raspberry Pi, you can take the following steps.) |
||
| (5 intermediate revisions by the same user not shown) | |||
| Line 23: | Line 23: | ||
=='''Test'''== | =='''Test'''== | ||
==='''To use the OLED with Arduino, you can take the following steps. '''=== | ==='''To use the OLED with Arduino, you can take the following steps. '''=== | ||
| − | '''Step1:'''Connecting circuit | + | '''Step1:'''Connecting circuit |
:::::::SSD1306 ------- Arduino Uno/Mega2560 | :::::::SSD1306 ------- Arduino Uno/Mega2560 | ||
| Line 31: | Line 31: | ||
:::::::: SDA ------- A4 Uno/pin20 Mega2560 | :::::::: SDA ------- A4 Uno/pin20 Mega2560 | ||
| − | '''Step2:'''Install the Arduino IDE in your computer.For detailed steps,refer to | + | '''Step2:'''Install the Arduino IDE in your computer.For detailed steps,refer to |
<font color="blue">http://wiki.sunfounder.cc/index.php?title=Install_Arduino_Software</font> | <font color="blue">http://wiki.sunfounder.cc/index.php?title=Install_Arduino_Software</font> | ||
| − | '''Step3:'''Add U8glib library. | + | '''Step3:'''Add U8glib library. |
1) Through the links at the bottom of the page to '''download''' [http://wiki.sunfounder.cc/images/0/0f/U8glib.zip U8glib.zip] and unzip. | 1) Through the links at the bottom of the page to '''download''' [http://wiki.sunfounder.cc/images/0/0f/U8glib.zip U8glib.zip] and unzip. | ||
| Line 47: | Line 47: | ||
[[File:Ugliad.jpg]] | [[File:Ugliad.jpg]] | ||
| − | '''Step4:'''Open '''Graphics_Test.ino''', Before clicking the Upload icon, set the '''Port''' and '''Board''' under '''Tools''' menu.Then upload the code to the board | + | '''Step4:'''Open '''Graphics_Test.ino''', Before clicking the Upload icon, set the '''Port''' and '''Board''' under '''Tools''' menu.Then upload the code to the board |
[[File:ssd5.jpg]]<br> | [[File:ssd5.jpg]]<br> | ||
==='''To use the OLED with Raspberry Pi, you can take the following steps. '''=== | ==='''To use the OLED with Raspberry Pi, you can take the following steps. '''=== | ||
| − | '''Step1:'''Connecting circuit | + | '''Step1:'''Connecting circuit |
:::::::SSD1306 ------- Raspberry Pi | :::::::SSD1306 ------- Raspberry Pi | ||
:::::::: GND ------- GND | :::::::: GND ------- GND | ||
| Line 57: | Line 57: | ||
:::::::: SCL ------- SCL | :::::::: SCL ------- SCL | ||
:::::::: SDA ------- SDA | :::::::: SDA ------- SDA | ||
| − | [[]]<br> | + | [[File:connecct1.png]]<br> |
| − | '''Step2:''' Download<br> | + | '''Step2:'''Download |
| + | <p> | ||
| + | git clone https://github.com/adafruit/Adafruit_Python_SSD1306<br></p> | ||
| + | |||
| + | '''Step3:'''Install | ||
<p> | <p> | ||
| − | |||
| − | |||
Go to the folder extracted from the package file downloaded:<br> | Go to the folder extracted from the package file downloaded:<br> | ||
cd Adafruit_Python_SSD1306<br> | cd Adafruit_Python_SSD1306<br> | ||
| Line 69: | Line 71: | ||
<p> | <p> | ||
Go to the examples folder and you can see some example files inside. Let's take shapes.py for example.<br> | Go to the examples folder and you can see some example files inside. Let's take shapes.py for example.<br> | ||
| − | cd examples | + | cd examples<br> |
nano shapes.py<br> | nano shapes.py<br> | ||
Since we use the I2C interface, the lines for SPI interface need to be commented out. <br> | Since we use the I2C interface, the lines for SPI interface need to be commented out. <br> | ||
Add a # to the beginning of the lines to do it. <br> | Add a # to the beginning of the lines to do it. <br> | ||
Here comment out the Line 23 #import Adafruit_GPIO.SPI as SPI. <br> | Here comment out the Line 23 #import Adafruit_GPIO.SPI as SPI. <br> | ||
| − | [[]]<br> | + | [[File:line23.png]]<br> |
Comment out Line 34, 35, and 36:<br> | Comment out Line 34, 35, and 36:<br> | ||
| − | [[]]<br> | + | [[File:line34.png]]<br> |
Comment out Line 46: <br> | Comment out Line 46: <br> | ||
| − | [[]]<br> | + | [[File:line46.png]]<br> |
Comment out Line 49: <br> | Comment out Line 49: <br> | ||
| − | [[]]<br> | + | [[File:line49.png]]<br> |
Press Ctrl+O to save, and Ctrl+X to exit. | Press Ctrl+O to save, and Ctrl+X to exit. | ||
</p> | </p> | ||
Latest revision as of 06:24, 17 August 2017
Contents
Introduction
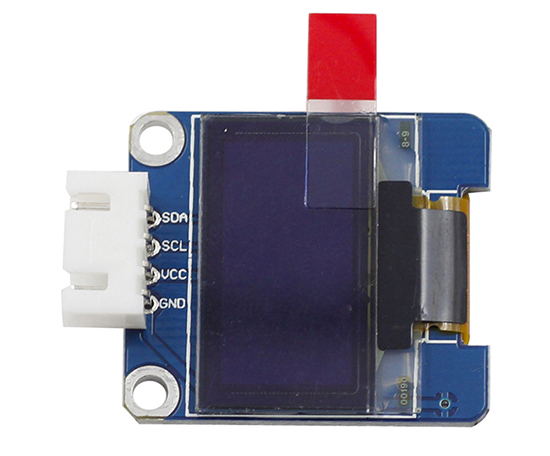
SSD1306 is a single-chip CMOS OLED/PLED driver with controller for organic / polymer light emitting diode dot-matrix graphic display system. It consists of 128 segments and 64commons. This IC is designed for Common Cathode type OLED panel. The SSD1306 embeds with contrast control, display RAM and oscillator, which reduces the number of external components and power consumption. It has 256-step brightness control. It is suitable for many compact portable applications, such as Smart watch,eal-time image display of camera on smart car,Battery management device,etc.
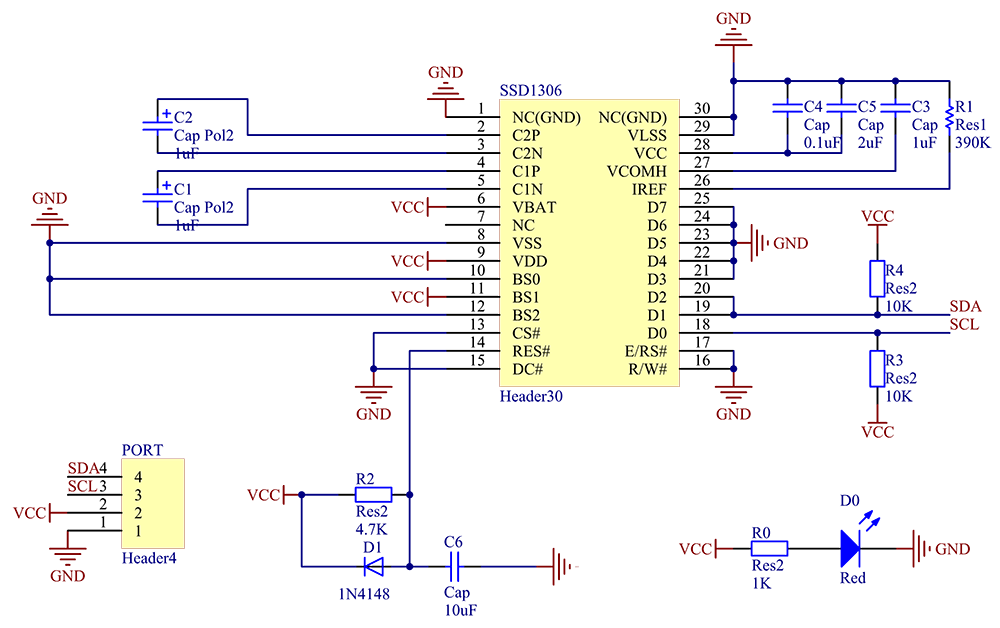
Schematic
Features
- For OLED-SSD1306, a more elaborate and beautiful screen than LCD, with more functions
- High contrast, thus supporting clear display With no need of backlight
- Working voltage: 2.7V - 5.5V; PCB size: 2.8 x 3.2cm
- Standard double-sided printed circuit board, 1.16mm thick, with an elegant layout, 3-mm holes at two corners for easy fixing
- Low power consumption: 0.04W during normal operation
Test
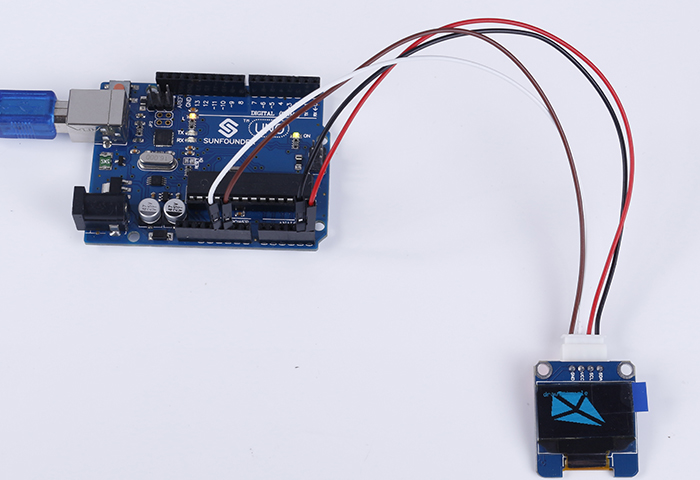
To use the OLED with Arduino, you can take the following steps.
Step1:Connecting circuit
- SSD1306 ------- Arduino Uno/Mega2560
- GND --------- GND
- VCC ------- 5V
- SCL ------- A5 Uno/pin21 Mega2560
- SDA ------- A4 Uno/pin20 Mega2560
- SSD1306 ------- Arduino Uno/Mega2560
Step2:Install the Arduino IDE in your computer.For detailed steps,refer to
http://wiki.sunfounder.cc/index.php?title=Install_Arduino_Software
Step3:Add U8glib library.
1) Through the links at the bottom of the page to download U8glib.zip and unzip.
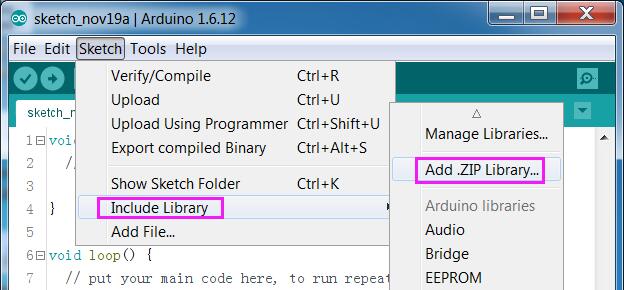
2)the Arduino IDE, import the library from the "Add Library" Menu.
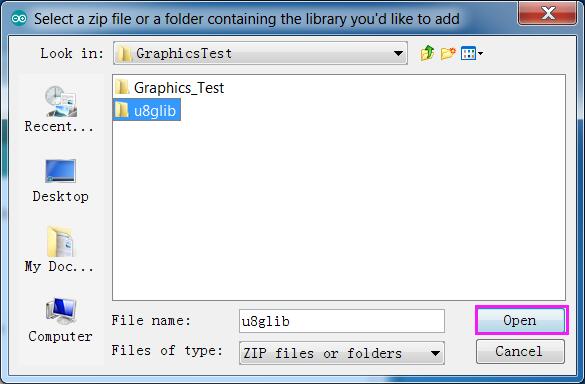
3) Find the u8glib folder you just extracted,clink open.
Step4:Open Graphics_Test.ino, Before clicking the Upload icon, set the Port and Board under Tools menu.Then upload the code to the board
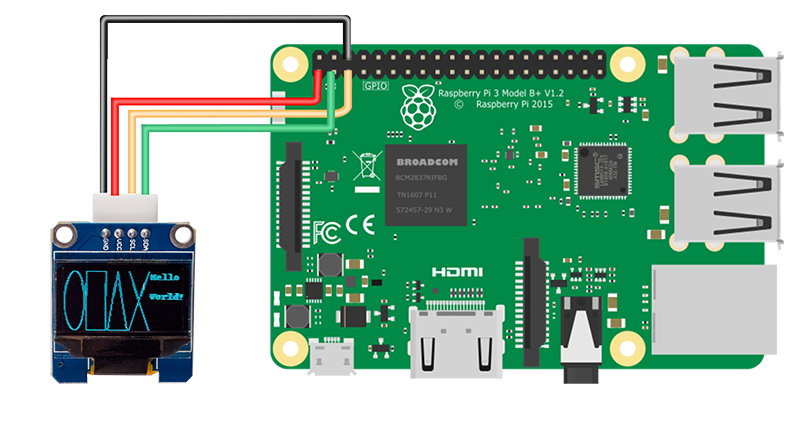
To use the OLED with Raspberry Pi, you can take the following steps.
Step1:Connecting circuit
- SSD1306 ------- Raspberry Pi
- GND ------- GND
- VCC ------- 3.3V
- SCL ------- SCL
- SDA ------- SDA
- SSD1306 ------- Raspberry Pi
Step2:Download
git clone https://github.com/adafruit/Adafruit_Python_SSD1306
Step3:Install
Go to the folder extracted from the package file downloaded:
cd Adafruit_Python_SSD1306
sudo python setup.py install
Step4:Edit the code
Go to the examples folder and you can see some example files inside. Let's take shapes.py for example.
cd examples
nano shapes.py
Since we use the I2C interface, the lines for SPI interface need to be commented out.
Add a # to the beginning of the lines to do it.
Here comment out the Line 23 #import Adafruit_GPIO.SPI as SPI.
![]()
Comment out Line 34, 35, and 36:

Comment out Line 46:

Comment out Line 49:

Press Ctrl+O to save, and Ctrl+X to exit.
Then run the program:
Python shapes.py
