Difference between revisions of "Get started with Mixly"
(→Blocks) |
|||
| (10 intermediate revisions by the same user not shown) | |||
| Line 11: | Line 11: | ||
==Get Started== | ==Get Started== | ||
| − | Download the Mixly package, get into the folder Mixly0.995_WIN:<br> | + | Download the Mixly package, get into the folder [https://s3.amazonaws.com/sunfounder/Arduino/Mixly0.995_WIN.zip Mixly0.995_WIN]:<br> |
[[File:Mixly-3.png]]<br> | [[File:Mixly-3.png]]<br> | ||
| − | Double click the Mixly icon[[]] on your desktop:<br> | + | Double click the Mixly icon[[File:Mixly-4.png]] on your desktop:<br> |
| − | + | ||
| + | [[File:Mixly-5.png]]<br> | ||
For convenience, we can right-click and select '''Send to -> Desktop (create shortcut)''' to create a desktop shortcut. | For convenience, we can right-click and select '''Send to -> Desktop (create shortcut)''' to create a desktop shortcut. | ||
| + | [[File:Mixly-6.png]]<br> | ||
| + | ==Blocks== | ||
| − | |||
The Mixly includes In/Out, Control, SerialPort, and some other block categories. Next, let’s get through what these categories cover. <br> | The Mixly includes In/Out, Control, SerialPort, and some other block categories. Next, let’s get through what these categories cover. <br> | ||
<font color="red">Note: Block categories supports Normal and Advanced views. For more functions, just click Advanced to use after you've mastered much.</font><br> | <font color="red">Note: Block categories supports Normal and Advanced views. For more functions, just click Advanced to use after you've mastered much.</font><br> | ||
| − | + | [[File:Mixly-7.png]]<br> | |
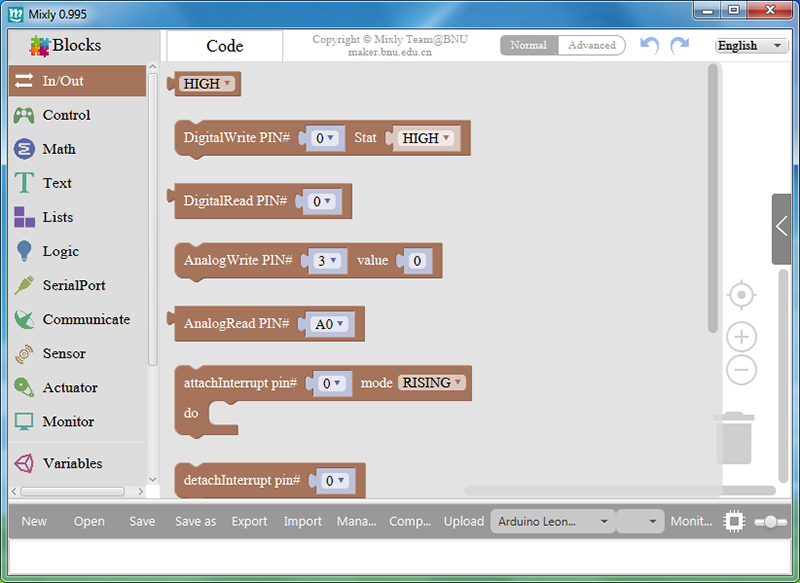
. <font color="green">In/Out:</font> DigitalRead, DigitalWrite, AnalogRead, AnalogWrite, attachInterrupt, detachInterrupt, ShiftOut, etc.<br> | . <font color="green">In/Out:</font> DigitalRead, DigitalWrite, AnalogRead, AnalogWrite, attachInterrupt, detachInterrupt, ShiftOut, etc.<br> | ||
| − | + | [[File:Mixly-8.png]]<br> | |
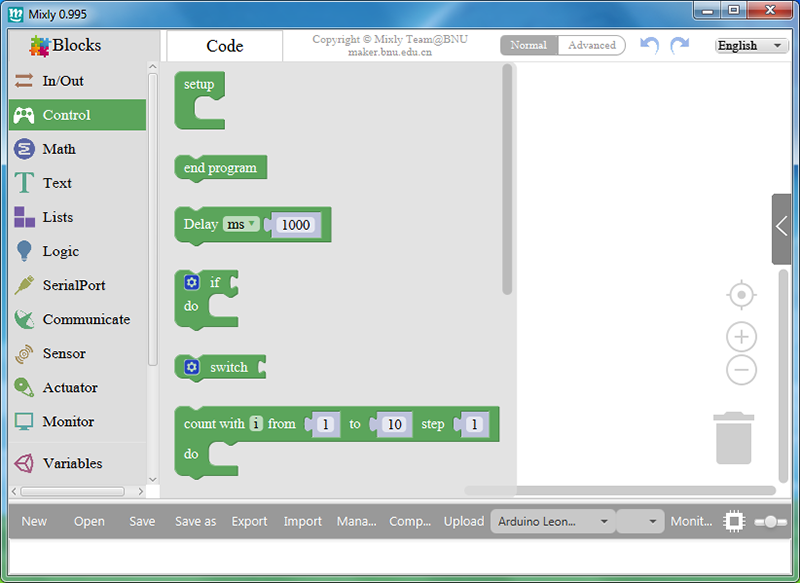
. <font color="green">Control:</font> Delay, if…do…, repeat…do…, System running time, setup, etc.<br> | . <font color="green">Control:</font> Delay, if…do…, repeat…do…, System running time, setup, etc.<br> | ||
| − | + | [[File:Mixly-9.png]]<br> | |
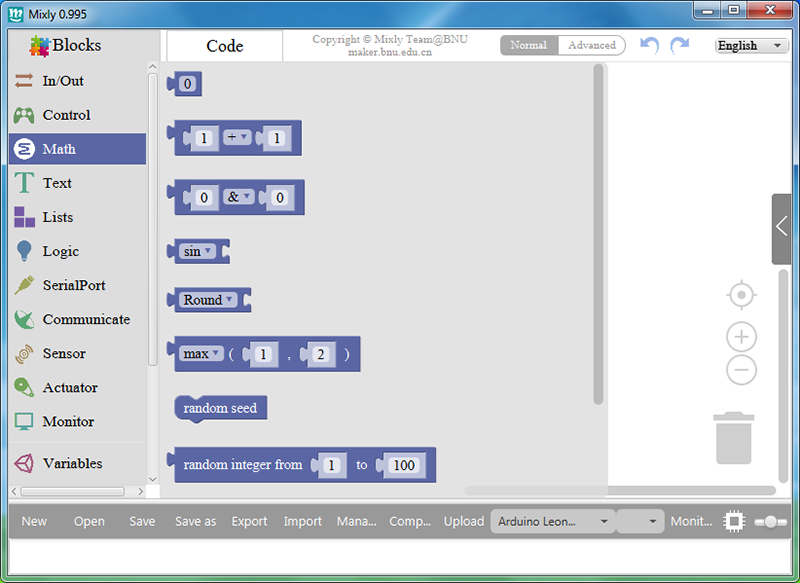
. <font color="green">Math:</font> Map, Constrain, operations like +/-, sin/cos, random integer from…to… etc.<br> | . <font color="green">Math:</font> Map, Constrain, operations like +/-, sin/cos, random integer from…to… etc.<br> | ||
| − | + | [[File:Mixly-10.png]]<br> | |
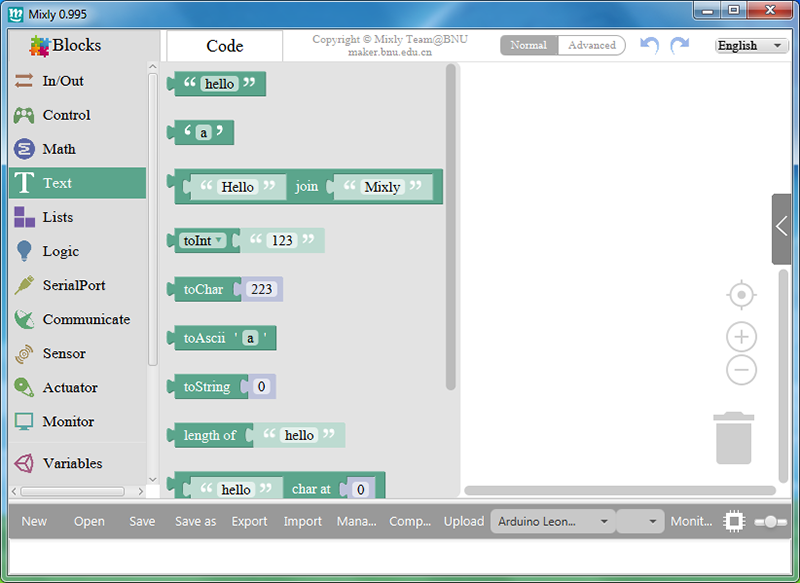
. <font color="green">Text:</font> text join, number to string, length of string, compareTo, etc.<br> | . <font color="green">Text:</font> text join, number to string, length of string, compareTo, etc.<br> | ||
| − | + | [[File:Mixly-11.png]]<br> | |
. <font color="green">Lists:</font> create list, get item at list, set item at list, etc.<br> | . <font color="green">Lists:</font> create list, get item at list, set item at list, etc.<br> | ||
| − | + | [[File:Mixly-12.png]]<br> | |
. <font color="green">Logic:</font> if conditional statement, logical operations<br> | . <font color="green">Logic:</font> if conditional statement, logical operations<br> | ||
| − | + | [[File:Mixly-13.png]]<br> | |
. <font color="green">SerialPort:</font> set baud rate, print data, read data<br> | . <font color="green">SerialPort:</font> set baud rate, print data, read data<br> | ||
| − | + | [[File:Mixly-14.png]]<br> | |
. <font color="green">Communicate:</font> IR receive, IR send, I2C read/write device, to SPI, etc.<br> | . <font color="green">Communicate:</font> IR receive, IR send, I2C read/write device, to SPI, etc.<br> | ||
| − | + | [[File:Mixly-15.png]]<br> | |
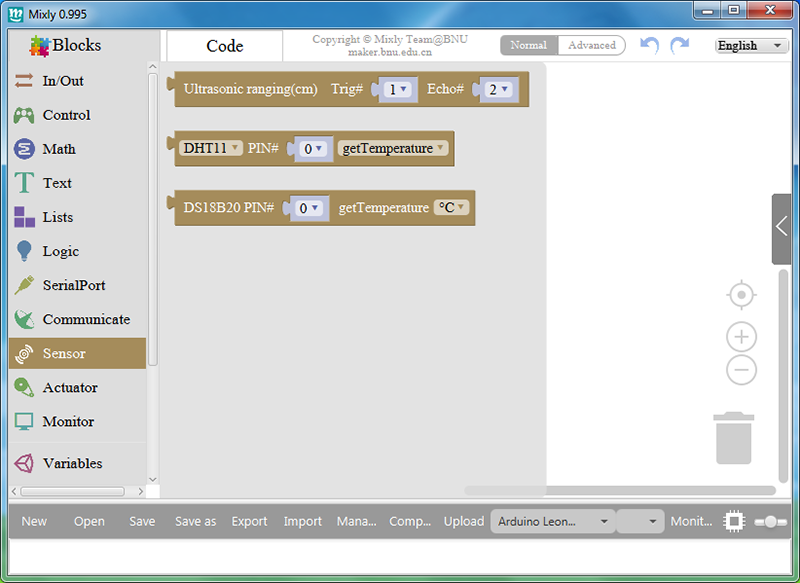
. <font color="green">Sensor:</font> ultrasonic, DHT11, DS18B20<br> | . <font color="green">Sensor:</font> ultrasonic, DHT11, DS18B20<br> | ||
| − | + | [[File:Mixly-16.png]]<br> | |
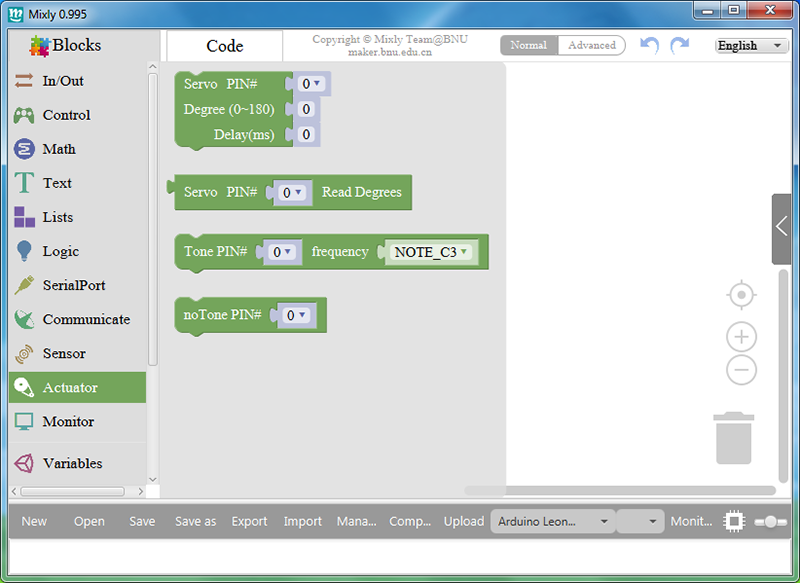
. <font color="green">Actuator:</font> Tone control, servo and stepper control.<br> | . <font color="green">Actuator:</font> Tone control, servo and stepper control.<br> | ||
| − | + | [[File:Mixly-17.png]]<br> | |
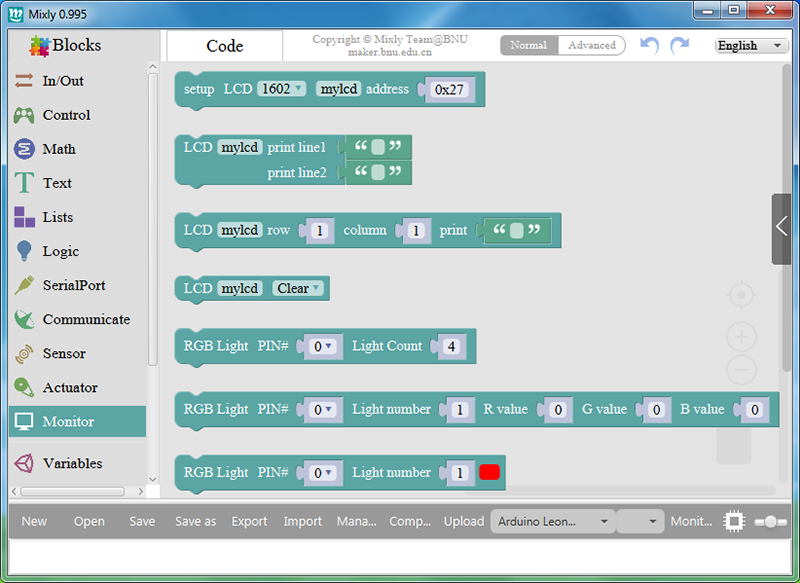
. <font color="green">Monitor:</font> setup LCD pin, LCD print data, set LCD I2C address<br> | . <font color="green">Monitor:</font> setup LCD pin, LCD print data, set LCD I2C address<br> | ||
| − | + | [[File:Mixly-18.png]]<br> | |
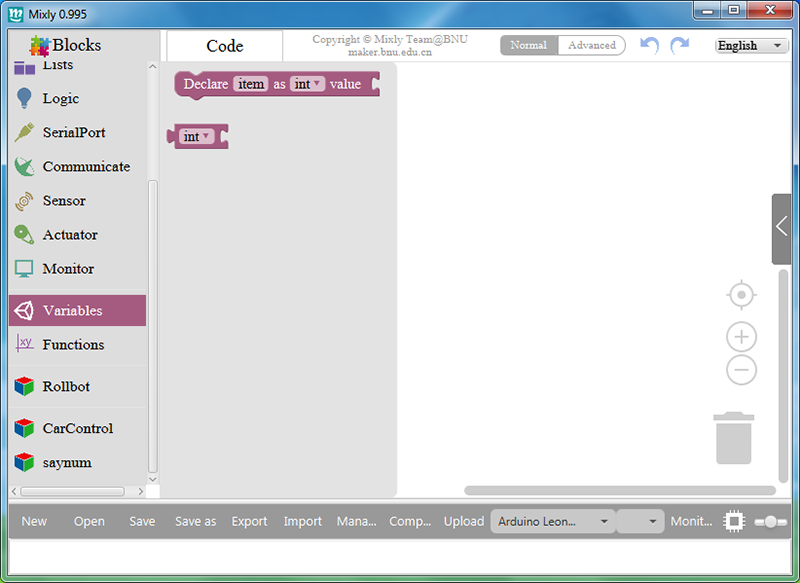
. <font color="green">Variables:</font> High/Low, True/False, float, integer, Boolean, string variables, etc.<br> | . <font color="green">Variables:</font> High/Low, True/False, float, integer, Boolean, string variables, etc.<br> | ||
| − | + | [[File:Mixly-19.png]]<br> | |
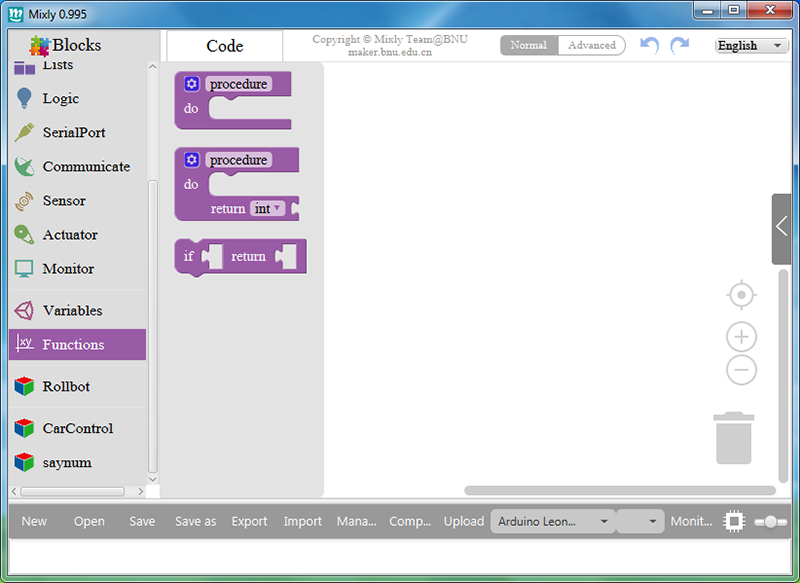
. <font color="green">Functions:</font> define function, do procedure with, etc.<br> | . <font color="green">Functions:</font> define function, do procedure with, etc.<br> | ||
| − | + | [[File:Mixly-20.png]]<br> | |
==Driver== | ==Driver== | ||
When you connect the Arduino or SunFounder board to the computer, it may show “Unknown Device” or “USB Serial Port” with a yellow exclamation mark.<br> | When you connect the Arduino or SunFounder board to the computer, it may show “Unknown Device” or “USB Serial Port” with a yellow exclamation mark.<br> | ||
| − | + | [[File:Mixly-21.png]]<br> | |
At that time, you need to install the driver yourself.<br> | At that time, you need to install the driver yourself.<br> | ||
Right-click on the “'''Unknown Device'''” or the “'''USB Serial Port'''” with yellow exclamation mark, and click “'''Update Driver Software'''”.<br> | Right-click on the “'''Unknown Device'''” or the “'''USB Serial Port'''” with yellow exclamation mark, and click “'''Update Driver Software'''”.<br> | ||
| − | + | [[File:Mixly-22.png]]<br> | |
Then click “'''Browse my computer for driver software'''”.<br> | Then click “'''Browse my computer for driver software'''”.<br> | ||
| − | + | [[File:Mixly-23.png]]<br> | |
Click '''Browse''', and select the path to Mixly-Rollman\Mixly0.995_WIN\Mixly0.995_WIN\arduino-1.8.2\drivers, then click '''Next'''.<br> | Click '''Browse''', and select the path to Mixly-Rollman\Mixly0.995_WIN\Mixly0.995_WIN\arduino-1.8.2\drivers, then click '''Next'''.<br> | ||
| − | + | [[File:Mixly-24.png]]<br> | |
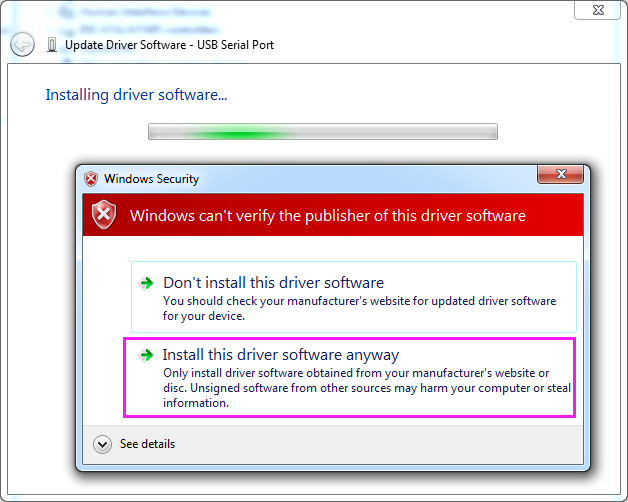
Click "'''Install this driver software anyway'''".<br> | Click "'''Install this driver software anyway'''".<br> | ||
| − | + | [[File:Mixly-25.png]]<br> | |
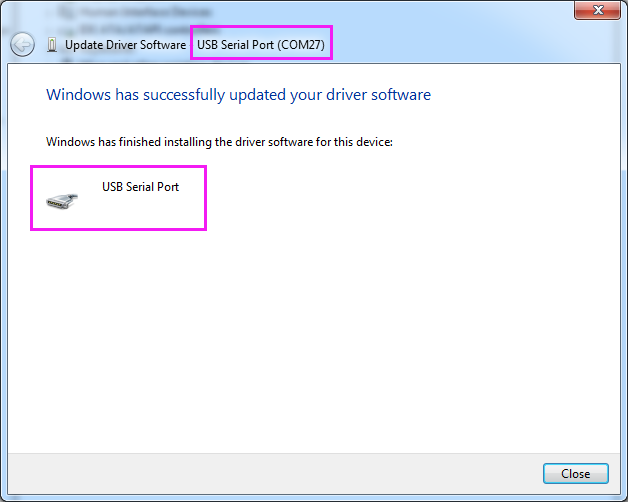
The driver will be installed successfully after a while. If it fails, replug the USB cable to try and repeat the previous operations. <br> | The driver will be installed successfully after a while. If it fails, replug the USB cable to try and repeat the previous operations. <br> | ||
| − | + | [[File:Mixly-26.png]]<br> | |
OK. That's all for the basics of the Mixly software. We'll probe into details later in specific lessons. Get familiar with them and you will find it pretty easy to catch up the following code tutorials. Good luck!<br> | OK. That's all for the basics of the Mixly software. We'll probe into details later in specific lessons. Get familiar with them and you will find it pretty easy to catch up the following code tutorials. Good luck!<br> | ||
| Line 112: | Line 113: | ||
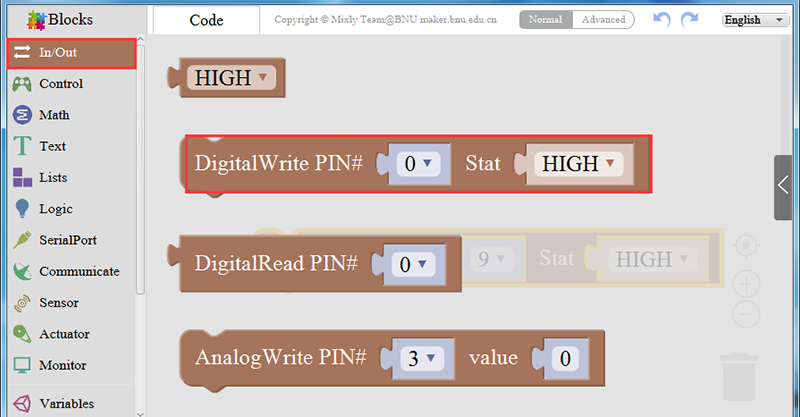
Let’s start Mixly learning from programming a very simple project, blinking LED. First, make sure the LED is connected to pin 9. Drag out a digitalWrite block from In/Out.<br> | Let’s start Mixly learning from programming a very simple project, blinking LED. First, make sure the LED is connected to pin 9. Drag out a digitalWrite block from In/Out.<br> | ||
| − | + | [[File:Mixly-27.png]]<br> | |
Set pin '''9''' to '''High''' to light up the LED.<br> | Set pin '''9''' to '''High''' to light up the LED.<br> | ||
| − | + | [[File:Mixly-28.png]]<br> | |
Then drag out a Delay block from Control category<br> | Then drag out a Delay block from Control category<br> | ||
| − | + | [[File:Mixly-29.png]]<br> | |
Set the value to 500, i.e. 0.5s.<br> | Set the value to 500, i.e. 0.5s.<br> | ||
| − | + | [[File:Mixly-30.png]]<br> | |
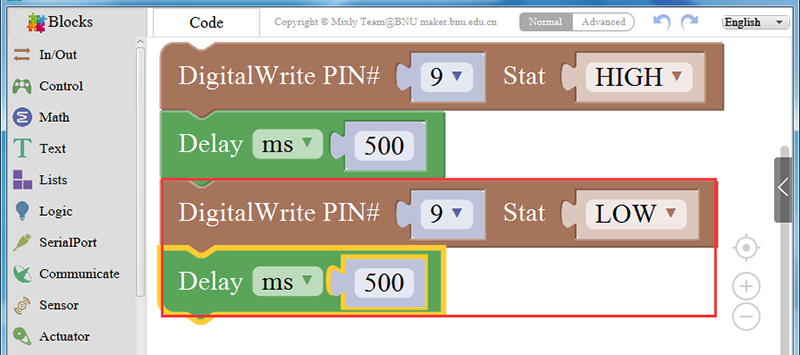
Then set pin '''9''' to '''LOW''' in the same way, and keep this state for '''0.5s'''. Thus the LED will be blinking.<br> | Then set pin '''9''' to '''LOW''' in the same way, and keep this state for '''0.5s'''. Thus the LED will be blinking.<br> | ||
| − | + | [[File:Mixly-31.png]]<br> | |
Connect the board to computer, and select the '''board''' type and '''port'''.<br> | Connect the board to computer, and select the '''board''' type and '''port'''.<br> | ||
| − | + | [[File:Mixly-32.png]]<br> | |
Upload the program, then we can see the LED blinking.<br> | Upload the program, then we can see the LED blinking.<br> | ||
| + | [[File:Mixly-33.png]]<br> | ||
| + | [[File:Mixly-34.jpg]]<br> | ||
| + | ==Resource== | ||
| − | + | [https://s3.amazonaws.com/sunfounder/Arduino/Mixly0.995_WIN.zip Mixly0.995_WIN][[File:ZIP.jpg]]<br> | |
| + | [https://s3.amazonaws.com/sunfounder/Arduino/Mixly0.995_MAC.zip Mixly0.995_MAC][[File:ZIP.jpg]]<br> | ||
| + | [https://s3.amazonaws.com/sunfounder/Arduino/Mixly0.995_Linux64.tar.xz Mixly0.995_Linux64][[File:ZIP.jpg]]<br> | ||
Latest revision as of 03:55, 4 September 2017
Introduction
Arduino is a very popular platform since its being Open Source in terms of both software and hardware. More and more people want to learn Arduino programming. But once they open the software Arduino IDE to check the samples, the complicated code frustrates them. For those without programming basics, Arduino programming is definitely a big obstacle. Fortunately, you have Mixly – a free, open source, graphical visual programming language software based on Arduino, which will make programming as easy as building blocks.
The Mixly GUI software is developed based on Blockly and Java8, which can run on OS Win7 or above. The Arduino IDE installation file, instructional lessons, and sample code are included in the package.
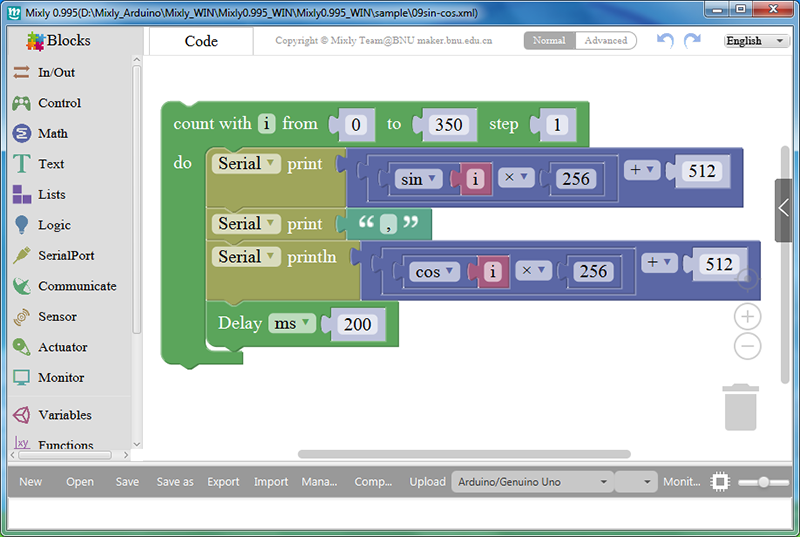
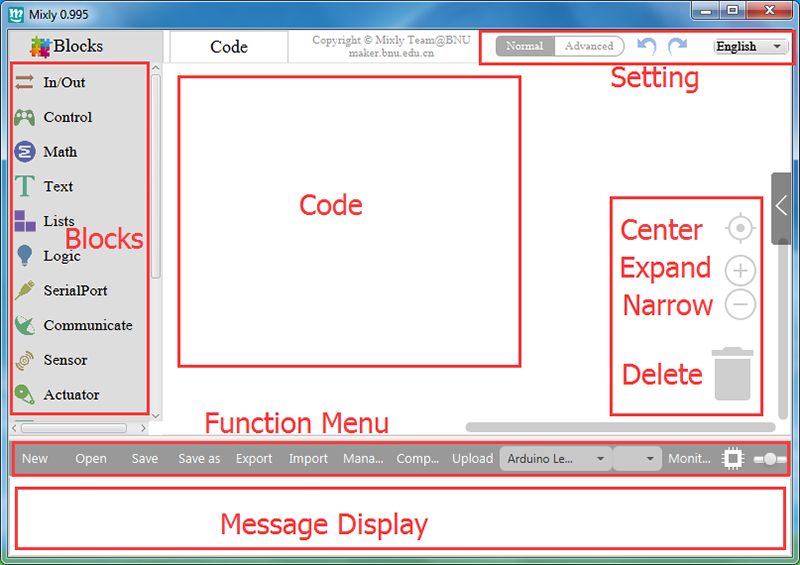
The main interface of Mixly is concise and clear. Block categories are at left, the coding area is at the center. You can see the buttons to center, to zoom in or out, and to delete at the right side. Then the grey bar at the bottom top is the tool bar including all function menus, and the area at the very bottom, is the message display.
Get Started
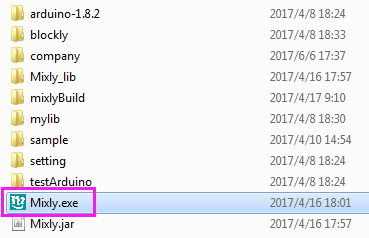
Download the Mixly package, get into the folder Mixly0.995_WIN:
Double click the Mixly icon on your desktop:
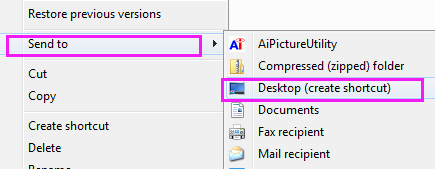
For convenience, we can right-click and select Send to -> Desktop (create shortcut) to create a desktop shortcut.
Blocks
The Mixly includes In/Out, Control, SerialPort, and some other block categories. Next, let’s get through what these categories cover.
Note: Block categories supports Normal and Advanced views. For more functions, just click Advanced to use after you've mastered much.
. In/Out: DigitalRead, DigitalWrite, AnalogRead, AnalogWrite, attachInterrupt, detachInterrupt, ShiftOut, etc.
. Control: Delay, if…do…, repeat…do…, System running time, setup, etc.
. Math: Map, Constrain, operations like +/-, sin/cos, random integer from…to… etc.
. Text: text join, number to string, length of string, compareTo, etc.
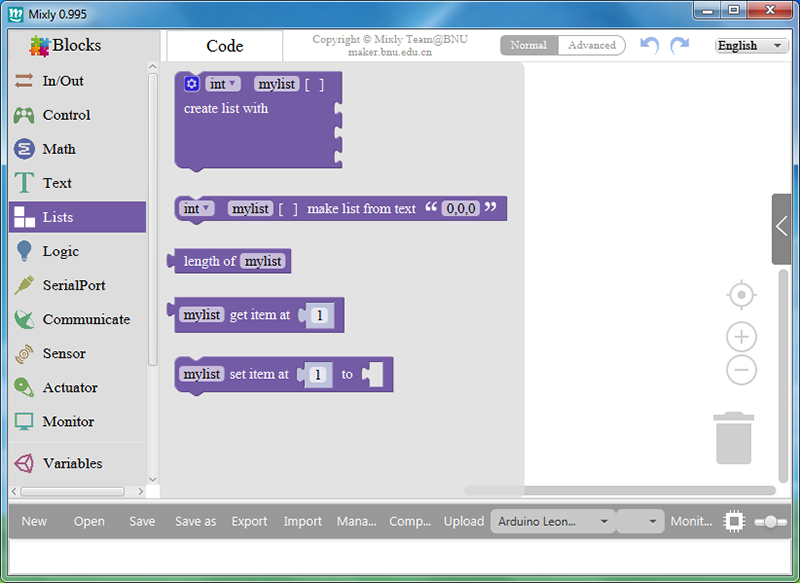
. Lists: create list, get item at list, set item at list, etc.
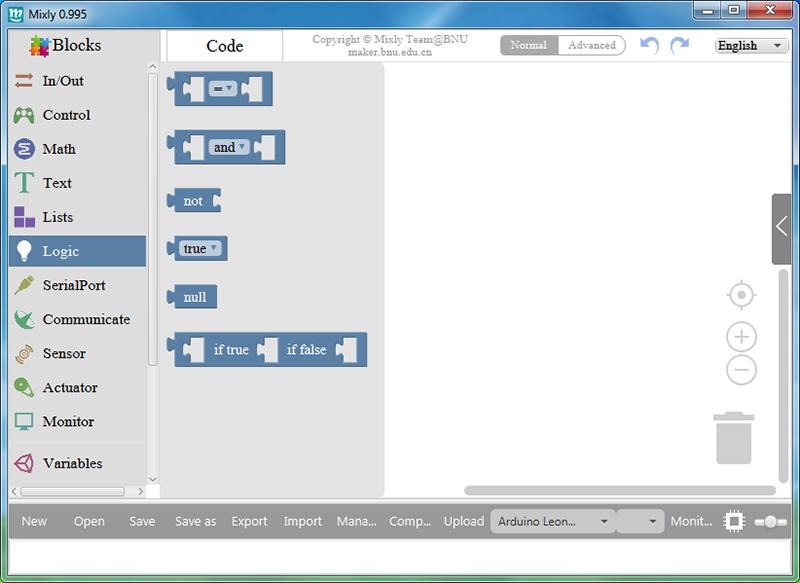
. Logic: if conditional statement, logical operations
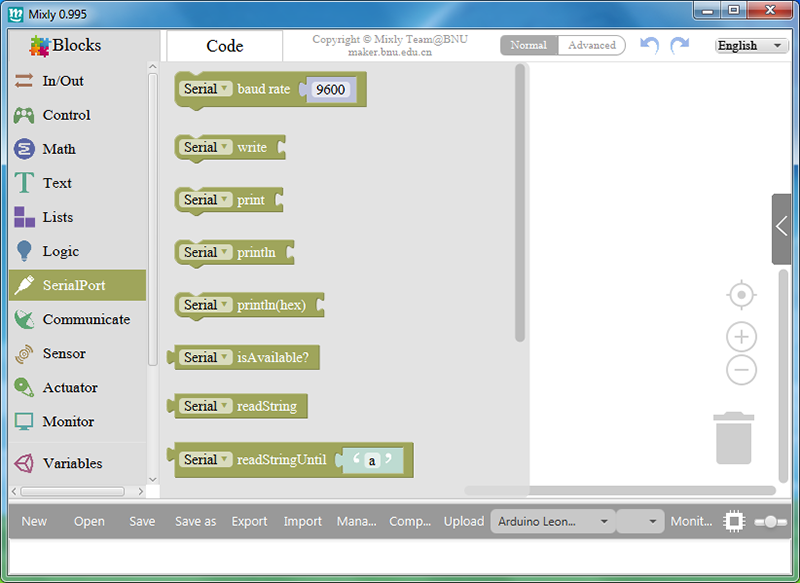
. SerialPort: set baud rate, print data, read data
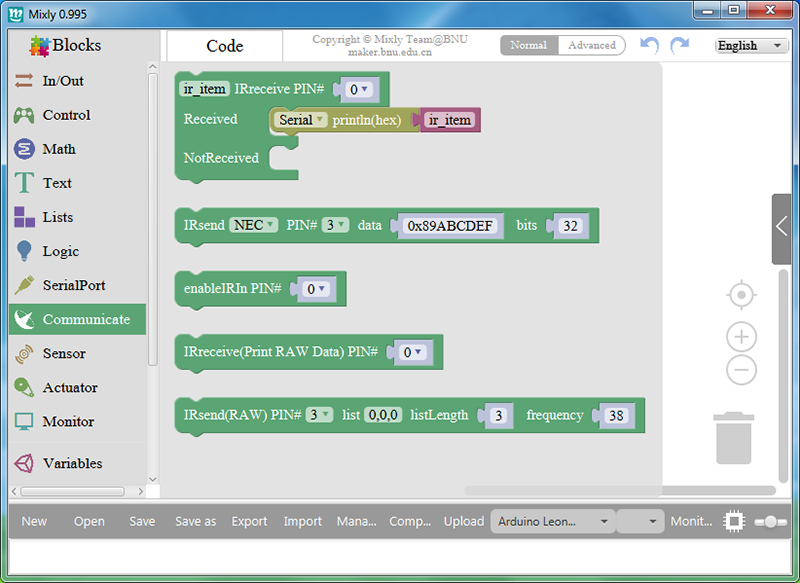
. Communicate: IR receive, IR send, I2C read/write device, to SPI, etc.
. Sensor: ultrasonic, DHT11, DS18B20
. Actuator: Tone control, servo and stepper control.
. Monitor: setup LCD pin, LCD print data, set LCD I2C address
. Variables: High/Low, True/False, float, integer, Boolean, string variables, etc.
. Functions: define function, do procedure with, etc.
Driver
When you connect the Arduino or SunFounder board to the computer, it may show “Unknown Device” or “USB Serial Port” with a yellow exclamation mark.
At that time, you need to install the driver yourself.
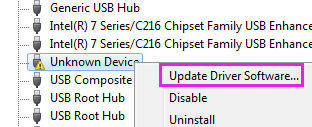
Right-click on the “Unknown Device” or the “USB Serial Port” with yellow exclamation mark, and click “Update Driver Software”.
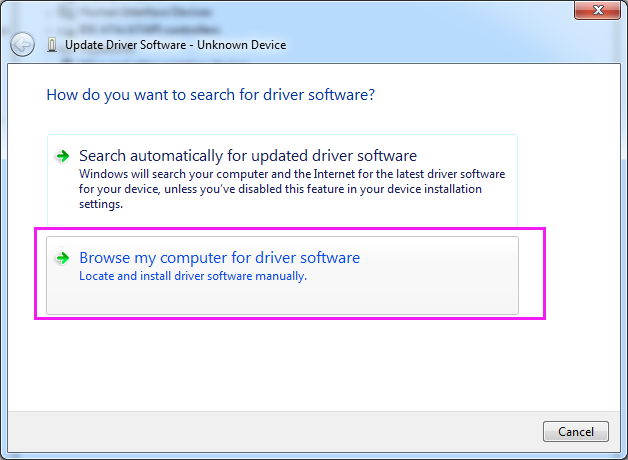
Then click “Browse my computer for driver software”.
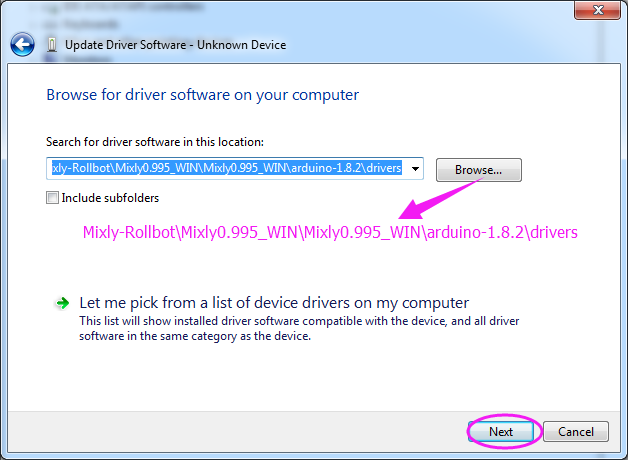
Click Browse, and select the path to Mixly-Rollman\Mixly0.995_WIN\Mixly0.995_WIN\arduino-1.8.2\drivers, then click Next.
Click "Install this driver software anyway".
The driver will be installed successfully after a while. If it fails, replug the USB cable to try and repeat the previous operations.
OK. That's all for the basics of the Mixly software. We'll probe into details later in specific lessons. Get familiar with them and you will find it pretty easy to catch up the following code tutorials. Good luck!
Example
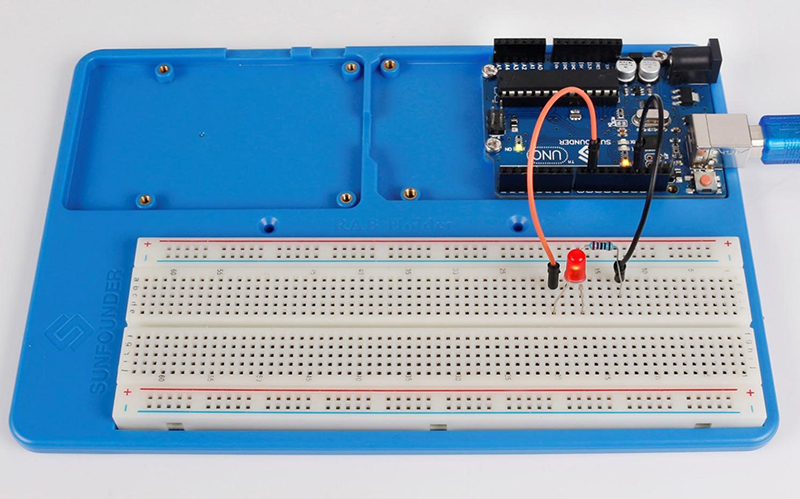
Let’s start Mixly learning from programming a very simple project, blinking LED. First, make sure the LED is connected to pin 9. Drag out a digitalWrite block from In/Out.
Set pin 9 to High to light up the LED.
Then drag out a Delay block from Control category
Set the value to 500, i.e. 0.5s.
Then set pin 9 to LOW in the same way, and keep this state for 0.5s. Thus the LED will be blinking.
Connect the board to computer, and select the board type and port.
Upload the program, then we can see the LED blinking.
