Difference between revisions of "Raspberry Pi 5110 Mini LCD 84*48 PCD8544 Usage"
(→Step 1: Download example code) |
(→Resource) |
||
| (4 intermediate revisions by the same user not shown) | |||
| Line 52: | Line 52: | ||
sudo apt-get install python-imaging | sudo apt-get install python-imaging | ||
</pre> | </pre> | ||
| − | ===Step 3: | + | ===Step 3:Run the Python program=== |
<pre> | <pre> | ||
cd examples | cd examples | ||
</pre> | </pre> | ||
| − | |||
| − | |||
| − | |||
| − | |||
| − | |||
| − | |||
| − | |||
| − | |||
| − | |||
<pre> | <pre> | ||
sudo python image.py | sudo python image.py | ||
| Line 74: | Line 65: | ||
=='''Resource'''== | =='''Resource'''== | ||
| − | [http:// | + | [http://wiki.sunfounder.cc/images/7/78/PCD8544_datasheet.pdf PCD8544 datasheet][[File:PDF.jpg]]<br> |
| − | [ | + | [http://wiki.sunfounder.cc/images/5/5b/Cpu_show.tar.gz Cpu_show][[File:ZIP.jpg]] |
Latest revision as of 07:40, 20 March 2017
Contents
Introduction
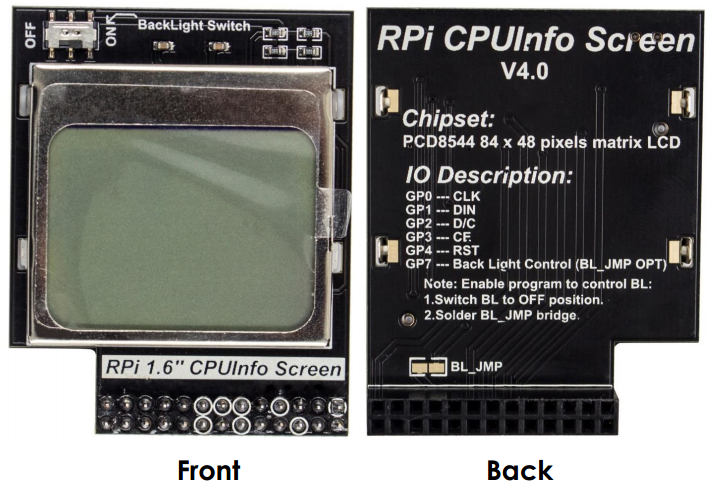
With a resolution of 84 * 48, this Mini LCD screen display the CPU utilization and the memory occupancy rate that runs on your Raspberry Pi through Raspberry Pi internal Python programming. It is clear at a glance.
Of course, geek players can also program by themselves to display any content. this Mini LCD screen is with backlit. When the Raspberry Pi is used as a server, you can also see the operation condition of Raspberry Pi at night.
Mini LCD screen is compatible with Raspberry Pi Model B+ and B.

For C User
If you are a C user, please test and use PCD8544 LCD according to the following steps:
Step1: Install wiringPi
cd /home
git clone git://git.drogon.net/wiringPi
cd wiringPi
sudo ./build
Step 2: Copy Cpu_show.tar.gz to /home and extract it
Download the Cpu_show.tar.gz and then unzip it
sudo cp yourpath/Cpu_show.tar.gz /home
sudo tar xvf Cpu_show.tar.gz
Step 3: Compile files
cd /home/cpu_show
sudo ./compile.sh
Step 4: Run the program
sudo ./cpushow
NOTE:
Due to the contrast of each LCD are different, if you found the content displayed too dark or too light, you need to modify the contrast variables of pcd8544_rpi.c, and then recompile and run to see the effect of changes !
vim pcd8544_rpi.c
Modify the line 52, int contrast = 45;
45 is the default contrast, if the character LCD display is too light, set this value increases, decreases if the character LCD display is too dark. Recommended stepping value is 5. After the changes are complete, re-compile the code, and then run.
For Python User
If you are a Python user, please test PCD8544 LCD according to the following steps:
Step 1: Download example code
git clone https://github.com/sunfounder/Adafruit_Nokia_LCD.git
Step 2: Configure the base environment
cd Adafruit_Nokia_LCD
sudo apt-get install python-dev
sudo python setup.py install
sudo apt-get install python-imaging
Step 3:Run the Python program
cd examples
sudo python image.py
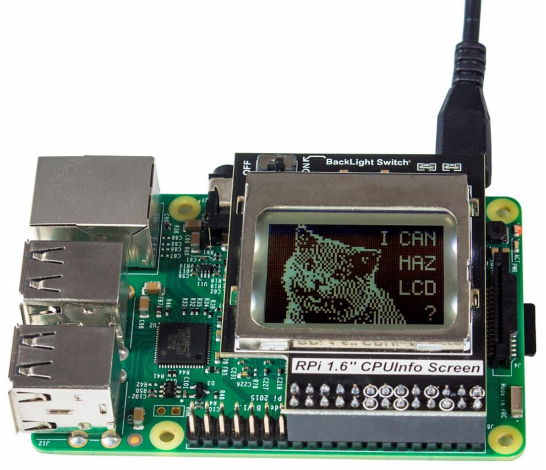
Press Enter, you should see a cat displayed on PCD8544 LCD.
Also you can modify these two files of animate.py and shapes.py exactly in the same way as image.py.Run and check the result.
