Difference between revisions of "How to Reburn the firmware onto Atmega16u2"
(→Wiring) |
|||
| (8 intermediate revisions by the same user not shown) | |||
| Line 10: | Line 10: | ||
=='''Wiring'''== | =='''Wiring'''== | ||
Connect components as follows. Then connect the buring tool USBtinyISP to the computer by a USB cable. You can connect the Uno later because the UNO will take power from the USBtinyISP. | Connect components as follows. Then connect the buring tool USBtinyISP to the computer by a USB cable. You can connect the Uno later because the UNO will take power from the USBtinyISP. | ||
| − | [[File: | + | <br> |
| + | [[File:Howtoburn1.jpg]] [[File:Biaoge.jpg]]<br> | ||
| + | <br> | ||
[[File:Howtoburn2.jpg]] | [[File:Howtoburn2.jpg]] | ||
| − | + | <br> | |
=='''Start burning the firmware'''== | =='''Start burning the firmware'''== | ||
===Step 1: Find the two files avrdude.exe and avrdude.conf=== | ===Step 1: Find the two files avrdude.exe and avrdude.conf=== | ||
When compiling, you need to call avrdude. Find the Arduino folder under the installation directory. Search for avrdude, and then avrdude.exe and avrdude.conf can be searched out.<br> | When compiling, you need to call avrdude. Find the Arduino folder under the installation directory. Search for avrdude, and then avrdude.exe and avrdude.conf can be searched out.<br> | ||
| − | + | <br> | |
| − | + | [[File:Howtoburn3.jpg]] | |
===Step 2: Copy them to path of Arduino software=== | ===Step 2: Copy them to path of Arduino software=== | ||
If you've in stalled it as default, it's C:\Program Files\Arduino\hardware\arduino\avr\firmwares\atmegaxxu2. But yours may not be C:\Program Files. Just use your own one.<br> | If you've in stalled it as default, it's C:\Program Files\Arduino\hardware\arduino\avr\firmwares\atmegaxxu2. But yours may not be C:\Program Files. Just use your own one.<br> | ||
| − | + | <br> | |
| + | [[File:Howtoburn5.jpg]] | ||
===Step 3: Type in commands=== | ===Step 3: Type in commands=== | ||
Click the Start icon and type in cmd in the search bar and click on the cmd.exe displayed to open the window for commands<br> | Click the Start icon and type in cmd in the search bar and click on the cmd.exe displayed to open the window for commands<br> | ||
Then type in the following command to go to the folder atmegaxxu2: <br> | Then type in the following command to go to the folder atmegaxxu2: <br> | ||
cd C:\Program Files\Arduino\hardware\arduino\avr\firmwares\atmegaxxu2 | cd C:\Program Files\Arduino\hardware\arduino\avr\firmwares\atmegaxxu2 | ||
| − | + | <br> | |
| + | [[File:Howtoburn6.jpg]] | ||
| + | |||
===Step 4:burn the firmware=== | ===Step 4:burn the firmware=== | ||
avrdude -p at90usb82 -F -P usb -c usbtiny -U flash:w:UNO-dfu_and_usbserial_combined.hex-U lfuse:w:0xFF:m -U hfuse:w:0xD9:m -U efuse:w:0xF4:m -U lock:w:0x0F:m | avrdude -p at90usb82 -F -P usb -c usbtiny -U flash:w:UNO-dfu_and_usbserial_combined.hex-U lfuse:w:0xFF:m -U hfuse:w:0xD9:m -U efuse:w:0xF4:m -U lock:w:0x0F:m | ||
| − | + | <br> | |
| + | [[File:Howtoburn7.jpg]]<br> | ||
<font color="red" >Note</font>: If you're reburning the hardware for a Uno board, in the command after '''flash:w:''' you typed in '''UNO-dfu_and_usbserial_combined.hex'''; but if you're using a '''Mega2560''', after the command you should do '''MEGA-dfu_and_usbserial_combined.hex'''. | <font color="red" >Note</font>: If you're reburning the hardware for a Uno board, in the command after '''flash:w:''' you typed in '''UNO-dfu_and_usbserial_combined.hex'''; but if you're using a '''Mega2560''', after the command you should do '''MEGA-dfu_and_usbserial_combined.hex'''. | ||
| Line 35: | Line 41: | ||
Or, you can find the two files in the atmegaxxu2 folder. <br> | Or, you can find the two files in the atmegaxxu2 folder. <br> | ||
| + | <br> | ||
| + | [[File:Howtoburn8.jpg]]<br> | ||
| + | <br> | ||
After a minute, you'll see "avrdude done. Thank you." which means the download is done.<br> | After a minute, you'll see "avrdude done. Thank you." which means the download is done.<br> | ||
| − | + | ||
=='''Test the burning'''== | =='''Test the burning'''== | ||
After finishing the work, you need to check whether it's done successfully. Connect Uno to your computer via a USB cable. <br> | After finishing the work, you need to check whether it's done successfully. Connect Uno to your computer via a USB cable. <br> | ||
Upon your plugging the wire, the computer will automatically install the driver, as shown below:<br> | Upon your plugging the wire, the computer will automatically install the driver, as shown below:<br> | ||
| − | + | <br> | |
| + | [[File:Howtoburn10.jpg]] <br> | ||
| + | <br> | ||
After a whiel, you can see a prompt of the serial port; here it's Arduino Uno (COM54), indicating that the computer has recognized your board. <br> | After a whiel, you can see a prompt of the serial port; here it's Arduino Uno (COM54), indicating that the computer has recognized your board. <br> | ||
| − | + | <br> | |
| + | [[File:Howtoburn11.jpg]] <br> | ||
| + | <br> | ||
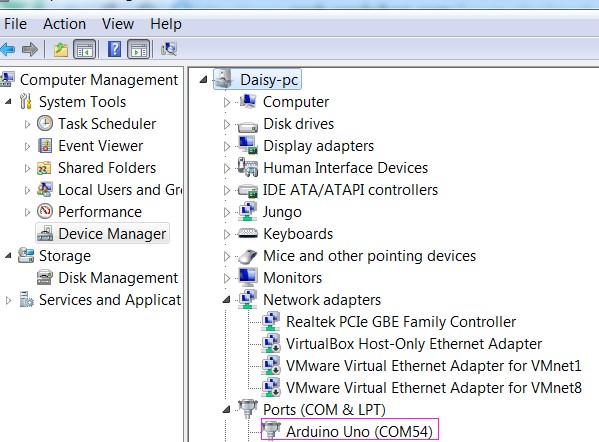
You can also check the port in Device Manager:<br> | You can also check the port in Device Manager:<br> | ||
| + | <br> | ||
| + | [[File:Howtoburn12.jpg]] | ||
| + | <br> | ||
Latest revision as of 04:27, 27 June 2016
Contents
Overview
When you connect the board to your computer by a USB cable, if the chipset on the board is not heated, but it doesn't appear under Device Manager and even there's no "Unknown Device" prompt, the firmware of ATmega16u2 can be missing. You need to reburn it .
Preparations
- USBtinyISP Module (burning tool)
- Arduino Board (use Uno here)
- PC
- Arduino IDE
- USB cable
Wiring
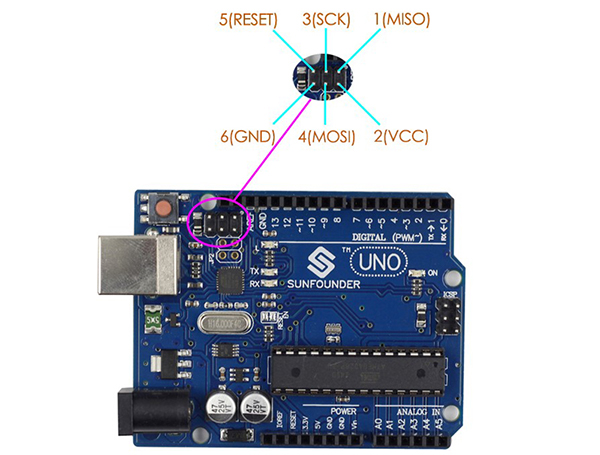
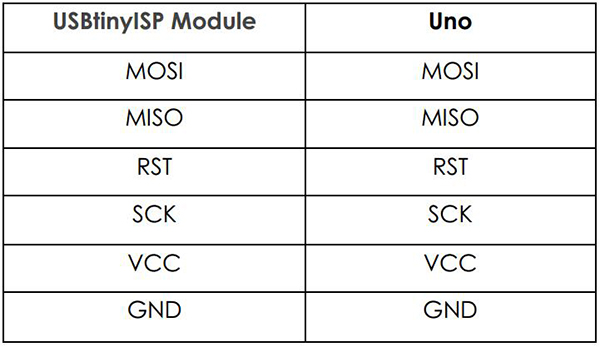
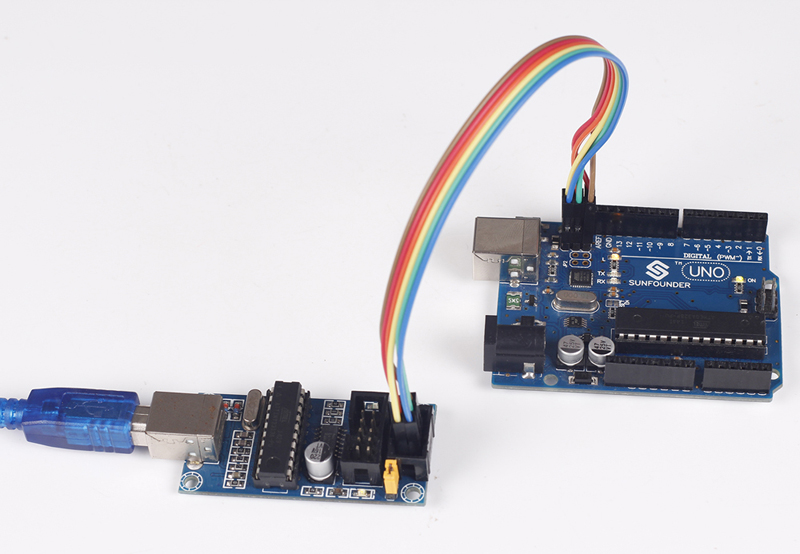
Connect components as follows. Then connect the buring tool USBtinyISP to the computer by a USB cable. You can connect the Uno later because the UNO will take power from the USBtinyISP.
Start burning the firmware
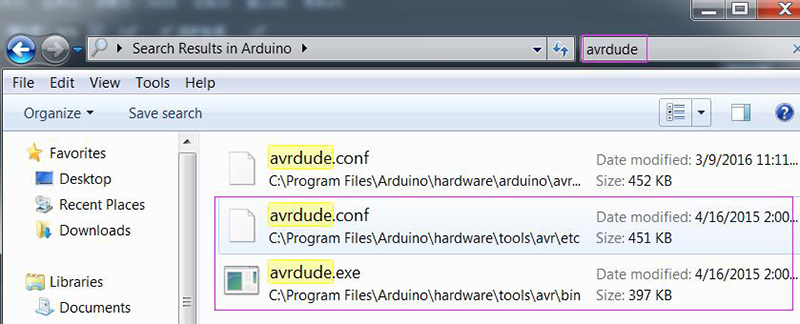
Step 1: Find the two files avrdude.exe and avrdude.conf
When compiling, you need to call avrdude. Find the Arduino folder under the installation directory. Search for avrdude, and then avrdude.exe and avrdude.conf can be searched out.
Step 2: Copy them to path of Arduino software
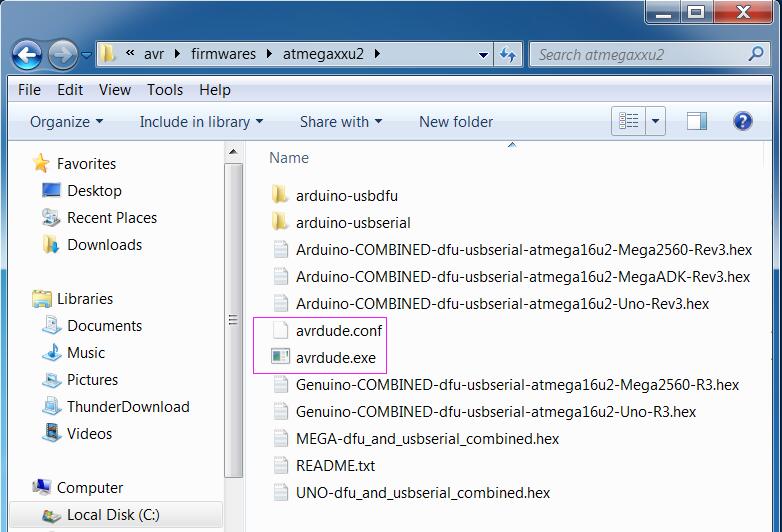
If you've in stalled it as default, it's C:\Program Files\Arduino\hardware\arduino\avr\firmwares\atmegaxxu2. But yours may not be C:\Program Files. Just use your own one.
Step 3: Type in commands
Click the Start icon and type in cmd in the search bar and click on the cmd.exe displayed to open the window for commands
Then type in the following command to go to the folder atmegaxxu2:
cd C:\Program Files\Arduino\hardware\arduino\avr\firmwares\atmegaxxu2
Step 4:burn the firmware
avrdude -p at90usb82 -F -P usb -c usbtiny -U flash:w:UNO-dfu_and_usbserial_combined.hex-U lfuse:w:0xFF:m -U hfuse:w:0xD9:m -U efuse:w:0xF4:m -U lock:w:0x0F:m
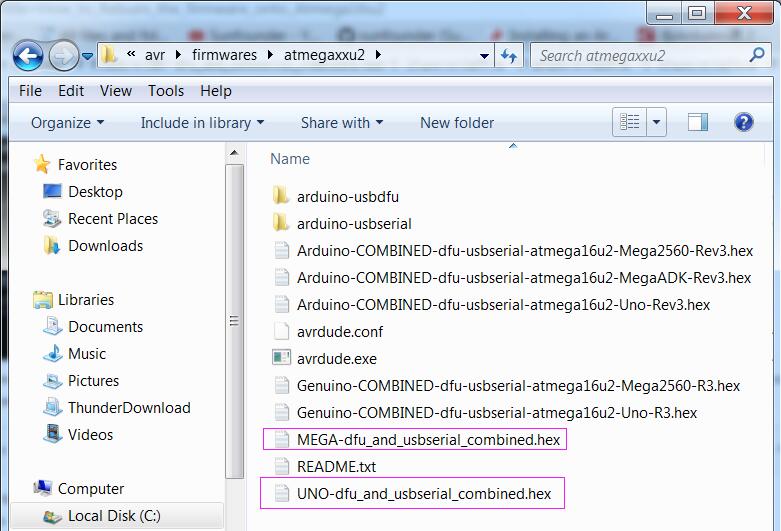
Note: If you're reburning the hardware for a Uno board, in the command after flash:w: you typed in UNO-dfu_and_usbserial_combined.hex; but if you're using a Mega2560, after the command you should do MEGA-dfu_and_usbserial_combined.hex. So for Mega, the whole command should be:
avrdude -p at90usb82 -F -P usb -c usbtiny -U flash:w:MEGA-dfu_and_usbserial_combined.hex -U lfuse:w:0xFF:m -U hfuse:w:0xD9:m -U efuse:w:0xF4:m -U lock:w:0x0F:m
Or, you can find the two files in the atmegaxxu2 folder.
After a minute, you'll see "avrdude done. Thank you." which means the download is done.
Test the burning
After finishing the work, you need to check whether it's done successfully. Connect Uno to your computer via a USB cable.
Upon your plugging the wire, the computer will automatically install the driver, as shown below:

After a whiel, you can see a prompt of the serial port; here it's Arduino Uno (COM54), indicating that the computer has recognized your board.

You can also check the port in Device Manager:
