Difference between revisions of "Quickly Get Started with Raspberry Pi Kits"
| (20 intermediate revisions by the same user not shown) | |||
| Line 1: | Line 1: | ||
=='''Overview'''== | =='''Overview'''== | ||
| + | |||
This article is a tutorial of basics for getting started quickly with Raspberry Pi kits. If you're new to Raspberry, you can use it as a best tool to begin your journey! Take the Lesson 1 of Super Kit for Raspberry Pi for example. | This article is a tutorial of basics for getting started quickly with Raspberry Pi kits. If you're new to Raspberry, you can use it as a best tool to begin your journey! Take the Lesson 1 of Super Kit for Raspberry Pi for example. | ||
| Line 6: | Line 7: | ||
==='''Preparation'''=== | ==='''Preparation'''=== | ||
| + | |||
1.Prepare a MicroSD/TF car of no less than 8GB, a 5V 2A DC power adapter with a MicroUSB port, and a network cable (to connect your router and Raspberry Pi, or plug in the USB WiFi adapter directly if you have one). | 1.Prepare a MicroSD/TF car of no less than 8GB, a 5V 2A DC power adapter with a MicroUSB port, and a network cable (to connect your router and Raspberry Pi, or plug in the USB WiFi adapter directly if you have one). | ||
| Line 14: | Line 16: | ||
==='''How to Open a Terminal'''=== | ==='''How to Open a Terminal'''=== | ||
| + | |||
In the subsequent tutorials, the terminal will be used from time to time. It is a platform for interactions in Linux. Therefore, before starting the lessons, you may need to know more about TERMINAL. | In the subsequent tutorials, the terminal will be used from time to time. It is a platform for interactions in Linux. Therefore, before starting the lessons, you may need to know more about TERMINAL. | ||
==='''Raspberry Pi as Master (recommended for beginners)'''=== | ==='''Raspberry Pi as Master (recommended for beginners)'''=== | ||
| + | |||
1.Preparations: a screen monitor, an HDMI cable (if your monitor only has a VGA port, use a VGA-HDMI converter), a USB mouse, a USB keyboard and a network cable. | 1.Preparations: a screen monitor, an HDMI cable (if your monitor only has a VGA port, use a VGA-HDMI converter), a USB mouse, a USB keyboard and a network cable. | ||
| Line 40: | Line 44: | ||
==='''For Windows Users'''=== | ==='''For Windows Users'''=== | ||
| + | |||
If your computer runs on Windows, you may go to the Raspberry Pi in a remote way, like PuTTY. | If your computer runs on Windows, you may go to the Raspberry Pi in a remote way, like PuTTY. | ||
| Line 49: | Line 54: | ||
3.Open PuTTY and click '''Session''' on the left tree-alike structure (generally it's collapsed upon PuTTY startup): | 3.Open PuTTY and click '''Session''' on the left tree-alike structure (generally it's collapsed upon PuTTY startup): | ||
| − | |||
4.Enter the IP address of the Raspberry Pi you just got in the textbox under Host Name (or IP address) and 22 under Port (by default it is 22) | 4.Enter the IP address of the Raspberry Pi you just got in the textbox under Host Name (or IP address) and 22 under Port (by default it is 22) | ||
| Line 62: | Line 66: | ||
==='''For Linux or Mac OS X Users'''=== | ==='''For Linux or Mac OS X Users'''=== | ||
| + | |||
Linux and Mac OS X users can only log in the Raspberry Pi via ssh. | Linux and Mac OS X users can only log in the Raspberry Pi via ssh. | ||
| Line 68: | Line 73: | ||
[[File:kit7.jpg]] | [[File:kit7.jpg]] | ||
| + | <br> | ||
| + | <br> | ||
[[File:kit8.jpg]] | [[File:kit8.jpg]] | ||
| Line 78: | Line 85: | ||
sudo apt-get install ssh | sudo apt-get install ssh | ||
For other Linux platforms, please contact your supplier. | For other Linux platforms, please contact your supplier. | ||
| − | Now, no matter what method you take, you can get in the client and log into the Raspberry Pi. | + | Now, no matter what method you take, you can get in the client and log into the Raspberry Pi. |
=='''Introduction to Raspberry Pi''' == | =='''Introduction to Raspberry Pi''' == | ||
| + | |||
Before starting to learn the commands, you first need to know more about the pins of the Raspberry Pi, which is key to the subsequent study. | Before starting to learn the commands, you first need to know more about the pins of the Raspberry Pi, which is key to the subsequent study. | ||
| Line 94: | Line 102: | ||
=='''Raspberry Pi Pin Number Introduction'''== | =='''Raspberry Pi Pin Number Introduction'''== | ||
| + | |||
For you to better understand, we draw the pin mapping tables below for the '''26-pin/40-pin GPIO Extension Board.''' | For you to better understand, we draw the pin mapping tables below for the '''26-pin/40-pin GPIO Extension Board.''' | ||
| Line 101: | Line 110: | ||
[[File:kit11.jpg]] | [[File:kit11.jpg]] | ||
| − | + | :::::::::'''26-pin GPIO Extension Board''' | |
The middle column is the pin names marked on the extension board, and the corresponding pin names are provided on its left and right for numbering by BCM and by wiringPi. The '''Name''' column is what the Raspberry Pi defines of the pin. "-" in two columns on the same line indicates the pin number and name is the same for the two numbering methods. | The middle column is the pin names marked on the extension board, and the corresponding pin names are provided on its left and right for numbering by BCM and by wiringPi. The '''Name''' column is what the Raspberry Pi defines of the pin. "-" in two columns on the same line indicates the pin number and name is the same for the two numbering methods. | ||
| Line 109: | Line 118: | ||
[[File:kit12.jpg]] | [[File:kit12.jpg]] | ||
| − | + | ::::::::'''40-pin GPIO Extension Board''' | |
=='''Install Libraries'''== | =='''Install Libraries'''== | ||
| + | |||
Similarly, go to the client and log in to the Raspberry Pi. Here we'll take the Raspberry Pi as the master. | Similarly, go to the client and log in to the Raspberry Pi. Here we'll take the Raspberry Pi as the master. | ||
| Line 126: | Line 136: | ||
<font color="brown">git</font> clone git://git.drogon.net/wiringPi | <font color="brown">git</font> clone git://git.drogon.net/wiringPi | ||
| − | + | ||
| + | |||
| + | <font color="red">''Note'':</font> <font color="brown">git</font> <font color="green">clone</font> is a command in Linux that is used to clone a release repository from a remote master. To use it, just type in git <font color="green">clone</font> (address of the repository). | ||
| + | |||
'''Step 2:''' Install wiringPi | '''Step 2:''' Install wiringPi | ||
| Line 133: | Line 146: | ||
<font color="brown"> git</font> pull origin | <font color="brown"> git</font> pull origin | ||
./build | ./build | ||
| − | + | ||
| + | |||
| + | <font color="red">Note:</font> <font color="brown">cd</font>, short for change directory, is a Linux command to change to the intended directory literally. To use it, type in <font color="brown">cd</font> <directory>. For example, type in <font color="brown">cd</font> <font color="green">wiringPi</font> to go to the wiringPi folder. The command <font color="brown">'''git'''</font> <font color="green">'''pull'''</font> origin is to update. | ||
| + | |||
After you press '''Enter''', with the script build, the source code of wiringPi will be compiled automatically and installed to the appropriate directory of Raspberry Pi OS. | After you press '''Enter''', with the script build, the source code of wiringPi will be compiled automatically and installed to the appropriate directory of Raspberry Pi OS. | ||
| Line 151: | Line 167: | ||
[[File:kit15.jpg]] | [[File:kit15.jpg]] | ||
| − | == | + | ===Raspberry Pi.GPIO=== |
If you are a Python user, you can program GPIOs with API provided by Raspberry Pi.GPIO. | If you are a Python user, you can program GPIOs with API provided by Raspberry Pi.GPIO. | ||
| Line 161: | Line 177: | ||
<font color="red">'''So in this kit, please note that the example code is ONLY applicable for Raspbian.'''</font> | <font color="red">'''So in this kit, please note that the example code is ONLY applicable for Raspbian.'''</font> | ||
| + | |||
| + | =='''Download the Code'''== | ||
| + | |||
| + | We provide two methods for download: '''Such as Super kit''' | ||
| + | |||
| + | ===Method 1: From our website=== | ||
| + | |||
| + | Download the source code from our website. <font color="blue">www.sunfounder.com</font> | ||
| + | |||
| + | Click '''LEARN->Get Tutorials''', find '''Super Kit V2.0 for Raspberry Pi''' and click to download the '''Super Kit for Raspberry Pi.zip''' file, unzip it, and then move the folder to the directory /home/pi/. | ||
| + | |||
| + | This is a simple way to do it. | ||
| + | |||
| + | ===Method 2: From Github=== | ||
| + | |||
| + | Change directory to /home/pi | ||
| + | |||
| + | cd /home/pi/ | ||
| + | |||
| + | |||
| + | <font color="red">Note:</font> cd to change to the intended directory from the current path. Informally, here is to go to the path /home/pi/. | ||
| + | |||
| + | |||
| + | Clone the repository from github (C code and python code) | ||
| + | git clone https://github.com/sunfounder/Sunfounder_SuperKit_C_code_for_RaspberryPi.git | ||
| + | |||
| + | git clone https://github.com/sunfounder/Sunfounder_SuperKit_Python_code_for_RaspberryPi.git | ||
| + | |||
| + | The advantage of this method is that, you can download the latest code any time you want, and then place the code under the path /home/pi/. But in case of incorrect typing which is possible especially when you're strange to the commands, you can just enter github.com/sunfounder at the address bar of a web browser, and on the page directed find the code for Super Kit. | ||
| + | |||
| + | [[File:kit16.jpg]] | ||
| + | |||
| + | Click on the repository. On the page directed, click '''Download ZIP''' on the right side. | ||
| + | |||
| + | [[File:kit17.jpg]] | ||
| + | |||
| + | After download, transfer the package to /home/pi/. | ||
| + | |||
| + | Now you can start the experiments. Here take the Lesson 1 Blinking LED of Super Kit for example. So let's rock! | ||
| + | |||
| + | =='''For C language users:'''== | ||
| + | |||
| + | '''Step 1:''' Build the circuit | ||
| + | |||
| + | '''Step 2:''' Go to the folder of the code. | ||
| + | |||
| + | '''If you use the Raspberry Pi as master, you're recommended to take the following steps.''' | ||
| + | |||
| + | Go to /home/pi/ and find the folder Sunfounder_SuperKit_C_code_for_RaspberryPi. Find '''01_LED''' in the folder, right-click on it and select '''Open in Terminal.''' Then a window will pop up as shown below. So now you've entered the path of the code led.c. | ||
| + | |||
| + | [[File:kit18.jpg]] | ||
| + | |||
| + | '''If you want to log into the Raspberry Pi remotely, type in the following:''' | ||
| + | |||
| + | cd /home/pi/Sunfounder_SuperKit_C_code_for_RaspberryPi/01_LED/ | ||
| + | |||
| + | |||
| + | <font color="red">Note:</font> Change directory to the path of the code in this experiment via cd. | ||
| + | |||
| + | |||
| + | [[File:kit19.jpg]] | ||
| + | |||
| + | |||
| + | '''In either way, you now are in the folder 01_LED. The subsequent procedures under the two methods are the same. Let's move on.''' | ||
| + | |||
| + | '''Step 3:''' Compile the Code | ||
| + | |||
| + | gcc led.c -o led -lwiringPi | ||
| + | |||
| + | |||
| + | <font color="red">Note:</font> gcc is a command in Linux. Here, it functions like compiling the C language file led.c and outputting an executable file led. In the command, -o means outputting and -lwiringPi is to load the library wiringPi (l is short for library). | ||
| + | |||
| + | |||
| + | '''Step 4: Run the executable file output in the previous step:''' | ||
| + | sudo ./led | ||
| + | |||
| + | |||
| + | <font color="red">Note:</font> To visit the root directory /home/pi, now you need to access to led with the permission of superuser, namely, by the command sudo. In the command, ./ indicates the current directory. The whole command is to run the led file in the current directory. | ||
| + | |||
| + | |||
| + | [[File:kit20.jpg]] | ||
| + | |||
| + | '''If you want to view the code''' <font color="green">''led.c''</font>, '''press''' '''Ctrl + C''' to stop running the code. Then type the following command to open it: | ||
| + | |||
| + | sudo nano led.c | ||
| + | |||
| + | |||
| + | <font color="red">Note:</font> sudo – superuser do; nano is an opening command. Thus the command is to open the code 01_led.py. | ||
| + | |||
| + | |||
| + | [[File:kit21.jpg]] | ||
| + | |||
| + | =='''For Python users:'''== | ||
| + | |||
| + | '''Go to the folder of the code and run it.''' | ||
| + | |||
| + | '''To run the Python code, you don't need to compile it. Therefore, you can put all the .py files together. Open the downloaded folder Sunfounder_SuperKit_Python_code_for_RaspberryPi and you can see them.''' | ||
| + | |||
| + | '''If you use the Raspberry Pi as master, you're recommended to take the following steps.''' | ||
| + | |||
| + | '''Find''' 01_led.py and click it to open. Now you're in the file. | ||
| + | |||
| + | [[File:kit22.jpg]] | ||
| + | |||
| + | '''Click''' '''[[Run ->Run Module]]''' in the window and the following contents will appear. | ||
| + | |||
| + | [[File:kit23.jpg]] | ||
| + | |||
| + | '''To stop it from running, just click the X button to close it and then you'll back to the code details. If you modify the code, before clicking [[Run Module(F5)]]''' you need to save it first. Then you can see the results. | ||
| + | |||
| + | '''If you want to log into the Raspberry Pi remotely, type in the command:''' | ||
| + | |||
| + | cd /home/pi/Sunfounder_SuperKit_Python_code_for_RaspberryPi/ | ||
| + | '''Run the code:''' | ||
| + | |||
| + | sudo python 01_led.py | ||
| + | |||
| + | |||
| + | <font color="red">Note:</font> Here sudo – superuser do, and python means to run the file by Python. | ||
| + | |||
| + | |||
| + | [[File:kit24.jpg]] | ||
| + | |||
| + | '''If you want to view the code 01'''<font color="green">''_led.py''</font>, '''press [[Ctrl + C]]''' to stop running the code. Then type the following command to open it: | ||
| + | |||
| + | sudo nano 01_led.py | ||
| + | |||
| + | |||
| + | <font color="red">Note:</font> sudo – superuser do; nano is an opening command. Thus the command is to open the code 01_led.py. | ||
| + | |||
| + | |||
| + | [[File:kit25.jpg]] | ||
Latest revision as of 03:22, 23 June 2016
Contents
Overview
This article is a tutorial of basics for getting started quickly with Raspberry Pi kits. If you're new to Raspberry, you can use it as a best tool to begin your journey! Take the Lesson 1 of Super Kit for Raspberry Pi for example.
Get Started
Preparation
1.Prepare a MicroSD/TF car of no less than 8GB, a 5V 2A DC power adapter with a MicroUSB port, and a network cable (to connect your router and Raspberry Pi, or plug in the USB WiFi adapter directly if you have one).
2.Download the image for the Raspbian system onto your computer. Refer to instructions through DOWNLOADS->RASPBIAN on the official website raspberrypi.org:
https://www.raspberrypi.org/documentation/installation/installing-images/README.md, write the image into the microSD/TF card, and then plug the card into the slot on your Raspberry Pi.
How to Open a Terminal
In the subsequent tutorials, the terminal will be used from time to time. It is a platform for interactions in Linux. Therefore, before starting the lessons, you may need to know more about TERMINAL.
Raspberry Pi as Master (recommended for beginners)
1.Preparations: a screen monitor, an HDMI cable (if your monitor only has a VGA port, use a VGA-HDMI converter), a USB mouse, a USB keyboard and a network cable.
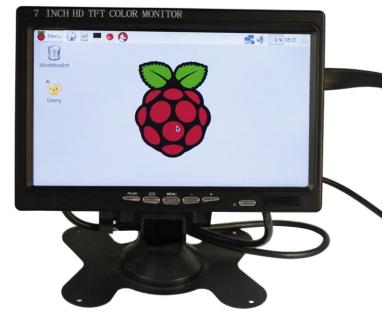
2.Connect the monitor to power. Then connect it with the Raspberry Pi via the converter cable. Connect the LAN port of the router to the network port on the Raspberry Pi by a network cable, and the mouse and keyboard to USB ports. At last, connect a 5V 2A DC power to the Raspberry Pi. Power on the screen if needed. Then you can see the display showing the Raspberry Pi icon as shown below.
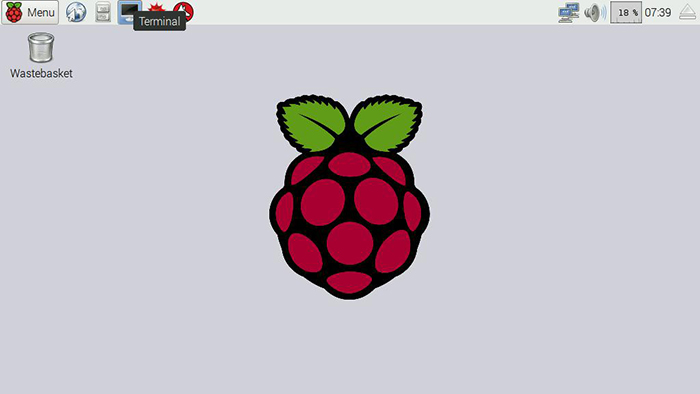
If the monitor displays colored texts with a black background after booting, it indicates that the option for automatically loading a graphic user interface (GUI) is not active. To activate it, you can type in startx with the keyboard and press Enter. Wait for a while and the display will show up as below.
Note:
The screen monitor shown above is the 7inch one we're using, available on our website www.sunfounder.com and our Amazon store. Check out now and use your Raspberry Pi in a most convenient way.
3.Now click the icon of Terminal on the screen.
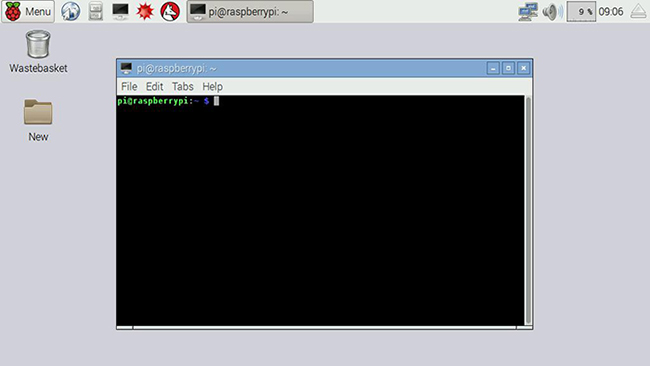
4.Then a terminal will pop up as follows:
For Windows Users
If your computer runs on Windows, you may go to the Raspberry Pi in a remote way, like PuTTY.
1.Similarly plug the TF card into the Raspberry Pi (Raspberry Pi), power the Raspberry Pi with a 5V 2A DC power and connect the LAN of the router with the network port of the Raspberry Pi. So now the Raspberry Pi is ready.
2.Then you need to know the IP address of the Raspberry Pi. You can find it on the settings interface of your router. For more details, please refer to your router provider's page.
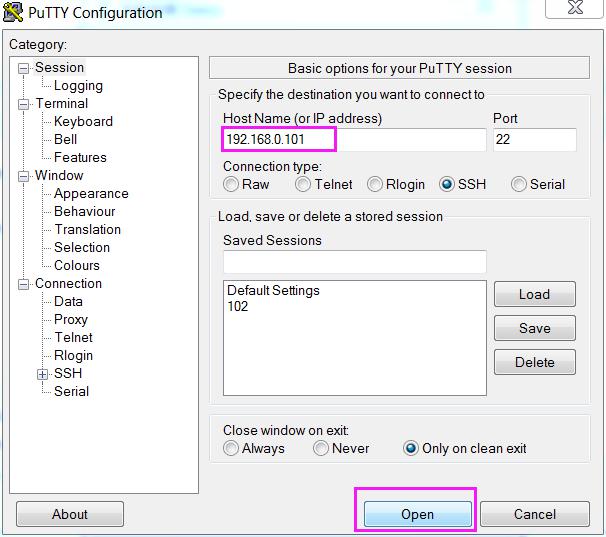
3.Open PuTTY and click Session on the left tree-alike structure (generally it's collapsed upon PuTTY startup):
4.Enter the IP address of the Raspberry Pi you just got in the textbox under Host Name (or IP address) and 22 under Port (by default it is 22)
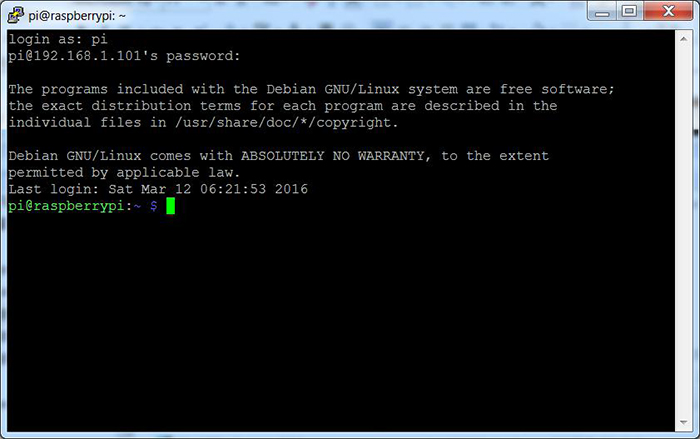
5.Click Open. Note that when you first log in to the Raspberry Pi with the IP address, you'll be prompted with a security reminder. Just click Yes. When the PuTTY window prompts login as: type in the user name of the Raspberry Pi: pi, and password: raspberry (the default one, if you haven't changed it).
Pay attention: when you're typing the password in, the window shows nothing just null, but you're in fact is typing things in. So just focus on typing it right and press Enter. After you log in the Raspberry Pi successfully, the window will display as follows.
For Linux or Mac OS X Users
Linux and Mac OS X users can only log in the Raspberry Pi via ssh.
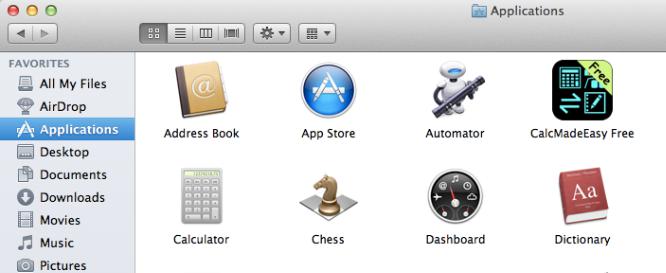
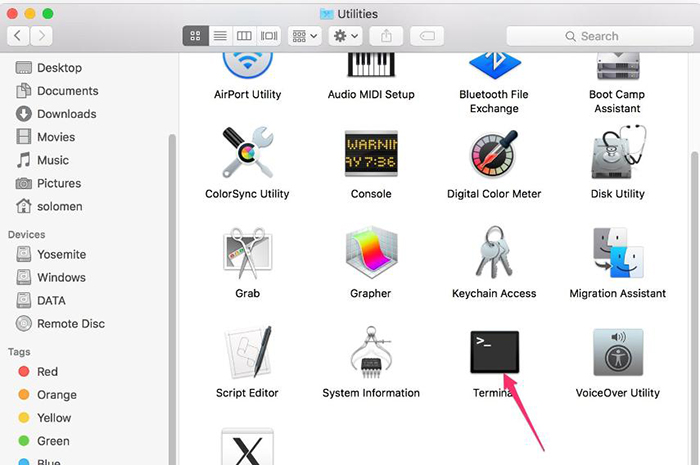
Go to Applications->Utilities, find the Terminal and open it.
Type in ssh pi@ip_address – ssh is the tool for remote logging, pi, the user name, and ip_address as the name suggests, your Raspberry Pi's IP address. For example:
ssh pi@192.168.0.1
Press Enter to confirm. If you get a prompt that no ssh is found, you need to install an ssh tool like Ubuntu and Debian by yourself:
sudo apt-get install ssh
For other Linux platforms, please contact your supplier. Now, no matter what method you take, you can get in the client and log into the Raspberry Pi.
Introduction to Raspberry Pi
Before starting to learn the commands, you first need to know more about the pins of the Raspberry Pi, which is key to the subsequent study.
There are several models of Raspberry Pi. To know some information about them, both the Raspberry Pi Model B (R1) and Model B have 26 pins, when Model B+, 2 Model B, and 3 Model B have 40. This difference is vital when you have a Raspberry Pi and want to do experiments or projects, but the related tutorials or materials are written based on a specific board which is different from yours. For more, refer to the official website www.raspberrypi.org.
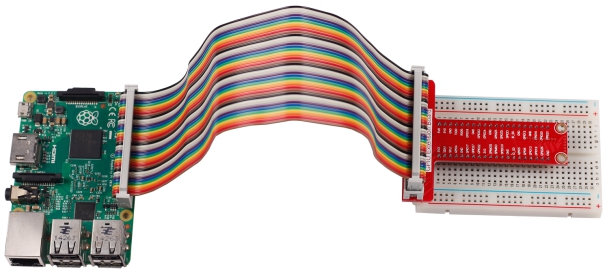
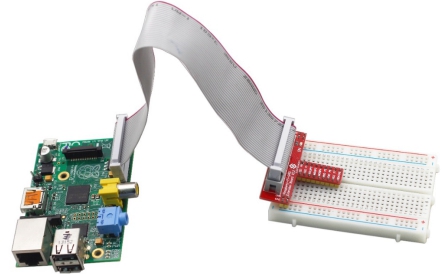
We can easily lead out pins of the Raspberry Pi to breadboard by GPIO Extension Board to avoid GPIO damage caused by frequent plugging in or out. This is our 40-pin GPIO Extension Board and GPIO cable for Raspberry Pi model B+, 2 model B and 3 model B.
26-pin GPIO Extension Board and GPIO cable for Raspberry Pi 1 model B and 1 model A:
Raspberry Pi Pin Number Introduction
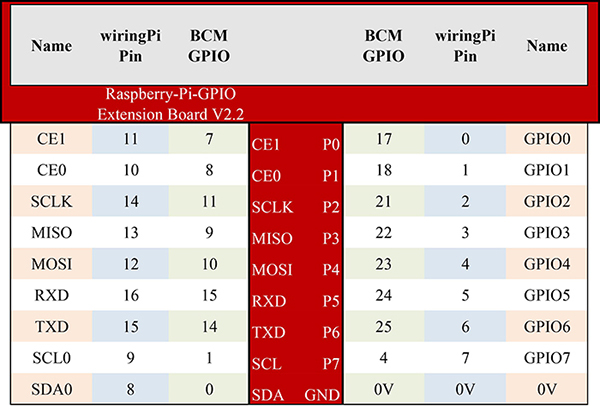
For you to better understand, we draw the pin mapping tables below for the 26-pin/40-pin GPIO Extension Board.
The pin mapping table for 26-pin GPIO Extension Board. Its 5V0 and 3V3 pins are not shown.
- 26-pin GPIO Extension Board
The middle column is the pin names marked on the extension board, and the corresponding pin names are provided on its left and right for numbering by BCM and by wiringPi. The Name column is what the Raspberry Pi defines of the pin. "-" in two columns on the same line indicates the pin number and name is the same for the two numbering methods.
Besides, in Python, pins are usually defined by the physical position on the board. From top to bottom and left to right, the pin is defined as 3V3 (1), 5V0 (2), SDA1 (3), etc., till GPIO21 (40). You'll get to more details in lessons later.
- 40-pin GPIO Extension Board
Install Libraries
Similarly, go to the client and log in to the Raspberry Pi. Here we'll take the Raspberry Pi as the master.
WiringPi
Introduction
WiringPi is a C language GPIO library applied to the Raspberry Pi platform. It complies with GUN Lv3. The functions in wiringPi are similar to those in the wiring system of Arduino. They enable the users familiar with Arduino to use wiringPi more easily.
How to install
Step 1: Get the source code of wiringPi
git clone git://git.drogon.net/wiringPi
Note: git clone is a command in Linux that is used to clone a release repository from a remote master. To use it, just type in git clone (address of the repository).
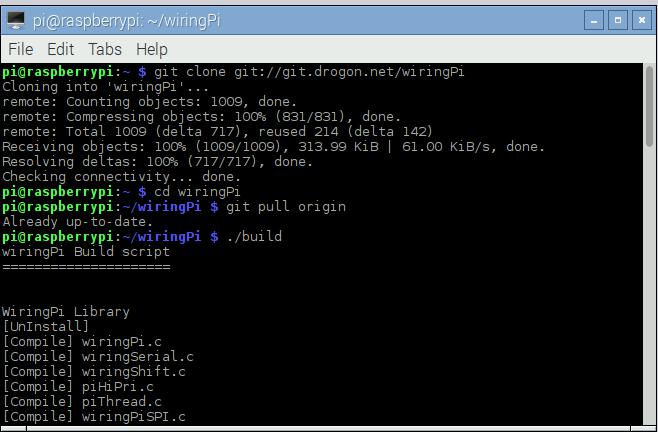
Step 2: Install wiringPi
   cd wiringPi
   git pull origin
   ./build
Note: cd, short for change directory, is a Linux command to change to the intended directory literally. To use it, type in cd <directory>. For example, type in cd wiringPi to go to the wiringPi folder. The command git pull origin is to update.
After you press Enter, with the script build, the source code of wiringPi will be compiled automatically and installed to the appropriate directory of Raspberry Pi OS.
Step 3: Test whether wiringPi is installed successfully or not
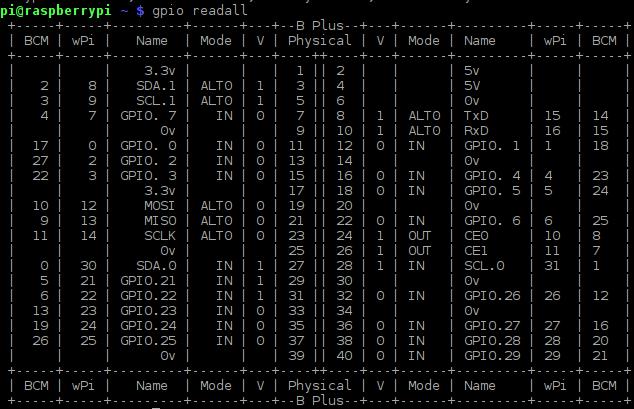
WiringPi includes lots of GPIO commands which enable you to control all kinds of interfaces on Raspberry Pi. You can test whether the wiringPi library is installed successfully or not by the following instructions.
gpio –v
If the message above appears, the wiringPi is installed successfully.
gpio readall
Raspberry Pi.GPIO
If you are a Python user, you can program GPIOs with API provided by Raspberry Pi.GPIO.
Introduction
Raspberry Pi.GPIO is a module to control Raspberry Pi GPIO channels. This package provides a class to control the GPIO on a Raspberry Pi. For examples and documents, visit http://sourceforge.net/p/raspberry-gpio-python/wiki/Home/
The Raspbian OS image of Raspberry Pi installs Raspberry Pi.GPIO by default, so you can use it directly.
So in this kit, please note that the example code is ONLY applicable for Raspbian.
Download the Code
We provide two methods for download: Such as Super kit
Method 1: From our website
Download the source code from our website. www.sunfounder.com
Click LEARN->Get Tutorials, find Super Kit V2.0 for Raspberry Pi and click to download the Super Kit for Raspberry Pi.zip file, unzip it, and then move the folder to the directory /home/pi/.
This is a simple way to do it.
Method 2: From Github
Change directory to /home/pi
cd /home/pi/
Note: cd to change to the intended directory from the current path. Informally, here is to go to the path /home/pi/.
Clone the repository from github (C code and python code)
git clone https://github.com/sunfounder/Sunfounder_SuperKit_C_code_for_RaspberryPi.git
git clone https://github.com/sunfounder/Sunfounder_SuperKit_Python_code_for_RaspberryPi.git
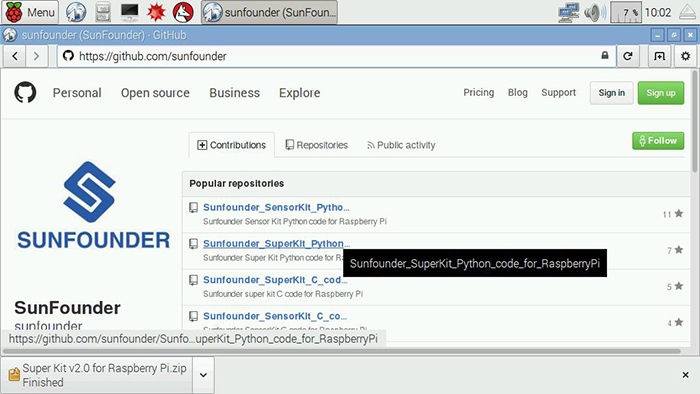
The advantage of this method is that, you can download the latest code any time you want, and then place the code under the path /home/pi/. But in case of incorrect typing which is possible especially when you're strange to the commands, you can just enter github.com/sunfounder at the address bar of a web browser, and on the page directed find the code for Super Kit.
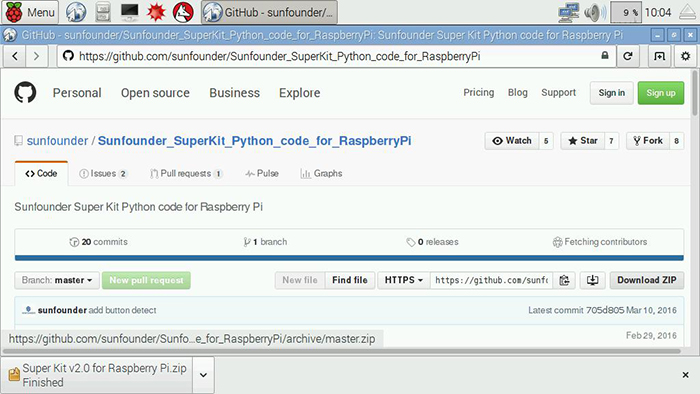
Click on the repository. On the page directed, click Download ZIP on the right side.
After download, transfer the package to /home/pi/.
Now you can start the experiments. Here take the Lesson 1 Blinking LED of Super Kit for example. So let's rock!
For C language users:
Step 1: Build the circuit
Step 2: Go to the folder of the code.
If you use the Raspberry Pi as master, you're recommended to take the following steps.
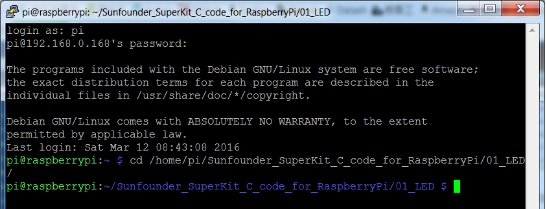
Go to /home/pi/ and find the folder Sunfounder_SuperKit_C_code_for_RaspberryPi. Find 01_LED in the folder, right-click on it and select Open in Terminal. Then a window will pop up as shown below. So now you've entered the path of the code led.c.
If you want to log into the Raspberry Pi remotely, type in the following:
cd /home/pi/Sunfounder_SuperKit_C_code_for_RaspberryPi/01_LED/
Note: Change directory to the path of the code in this experiment via cd.
In either way, you now are in the folder 01_LED. The subsequent procedures under the two methods are the same. Let's move on.
Step 3: Compile the Code
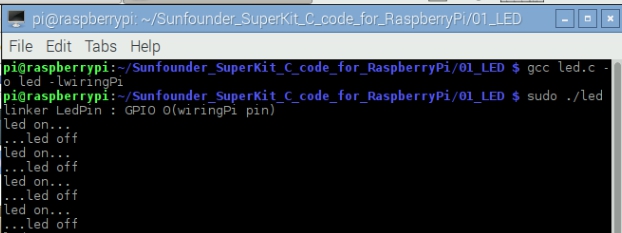
gcc led.c -o led -lwiringPi
Note: gcc is a command in Linux. Here, it functions like compiling the C language file led.c and outputting an executable file led. In the command, -o means outputting and -lwiringPi is to load the library wiringPi (l is short for library).
Step 4: Run the executable file output in the previous step:
sudo ./led
Note: To visit the root directory /home/pi, now you need to access to led with the permission of superuser, namely, by the command sudo. In the command, ./ indicates the current directory. The whole command is to run the led file in the current directory.
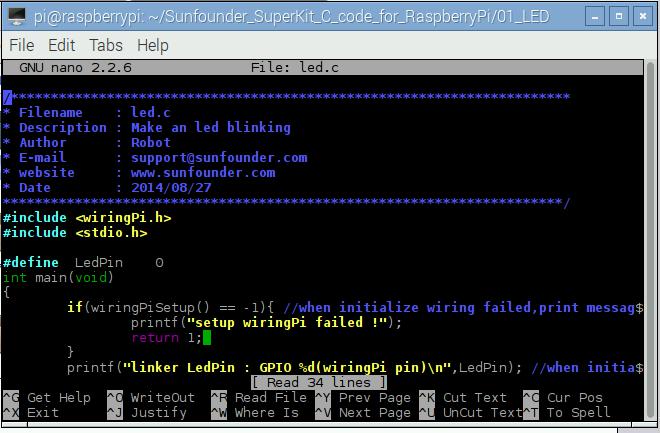
If you want to view the code led.c, press Ctrl + C to stop running the code. Then type the following command to open it:
sudo nano led.c
Note: sudo – superuser do; nano is an opening command. Thus the command is to open the code 01_led.py.
For Python users:
Go to the folder of the code and run it.
To run the Python code, you don't need to compile it. Therefore, you can put all the .py files together. Open the downloaded folder Sunfounder_SuperKit_Python_code_for_RaspberryPi and you can see them.
If you use the Raspberry Pi as master, you're recommended to take the following steps.
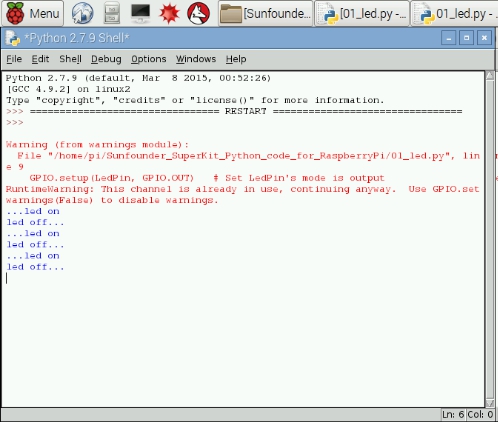
Find 01_led.py and click it to open. Now you're in the file.
Click [[Run ->Run Module]] in the window and the following contents will appear.
To stop it from running, just click the X button to close it and then you'll back to the code details. If you modify the code, before clicking Run Module(F5) you need to save it first. Then you can see the results.
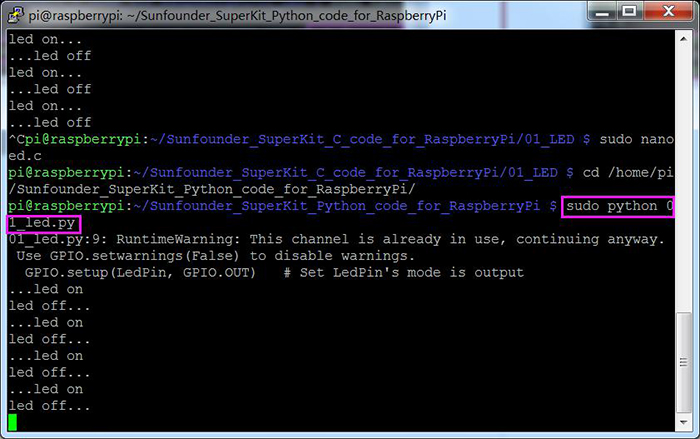
If you want to log into the Raspberry Pi remotely, type in the command:
cd /home/pi/Sunfounder_SuperKit_Python_code_for_RaspberryPi/
Run the code:
sudo python 01_led.py
Note: Here sudo – superuser do, and python means to run the file by Python.
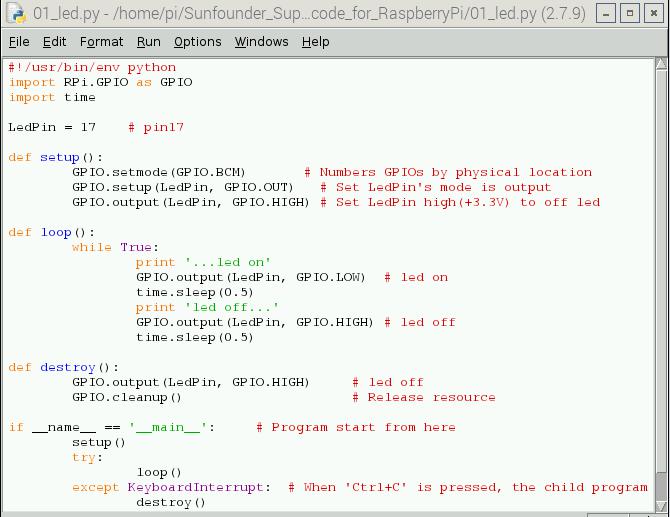
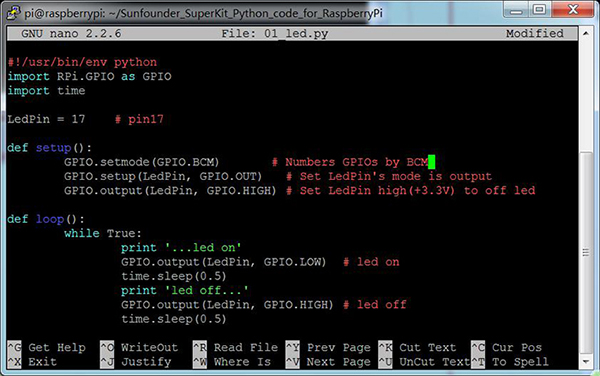
If you want to view the code 01_led.py, press Ctrl + C to stop running the code. Then type the following command to open it:
sudo nano 01_led.py
Note: sudo – superuser do; nano is an opening command. Thus the command is to open the code 01_led.py.
