Difference between revisions of "2.2 Inch TFT Screen Display Extension Board"
(→Attention) |
|||
| (31 intermediate revisions by the same user not shown) | |||
| Line 1: | Line 1: | ||
| + | ==Introduction== | ||
| + | <center> | ||
| + | [[File:TFT1.jpg]]<br> | ||
| + | </center> | ||
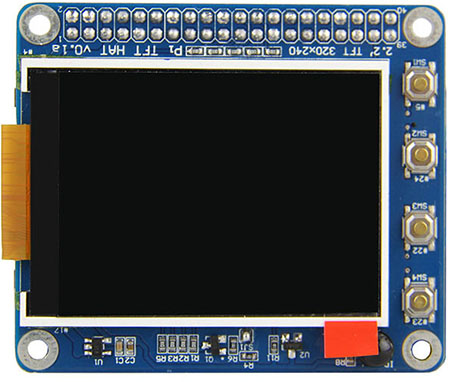
| + | This monitor is specially designed for Raspberry Pi. You're recommended to download and install the image we provide. It is written based on the Raspbian Jessie 2016-5-27 version and we've pre-installed the driver and pre-set the calibration program. So you can just burn it on your card for use. If you want to change the calibration, you can just find the program and alter it. <br> | ||
| + | Download the image at the bottom of the page, unzip the package downloaded and you'll see a .img file. Burn it to your TF card by win32imager.<br> | ||
| + | Next, connect the monitor to the Raspberry Pi, and the HDMI board. plug in the TF card with the image file burnt. Connect the power and you can start the use. | ||
| + | Or, you may install the driver based on the instructions we provide in the package. <br> | ||
| − | + | If you have any problem, please feel free to contact us, by email to service@sunfounder.com or posts on our FORUM. We'll reply you ASAP. Thanks for support!<br> | |
| − | + | ==Features== | |
| − | + | ||
| − | + | ||
*Size: 65mm×56.5mm, standard as a Raspberry Pi HAT board | *Size: 65mm×56.5mm, standard as a Raspberry Pi HAT board | ||
*Screen sizing 2.2 inch and supporting a 320x240 resolution with high PPI, being small but able to provide a fine image | *Screen sizing 2.2 inch and supporting a 320x240 resolution with high PPI, being small but able to provide a fine image | ||
| Line 9: | Line 15: | ||
*With an Infrared receiver | *With an Infrared receiver | ||
| − | Procedures for Applying TFT Screen Display with Raspbian Jessie | + | ==Procedures for Applying TFT Screen Display with Raspbian Jessie== |
| − | + | [[File:TFT2.jpg]] | |
| − | + | ||
| − | + | ||
| − | + | '''Download''' the simplified installation package at the bottom (or [https://s3.amazonaws.com/sunfounder/Raspberry/images/2.2LCD-Show/pitft_setup.tar.gz here]). Transfer it to the Raspberry Pi. | |
| − | + | ||
| − | + | Finish the installation with '''Installation Guide''' which comes along with the product. | |
| − | + | ==Buttons== | |
| − | + | ||
| − | + | ||
| − | + | [[File:TFT3.jpg]] | |
| − | + | ||
| − | + | ||
| − | + | There are 6 buttons on the screen, which are marked by a number beginning with "#", such as '''#21''', '''#22''', etc. The number indicates that the pins are connected to GPIOs defined by '''BCM''' numbering. | |
| − | + | ||
| − | + | ||
| − | + | ==Backlight control:== | |
| − | + | [[File:TFT6.jpg]] | |
| − | + | '''SJ2''' is the switch for backlight control. Connect the two soldering pads of SJ2 by solder. You can use '''#27''' to switch on/off the backlight. | |
| − | + | gpio -g mode 27 in # Switch off | |
| + | gpio -g mode 27 out # Switch on | ||
| − | + | ==Infrared Receiving:== | |
| − | + | [[File:TFT4.jpg]] | |
| − | + | '''SJ1''' is the switch for IR control. | |
| − | + | ||
| − | + | ||
| − | + | ||
| − | + | ===1.Connect the two soldering pads of SJ1 by solder.=== | |
| − | + | ===2. Update and install the LIRC. Run:=== | |
| − | sudo | + | sudo apt-get update |
| − | + | sudo apt-get install lirc | |
| − | + | ===3.Edit /boot/config.txt and add settings. IR receiver of the extension board = 26=== | |
| − | + | sudo nano /boot/config.txt<br /> | |
| − | + | Add the following line to config.txt<br /> | |
| + | dtoverlay=lirc-rpi,gpio_in_pin=26<br /> | ||
| + | ===4.Edit the configuration file of LIRC to enable the Infrared function:=== | ||
| + | sudo nano /etc/lirc/hardware.conf<br /> | ||
| + | Change the following lines:<br /> | ||
| + | LIRCD_ARGS="--uinput" | ||
| + | DRIVER="default" | ||
| + | DEVICE="/dev/lirc0" | ||
| + | MODULES="lirc_rpi" | ||
| + | Note that there should be two hyphens in "--uinput".<br /> | ||
| + | ===5.Reboot the Raspberry Pi.=== | ||
| + | sudo reboot<br /> | ||
| + | And then, check whether the Infrared function is enabled.<br /> | ||
| + | ls /dev/l*<br /> | ||
| + | [[File:TFT5.jpg]]<br /> | ||
If you see the contents are displayed as shown in the above red box, it means the function is active now. | If you see the contents are displayed as shown in the above red box, it means the function is active now. | ||
| − | Record the buttons | + | ===6.Record the buttons=== |
| − | sudo /etc/init.d/lirc stop | + | sudo /etc/init.d/lirc stop |
| − | sudo irrecord -n -d /dev/lirc0 ~/lircd.conf | + | sudo irrecord -n -d /dev/lirc0 ~/lircd.conf |
| − | Record the buttons for your remote control as prompted. Record respectively "pause", "nextsong", "prevsong", "stop", "volumeup", and " | + | Record the buttons for your remote control as prompted. Record respectively "'''pause'''", "'''nextsong'''", "'''prevsong'''", "'''stop'''", "'''volumeup'''", and "v'''olumedown'''". |
Overwrite the corresponding lirc file with the recorded ~/lircd.conf | Overwrite the corresponding lirc file with the recorded ~/lircd.conf | ||
| − | sudo cp ~/lircd.conf /etc/lirc/lircd.conf | + | sudo cp ~/lircd.conf /etc/lirc/lircd.conf |
| − | + | ||
| − | + | ===7.Start lirc=== | |
| − | + | ||
| − | irw | + | sudo /etc/init.d/lirc start |
| + | ===8.Check the status of recording. Run=== | ||
| + | |||
| + | irw | ||
Then press the buttons recorded before in turns. | Then press the buttons recorded before in turns. | ||
| − | You can also view the name of the recorded and ready-for-use buttons by the command irsend | + | ===9.You can also view the name of the recorded and ready-for-use buttons by the command irsend=== |
| − | irsend LIST /home/pi/lircd.conf | + | irsend LIST /home/pi/lircd.conf |
You can see contents similar to the following displayed | You can see contents similar to the following displayed | ||
| − | irsend: 000000000000c837 pause | + | irsend: 000000000000c837 pause |
| − | irsend: 00000000000048b7 nextsong | + | irsend: 00000000000048b7 nextsong |
| − | Now you can send the code of the recorded buttons on the remote by the Infrared emitter. You can thus use the extension board to change programs. Refer to the following commands: | + | ===10.Now you can send the code of the recorded buttons on the remote by the Infrared emitter. === |
| + | You can thus use the extension board to change programs. Refer to the following commands:<br> | ||
| + | |||
| + | irsend SEND_ONCE /home/pi/lircd.conf pause | ||
| + | irsend SEND_ONCE /home/pi/lircd.conf nextsong | ||
| + | irsend SEND_ONCE /home/pi/lircd.conf KEY_VOLUMEDOWN | ||
| + | irsend SEND_ONCE /home/pi/lircd.conf KEY_VOLUMEUP | ||
| + | |||
| + | ==Attention== | ||
| + | <font color="red">Warning:</font>sometimes the driver installation may fail to be completed, and will further cause data missing, so you will need to reburn the system. You should clear about the risk.<br> | ||
| + | <font color="green">Suggestion:</font>Copy the important information on SD card to another one before driver installation.<br> | ||
| + | <font color="blue">Here is how:</font>Connect the Raspberry Pi to the display, click '''menu -> Accessories -> SD Card Copier''', and select the proper device to start.<br> | ||
| + | [[File:SD-1.png]]<br> | ||
| + | [[File:SD-2.png]]<br> | ||
| + | |||
| + | =='''Resources'''== | ||
| + | [https://s3.amazonaws.com/sunfounder/Raspberry/images/2.2LCD-Show/2.2LCD-Show.zip 2.2LCD-Show.img][[File:ZIP.jpg]]<br> | ||
| + | Note: | ||
| + | 1. This image is based on the official 2016-05-27-raspbian-jessie. | ||
| + | |||
| + | 2. Burn the image to the SD card by the tool win32DiskImager. | ||
| + | |||
| + | 3. After burning the image, configure the network first. Edit the file wpa_supplicant.conf, enter your own ID and password in ssid="your wifi ssid(name)" ;psk="your wifi password", and then save and copy the file to the TF card. | ||
| + | |||
| + | 4. Plug in the card and start the Raspberry Pi. Connect to the Internet, log in via ssh. Type in sudo raspi-config, select the first option - extend the SD card. After that, restart the Raspberry Pi. Now you should use the device normally. | ||
| + | |||
| − | + | [https://s3.amazonaws.com/sunfounder/Raspberry/images/2.2LCD-Show/pitft_setup.tar.gz pitft_setup][[File:ZIP.jpg]] | |
| − | + | ||
| − | + | ||
| − | + | ||
Latest revision as of 06:31, 8 August 2017
Contents
[hide]- 1 Introduction
- 2 Features
- 3 Procedures for Applying TFT Screen Display with Raspbian Jessie
- 4 Buttons
- 5 Backlight control:
- 6 Infrared Receiving:
- 6.1 1.Connect the two soldering pads of SJ1 by solder.
- 6.2 2. Update and install the LIRC. Run:
- 6.3 3.Edit /boot/config.txt and add settings. IR receiver of the extension board = 26
- 6.4 4.Edit the configuration file of LIRC to enable the Infrared function:
- 6.5 5.Reboot the Raspberry Pi.
- 6.6 6.Record the buttons
- 6.7 7.Start lirc
- 6.8 8.Check the status of recording. Run
- 6.9 9.You can also view the name of the recorded and ready-for-use buttons by the command irsend
- 6.10 10.Now you can send the code of the recorded buttons on the remote by the Infrared emitter.
- 7 Attention
- 8 Resources
Introduction
This monitor is specially designed for Raspberry Pi. You're recommended to download and install the image we provide. It is written based on the Raspbian Jessie 2016-5-27 version and we've pre-installed the driver and pre-set the calibration program. So you can just burn it on your card for use. If you want to change the calibration, you can just find the program and alter it.
Download the image at the bottom of the page, unzip the package downloaded and you'll see a .img file. Burn it to your TF card by win32imager.
Next, connect the monitor to the Raspberry Pi, and the HDMI board. plug in the TF card with the image file burnt. Connect the power and you can start the use.
Or, you may install the driver based on the instructions we provide in the package.
If you have any problem, please feel free to contact us, by email to service@sunfounder.com or posts on our FORUM. We'll reply you ASAP. Thanks for support!
Features
- Size: 65mm×56.5mm, standard as a Raspberry Pi HAT board
- Screen sizing 2.2 inch and supporting a 320x240 resolution with high PPI, being small but able to provide a fine image
- Multi-button design: 6 buttons, meeting different demands for buttons from various users
- With an Infrared receiver
Procedures for Applying TFT Screen Display with Raspbian Jessie
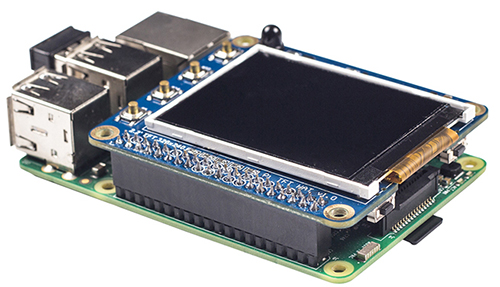
Download the simplified installation package at the bottom (or here). Transfer it to the Raspberry Pi.
Finish the installation with Installation Guide which comes along with the product.
Buttons
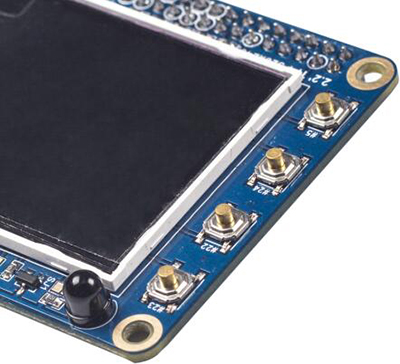
There are 6 buttons on the screen, which are marked by a number beginning with "#", such as #21, #22, etc. The number indicates that the pins are connected to GPIOs defined by BCM numbering.
Backlight control:
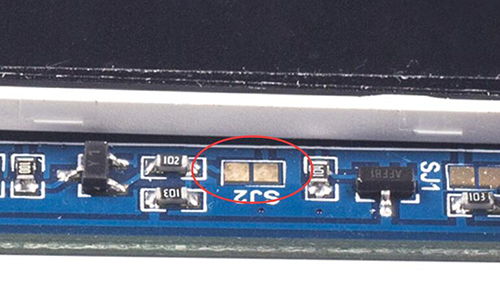
SJ2 is the switch for backlight control. Connect the two soldering pads of SJ2 by solder. You can use #27 to switch on/off the backlight.
gpio -g mode 27 in  # Switch off
gpio -g mode 27 out # Switch on
Infrared Receiving:
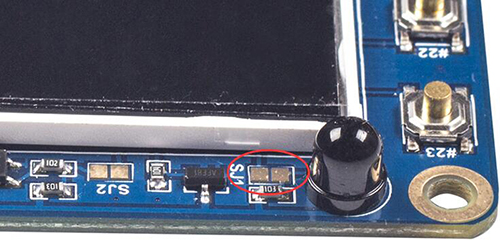
SJ1 is the switch for IR control.
1.Connect the two soldering pads of SJ1 by solder.
2. Update and install the LIRC. Run:
sudo apt-get update
sudo apt-get install lirc
3.Edit /boot/config.txt and add settings. IR receiver of the extension board = 26
sudo nano /boot/config.txt
Add the following line to config.txt
dtoverlay=lirc-rpi,gpio_in_pin=26
4.Edit the configuration file of LIRC to enable the Infrared function:
sudo nano /etc/lirc/hardware.conf
Change the following lines:
LIRCD_ARGS="--uinput"
DRIVER="default"
DEVICE="/dev/lirc0"
MODULES="lirc_rpi"
Note that there should be two hyphens in "--uinput".
5.Reboot the Raspberry Pi.
sudo reboot
And then, check whether the Infrared function is enabled.
ls /dev/l*
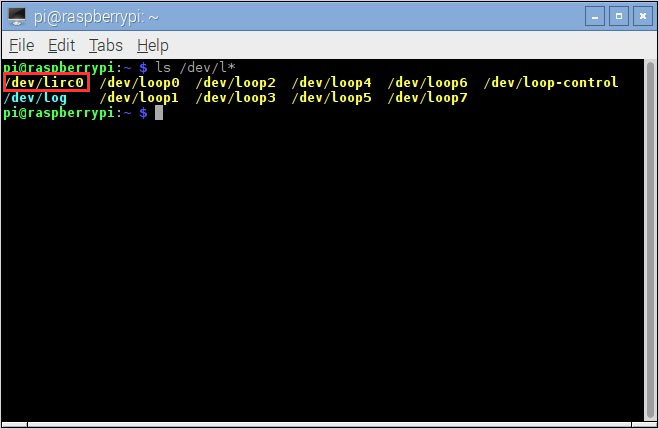
If you see the contents are displayed as shown in the above red box, it means the function is active now.
6.Record the buttons
sudo /etc/init.d/lirc stop
sudo irrecord -n -d /dev/lirc0 ~/lircd.conf
Record the buttons for your remote control as prompted. Record respectively "pause", "nextsong", "prevsong", "stop", "volumeup", and "volumedown".
Overwrite the corresponding lirc file with the recorded ~/lircd.conf
sudo cp ~/lircd.conf /etc/lirc/lircd.conf
7.Start lirc
sudo /etc/init.d/lirc start
8.Check the status of recording. Run
irw
Then press the buttons recorded before in turns.
9.You can also view the name of the recorded and ready-for-use buttons by the command irsend
irsend LIST /home/pi/lircd.conf
You can see contents similar to the following displayed
irsend: 000000000000c837 pause
irsend: 00000000000048b7 nextsong
10.Now you can send the code of the recorded buttons on the remote by the Infrared emitter.
You can thus use the extension board to change programs. Refer to the following commands:
irsend SEND_ONCE /home/pi/lircd.conf pause
irsend SEND_ONCE /home/pi/lircd.conf nextsong
irsend SEND_ONCE /home/pi/lircd.conf KEY_VOLUMEDOWN
irsend SEND_ONCE /home/pi/lircd.conf KEY_VOLUMEUP
Attention
Warning:sometimes the driver installation may fail to be completed, and will further cause data missing, so you will need to reburn the system. You should clear about the risk.
Suggestion:Copy the important information on SD card to another one before driver installation.
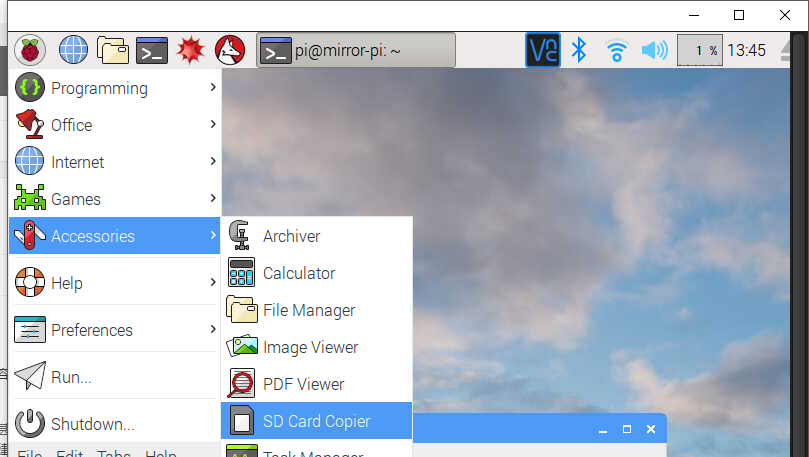
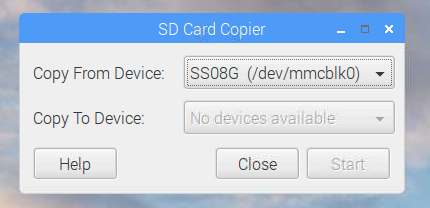
Here is how:Connect the Raspberry Pi to the display, click menu -> Accessories -> SD Card Copier, and select the proper device to start.
Resources
2.2LCD-Show.img![]()
Note:
1. This image is based on the official 2016-05-27-raspbian-jessie.
2. Burn the image to the SD card by the tool win32DiskImager.
3. After burning the image, configure the network first. Edit the file wpa_supplicant.conf, enter your own ID and password in ssid="your wifi ssid(name)" ;psk="your wifi password", and then save and copy the file to the TF card.
4. Plug in the card and start the Raspberry Pi. Connect to the Internet, log in via ssh. Type in sudo raspi-config, select the first option - extend the SD card. After that, restart the Raspberry Pi. Now you should use the device normally.
