Difference between revisions of "SD/TF Card Reader Module"
(Created page with "SunFounder SD/TF Card reader Memory Card Shield module SPI Interface for Arduino UNO R3 MEGA 2560 DUE Raspberry Pi Features 1) Support Micro SD card and TF card 2) Communica...") |
|||
| (10 intermediate revisions by the same user not shown) | |||
| Line 1: | Line 1: | ||
| − | + | =='''Introduction'''== | |
| − | + | ||
| − | + | ||
| − | + | ||
| − | + | ||
| − | + | ||
| − | + | ||
| − | + | ||
| − | + | ||
| − | Introduction | + | |
| − | + | ||
| − | + | ||
| − | + | ||
| − | Note: | + | [[File:sds1.jpg]] |
| + | |||
| + | When you have to deal with the audio, video or images in some projects, you will need a memory card to help you save these objects. A Reader Module is needed in the communication between the memory card and the MCU. | ||
| + | |||
| + | Sunfounder SD/TF card module can meet your needs. With standard SPI port, this module supports both SD and TF cards. Through the file system and SPI port | ||
| + | driver, the MCU can read and write the file inside the MicroSD card. | ||
| + | |||
| + | =='''Features'''== | ||
| + | |||
| + | 1)Support Micro SD/TF card, SD card. | ||
| + | |||
| + | 2)Communication interface: standard SPI interface. | ||
| + | |||
| + | 3)Built-in 5v -> 3.3v level translator chip TXB0104, making TF card work | ||
| + | |||
| + | 4)Power Supply: 5V, PCB Dimension: 34mmx32mm ->1.34inch x 1.26inch | ||
| + | |||
| + | 5)Control Interface: GND, VCC, MISO, MOSI, SCK, CS | ||
| + | |||
| + | |||
| + | <font color="red">'''Note''' | ||
| + | |||
| + | 1)DO NOT put the two cards in at the same time, otherwise the module will not work. | ||
| + | |||
| + | 2)Pin '''CD''' is used for detect whether the Card has inserted or not. If yes, the pin is low level. | ||
| + | |||
| + | 3)Support SD/TF card in FAT16 and FAT32 format only </font> | ||
| + | |||
| + | =='''Schematic''' == | ||
| + | [http://wiki.sunfounder.cc/images/9/9b/Shifting_SD%26TF.pdf Shifting_SD%26TF][[File:PDF.jpg]]<br> | ||
| + | |||
| + | [[File:sds2.jpg]] | ||
| + | |||
| + | =='''Formatting notes'''== | ||
| + | |||
| + | TF/ SD cards are regarded as the original storage. They’re parts of the flash chip and no structure of them is changeless, which means you could format an SD card to be a Linux filesystem, a FAT (DOS) filesystem or a Mac filesystem. Certainly, you can choose not to format the SD card to any filesystem. But you should note that most of the digital devices require FAT16 or FAT32 for the filesystem including cameras, computers, etc. | ||
| + | |||
| + | [[File:sd3.jpg]] | ||
| + | |||
| + | Although it’s most convenient to format an SD card to a filesystem you want when the card is in its original status, no matter for the Arduino library we’re going to talk about or for the other SD libraries, the card must be formatted to FAT16 or FAT32. Some SD libraries just compatible with one of the format while both are available for Arduino SD library. | ||
| + | |||
| + | When you are going to handle an SD card, it will be appreciated to format the card before using even if it’s new. Please remember to save everything you want before reformatting as it will erase all the data of the card. | ||
| + | |||
| + | <font color="red">Please download the formatting software in the '''sdcard''' official website</font> | ||
| + | |||
| + | |||
| + | <font color="blue">https://www.sdcard.org/downloads/formatter_4/index.html</font> | ||
| + | |||
| + | Download it and run it on your computer, there's also a manual linked from that page for use. | ||
| + | |||
| + | =='''Testing''' == | ||
| + | ==='''Preparing the equipment'''=== | ||
| + | -An Arduino board(Here use UNO) | ||
| + | |||
| + | -a USB Cable | ||
| + | |||
| + | -a TF Card or SD card | ||
| + | |||
| + | -some jump wires | ||
| + | |||
| + | -a SD/TF card reader module | ||
| + | |||
| + | ==='''Wiring'''=== | ||
| + | :::::::::::SD/TF Reader Module -------- UNO/Mega2560 | ||
| + | :::::::::::::MISO------------------ 12 / 50 MEGA | ||
| + | :::::::::::::SCK------------------ 13 / 52 MEGA | ||
| + | :::::::::::::VCC------------------ 5V | ||
| + | :::::::::::::CD------------------ N/C | ||
| + | :::::::::::::GND------------------ GND | ||
| + | :::::::::::::MOSI------------------ 11 / 51 MEGA | ||
| + | :::::::::::::CS------------------ 4 / 4 MEGA | ||
| + | |||
| + | [[File:sds4.jpg]] | ||
| + | |||
| + | There's one more pin '''CD''' - this is the Card Detect pin. It shorts to ground when a card is inserted. Wire this to the control board if you want to detect when a card is inserted. We won't be using it for now. Now, we can start to test. | ||
| + | |||
| + | '''Code''' | ||
| + | |||
| + | There is a built-in SD library of Arduino IDE which can be used to test the SD/TF card Reader Module and read or write data to SD/TF card | ||
| + | |||
| + | '''Step 1:''' Open Arduino IDE, find the '''CardInfo''' | ||
| + | |||
| + | [[File:sd5.jpg]] | ||
| + | |||
| + | '''Step2:''' Select correct board, here is Arduino/Genuino Uno | ||
| + | |||
| + | [[File:sd6.jpg]] | ||
| + | |||
| + | Then Tool -> Port | ||
| + | |||
| + | [[File:sds7.jpg]] | ||
| + | |||
| + | '''Step 3:''' Upload code to the uno, it indicates the successful uploading of the code when “Done uploading” appears. | ||
| + | |||
| + | [[File:sd8.jpg]] | ||
| + | |||
| + | [[File:sd9.jpg]] | ||
| + | |||
| + | '''Step 4:''' Open the Monitor, you will see the detailed information of the card which indicates the | ||
| + | SD/TF card Reader Module can work normally. | ||
| + | |||
| + | [[File:sd10.jpg]] | ||
| + | |||
| + | Now, you can use the SD/TF card Reader Module to read and write data of your card. | ||
Latest revision as of 07:57, 1 November 2021
Contents
[hide]Introduction
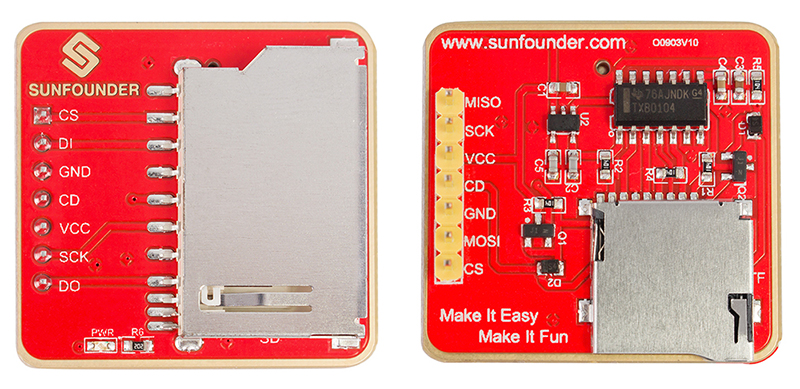
When you have to deal with the audio, video or images in some projects, you will need a memory card to help you save these objects. A Reader Module is needed in the communication between the memory card and the MCU.
Sunfounder SD/TF card module can meet your needs. With standard SPI port, this module supports both SD and TF cards. Through the file system and SPI port driver, the MCU can read and write the file inside the MicroSD card.
Features
1)Support Micro SD/TF card, SD card.
2)Communication interface: standard SPI interface.
3)Built-in 5v -> 3.3v level translator chip TXB0104, making TF card work
4)Power Supply: 5V, PCB Dimension: 34mmx32mm ->1.34inch x 1.26inch
5)Control Interface: GND, VCC, MISO, MOSI, SCK, CS
Note
1)DO NOT put the two cards in at the same time, otherwise the module will not work.
2)Pin CD is used for detect whether the Card has inserted or not. If yes, the pin is low level.
3)Support SD/TF card in FAT16 and FAT32 format only
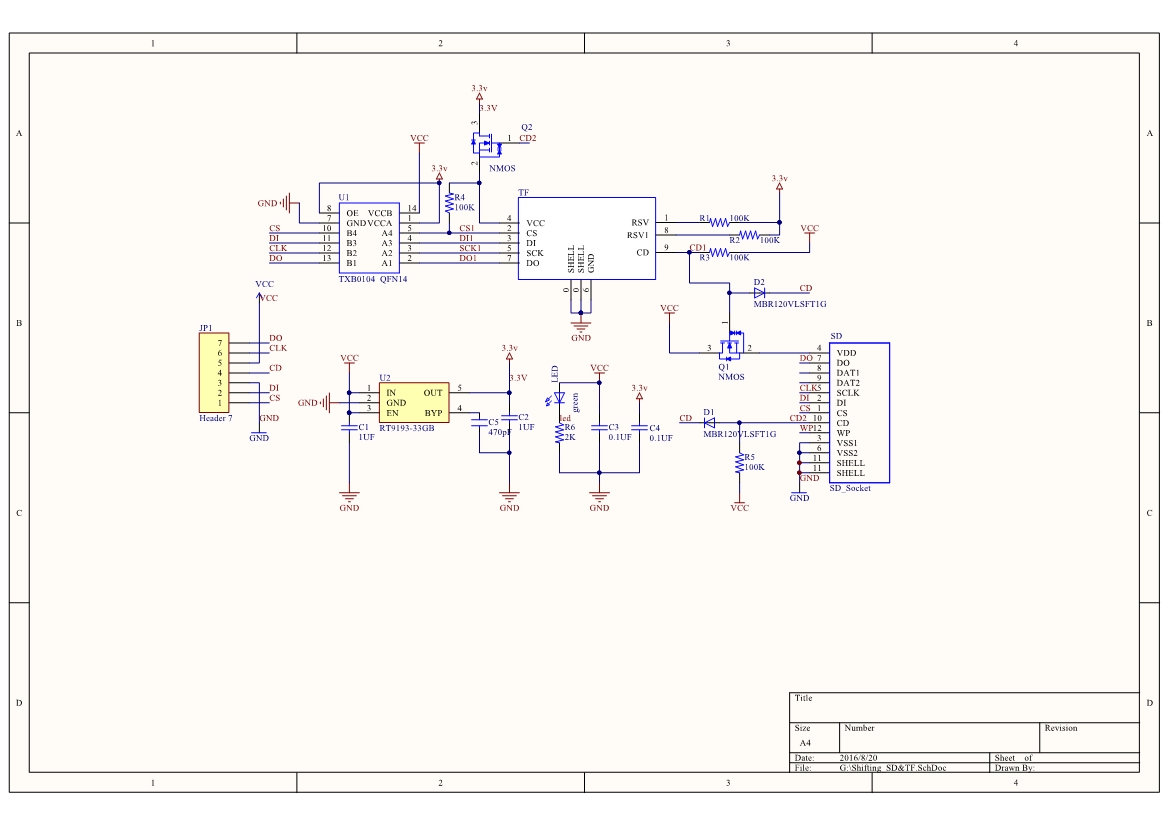
Schematic
Formatting notes
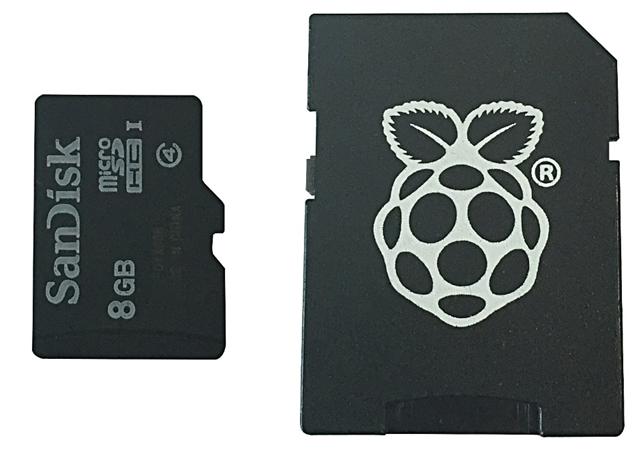
TF/ SD cards are regarded as the original storage. They’re parts of the flash chip and no structure of them is changeless, which means you could format an SD card to be a Linux filesystem, a FAT (DOS) filesystem or a Mac filesystem. Certainly, you can choose not to format the SD card to any filesystem. But you should note that most of the digital devices require FAT16 or FAT32 for the filesystem including cameras, computers, etc.
Although it’s most convenient to format an SD card to a filesystem you want when the card is in its original status, no matter for the Arduino library we’re going to talk about or for the other SD libraries, the card must be formatted to FAT16 or FAT32. Some SD libraries just compatible with one of the format while both are available for Arduino SD library.
When you are going to handle an SD card, it will be appreciated to format the card before using even if it’s new. Please remember to save everything you want before reformatting as it will erase all the data of the card.
Please download the formatting software in the sdcard official website
https://www.sdcard.org/downloads/formatter_4/index.html
Download it and run it on your computer, there's also a manual linked from that page for use.
Testing
Preparing the equipment
-An Arduino board(Here use UNO)
-a USB Cable
-a TF Card or SD card
-some jump wires
-a SD/TF card reader module
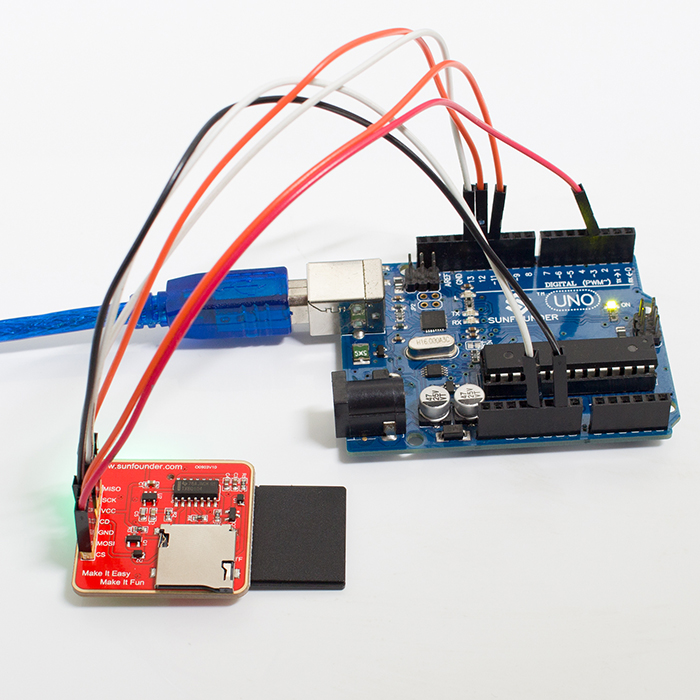
Wiring
- SD/TF Reader Module -------- UNO/Mega2560
- MISO------------------ 12 / 50 MEGA
- SCK------------------ 13 / 52 MEGA
- VCC------------------ 5V
- CD------------------ N/C
- GND------------------ GND
- MOSI------------------ 11 / 51 MEGA
- CS------------------ 4 / 4 MEGA
- SD/TF Reader Module -------- UNO/Mega2560
There's one more pin CD - this is the Card Detect pin. It shorts to ground when a card is inserted. Wire this to the control board if you want to detect when a card is inserted. We won't be using it for now. Now, we can start to test.
Code
There is a built-in SD library of Arduino IDE which can be used to test the SD/TF card Reader Module and read or write data to SD/TF card
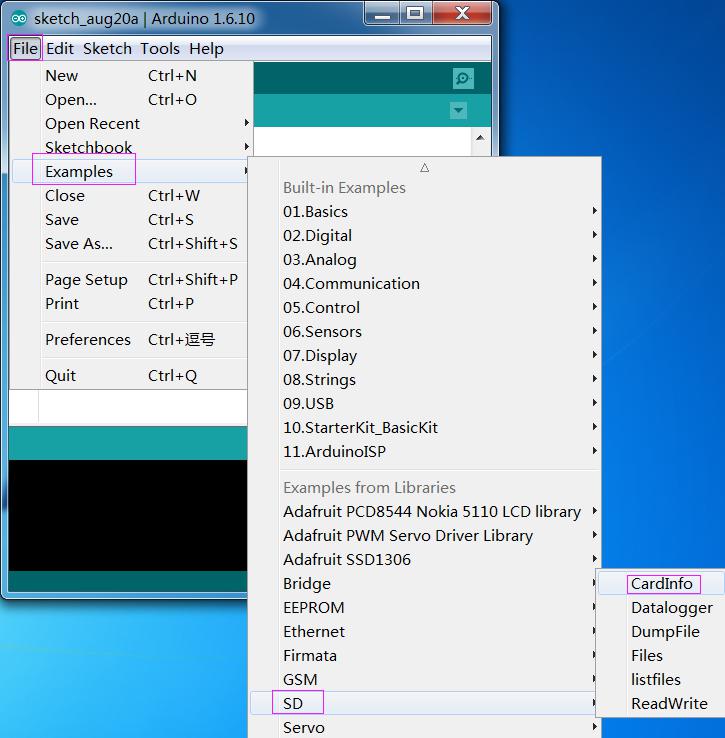
Step 1: Open Arduino IDE, find the CardInfo
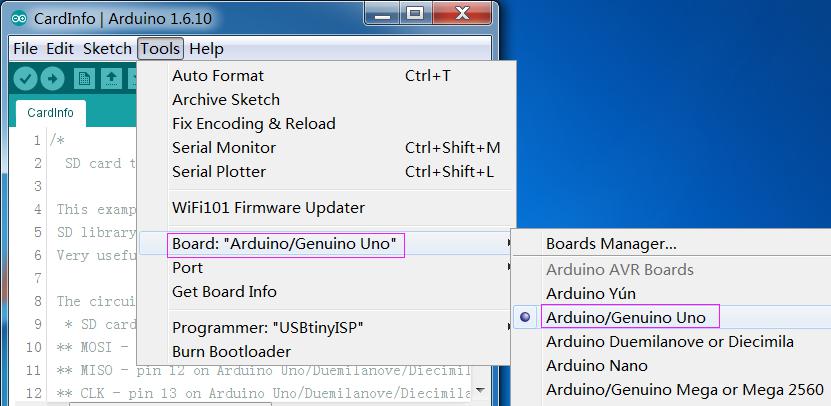
Step2: Select correct board, here is Arduino/Genuino Uno
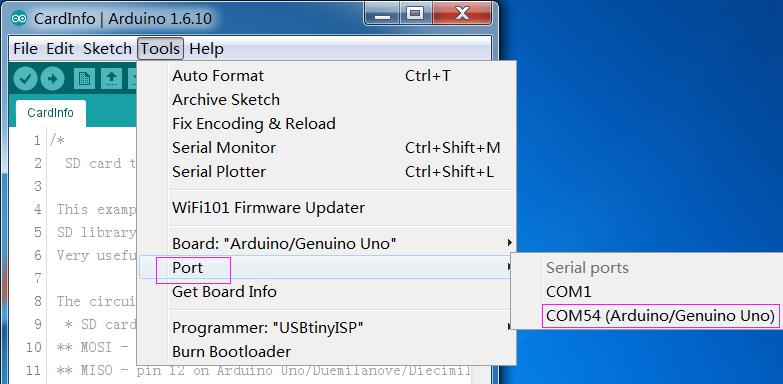
Then Tool -> Port
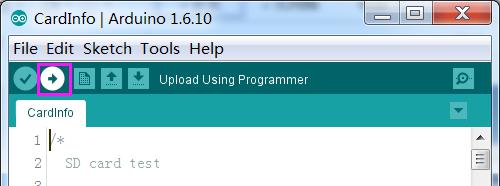
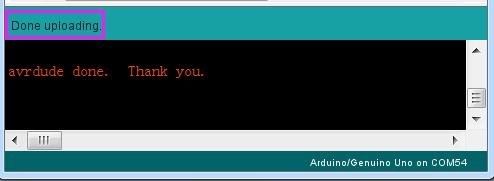
Step 3: Upload code to the uno, it indicates the successful uploading of the code when “Done uploading” appears.
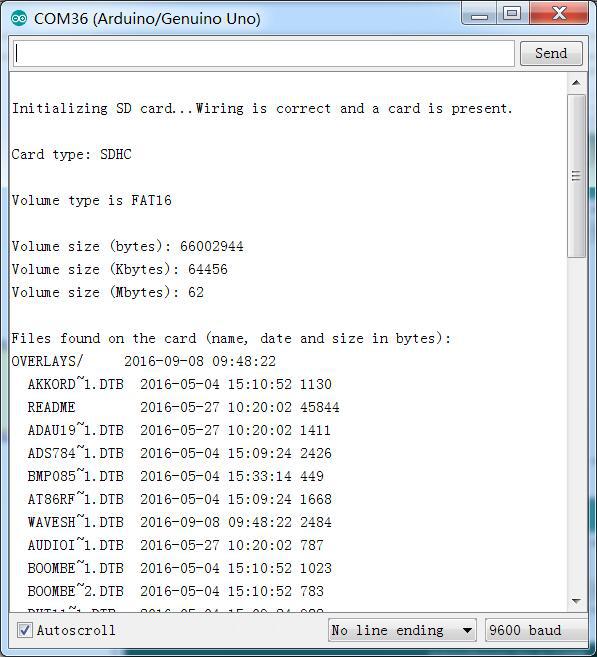
Step 4: Open the Monitor, you will see the detailed information of the card which indicates the SD/TF card Reader Module can work normally.
Now, you can use the SD/TF card Reader Module to read and write data of your card.
