Difference between revisions of "GPIO 40pin Breakout Expansion Board"
(Created page with "File:gpi1.jpg We can easily lead out pins of the Raspberry Pi to breadboard by GPIO Extension Board to avoid GPIO damage caused by frequent plugging in or out. This is ou...") |
|||
| (4 intermediate revisions by the same user not shown) | |||
| Line 1: | Line 1: | ||
| − | + | =='''Introduction'''== | |
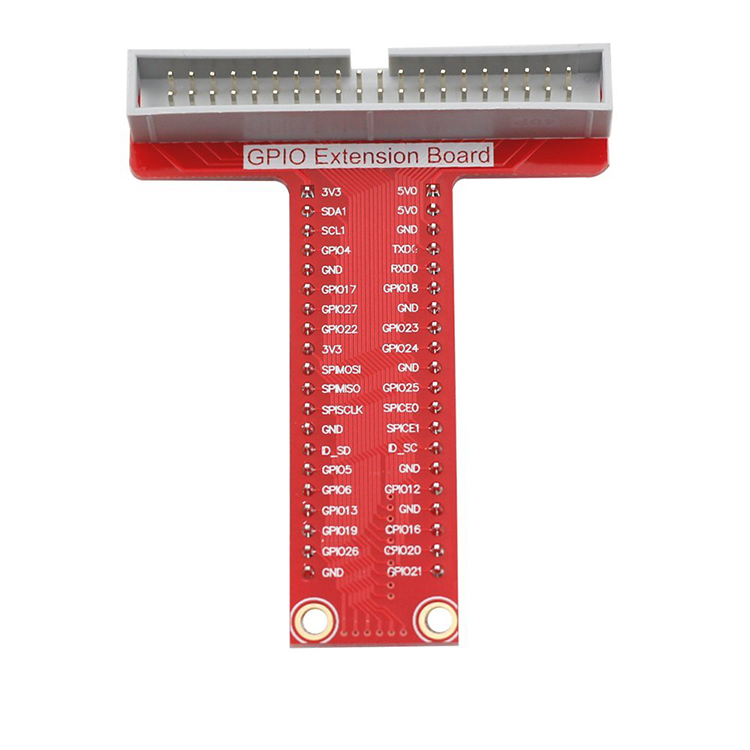
| − | + | This is 40-pin GPIO Extension Board and GPIO cable for Raspberry Pi model B+, 2 model B and 3 model B.It is used to lead out pins of Raspberry Pi to breadboard to avoid GPIO damage caused by frequentplugging in or out.<br> | |
| + | |||
| + | [[File:gpi1.jpg]]<br> | ||
| + | |||
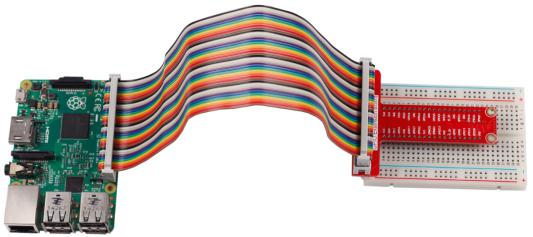
| + | Connected with Raspberry Pi shown below, the principle is lead out the raspberry pi GPIO by GPIO cable to the GPIO pin extension board and extention board inserted into the breadboard, when you jump wire is inserted into the breadboard, equivalent inserted into the raspberry Pi GPIO.<br> | ||
[[File:gpi2.jpg]] | [[File:gpi2.jpg]] | ||
=='''Raspberry Pi Pin Number Introduction'''== | =='''Raspberry Pi Pin Number Introduction'''== | ||
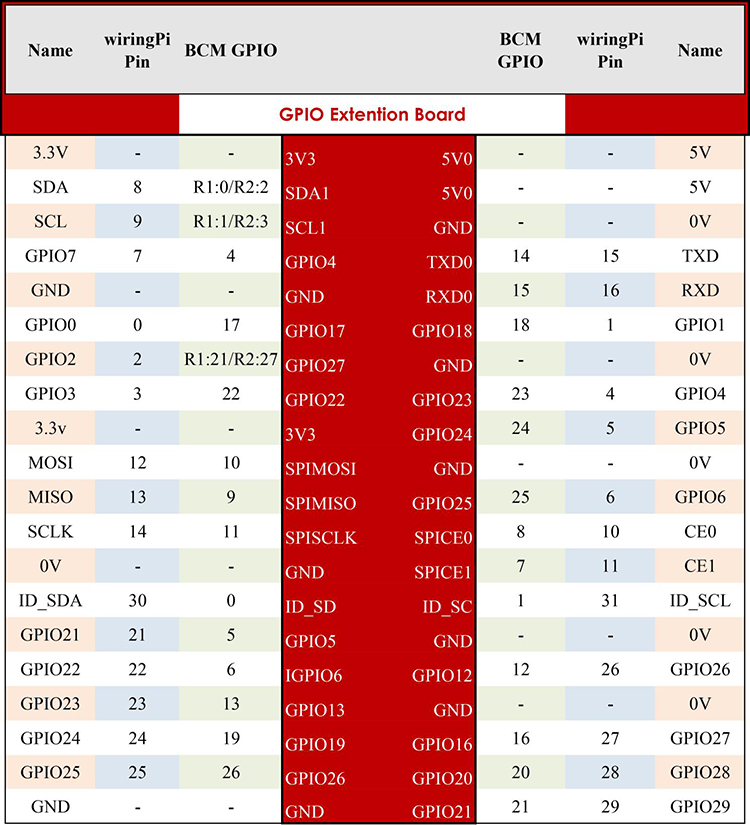
| − | The middle column is the pin names marked on the extension board, and the corresponding pin names are provided on its left and right for numbering by BCM and by wiringPi. The Name column is what the Raspberry Pi defines of the pin. "-" in two columns on the same line indicates the pin number and '''name''' is the same for the two numbering methods. | + | The middle column is the pin names marked on the extension board, and the corresponding pin names are provided on its left and right for numbering by BCM and by wiringPi. The Name column is what the Raspberry Pi defines of the pin. "-" in two columns on the same line indicates the pin number and '''name''' is the same for the two numbering methods. <br> |
| − | Besides, in Python, pins are usually defined by the physical position on the board. From top to bottom and left to right, the pin is defined as 3V3 (1), 5V0 (2), SDA1 (3), etc., till GPIO40. You'll get to more details in lessons later. | + | Besides, in Python, pins are usually defined by the physical position on the board. From top to bottom and left to right, the pin is defined as 3V3 (1), 5V0 (2), SDA1 (3), etc., till GPIO40. You'll get to more details in lessons later. <br> |
| − | [[File: | + | [[File:gip3.jpg]] |
:::::40-pin GPIO Extension Board | :::::40-pin GPIO Extension Board | ||
| Line 16: | Line 20: | ||
=='''GPIO Libraries WiringPi''' == | =='''GPIO Libraries WiringPi''' == | ||
==='''Introduction'''=== | ==='''Introduction'''=== | ||
| − | WiringPi is a GPIO library for C applied to the Raspberry Pi. It complies with GUN Lv3. The functions in wiringPi are similar to those in the wiring system of Arduino. They enable the users familiar with Arduino to use wiringPi more easily. | + | WiringPi is a GPIO library for C applied to the Raspberry Pi. It complies with GUN Lv3. The functions in wiringPi are similar to those in the wiring system of Arduino. They enable the users familiar with Arduino to use wiringPi more easily.<br> |
| − | Now the Raspbian Jessie 2016-05-27 has wiringPi pre-installed, you can use it directly. | + | Now the Raspbian Jessie 2016-05-27 has wiringPi pre-installed, you can use it directly.<br> |
| − | Test whether wiringPi is installed or not | + | Test whether wiringPi is installed or not<br> |
| − | WiringPi includes lots of GPIO commands which enable you to control all kinds of interfaces on Raspberry Pi. You can test whether the wiringPi library is installed successfully or not by the following instructions. | + | WiringPi includes lots of GPIO commands which enable you to control all kinds of interfaces on Raspberry Pi. You can test whether the wiringPi library is installed successfully or not by the following instructions.<br> |
gpio –v | gpio –v | ||
| Line 28: | Line 32: | ||
[[File:gpi4.jpg]] | [[File:gpi4.jpg]] | ||
| − | If the message above appears, the wiringPi is installed successfully. | + | If the message above appears, the wiringPi is installed successfully.<br> |
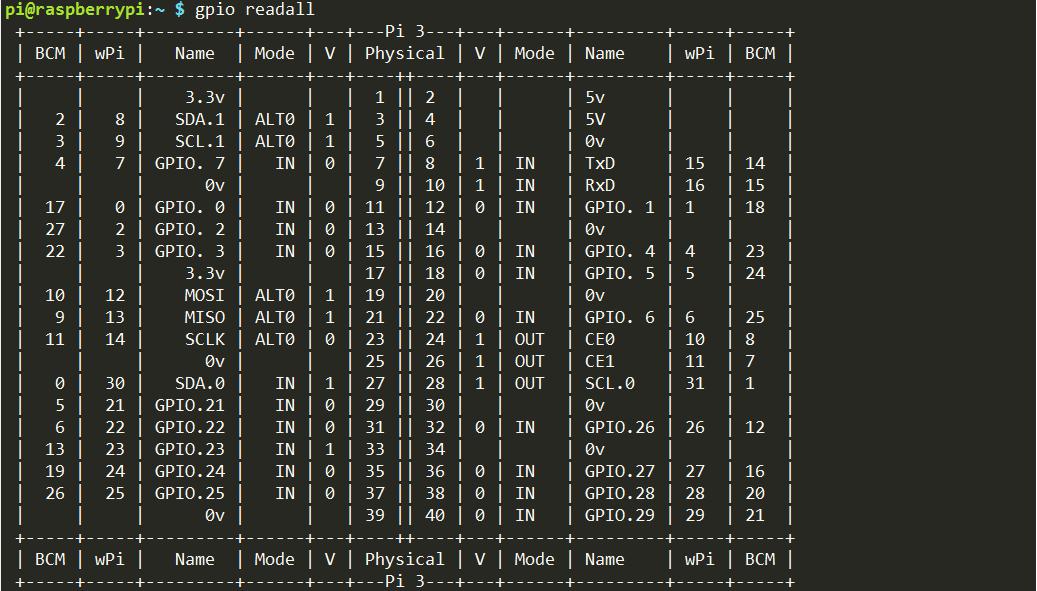
| − | Use the command below to see the GPIO layout | + | Use the command below to see the GPIO layout<br> |
gpio readall | gpio readall | ||
| Line 68: | Line 72: | ||
If it show its version like about, your Pi is ready to go! | If it show its version like about, your Pi is ready to go! | ||
| − | |||
| − | |||
Latest revision as of 07:39, 20 March 2017
Contents
[hide]Introduction
This is 40-pin GPIO Extension Board and GPIO cable for Raspberry Pi model B+, 2 model B and 3 model B.It is used to lead out pins of Raspberry Pi to breadboard to avoid GPIO damage caused by frequentplugging in or out.
Connected with Raspberry Pi shown below, the principle is lead out the raspberry pi GPIO by GPIO cable to the GPIO pin extension board and extention board inserted into the breadboard, when you jump wire is inserted into the breadboard, equivalent inserted into the raspberry Pi GPIO.
Raspberry Pi Pin Number Introduction
The middle column is the pin names marked on the extension board, and the corresponding pin names are provided on its left and right for numbering by BCM and by wiringPi. The Name column is what the Raspberry Pi defines of the pin. "-" in two columns on the same line indicates the pin number and name is the same for the two numbering methods.
Besides, in Python, pins are usually defined by the physical position on the board. From top to bottom and left to right, the pin is defined as 3V3 (1), 5V0 (2), SDA1 (3), etc., till GPIO40. You'll get to more details in lessons later.
- 40-pin GPIO Extension Board
GPIO Libraries WiringPi
Introduction
WiringPi is a GPIO library for C applied to the Raspberry Pi. It complies with GUN Lv3. The functions in wiringPi are similar to those in the wiring system of Arduino. They enable the users familiar with Arduino to use wiringPi more easily.
Now the Raspbian Jessie 2016-05-27 has wiringPi pre-installed, you can use it directly.
Test whether wiringPi is installed or not
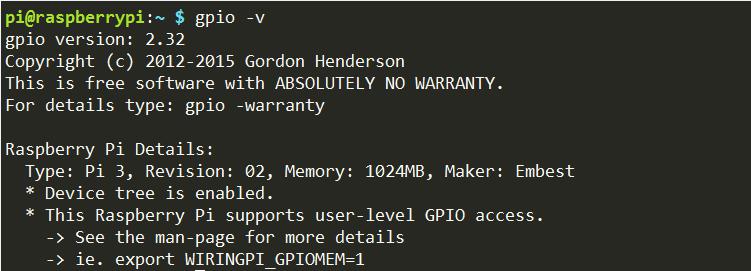
WiringPi includes lots of GPIO commands which enable you to control all kinds of interfaces on Raspberry Pi. You can test whether the wiringPi library is installed successfully or not by the following instructions.
gpio –v
If the message above appears, the wiringPi is installed successfully.
Use the command below to see the GPIO layout
gpio readall
RPi.GPIO
If you are a Python user, you can program GPIOs with API provided by RPi.GPIO.
Introduction
RPi.GPIO is a module to control Raspberry Pi GPIO channels. This package provides a class to control the GPIO on a Raspberry Pi. For examples and documents, visit http://sourceforge.net/p/raspberry-gpio-python/wiki/Home/
Now the Raspbian Jessie 2016-05-27 has RPi.GPIO pre-installed, you can use it directly, too.
Test whether RPi.GPIO is installed or not:
Type in python to python CLI:
In Python CLI, Type in:
import RPi.GPIO
If no error prompt, means RPi.GPIO is installed.
Then, type in
RPi.GPIO.VERSION
If it show its version like about, your Pi is ready to go!
