Difference between revisions of "TCS3200 Color Sensor Module"
| (4 intermediate revisions by the same user not shown) | |||
| Line 64: | Line 64: | ||
{| class="wikitable" | {| class="wikitable" | ||
|- | |- | ||
| − | |GY-33 | + | |'''GY-33''' |
| − | |Uno Board | + | |'''Uno Board''' |
|- | |- | ||
|VCC | |VCC | ||
| Line 82: | Line 82: | ||
|GND | |GND | ||
|} | |} | ||
| + | |||
| + | [[File:TCS3200_4.jpg]] | ||
| + | <br> | ||
| + | '''Step 2:''' Compile and upload the code. | ||
| + | <pre> | ||
| + | #include <TimerOne.h> | ||
| + | #define S0 6 | ||
| + | #define S1 5 | ||
| + | #define S2 4 | ||
| + | #define S3 3 | ||
| + | #define OUT 2 | ||
| + | int g_count = 0; | ||
| + | int g_array[3]; | ||
| + | int g_flag = 0; | ||
| + | float g_SF[3]; | ||
| + | void TSC_Init() | ||
| + | { | ||
| + | pinMode(S0, OUTPUT); | ||
| + | pinMode(S1, OUTPUT); | ||
| + | pinMode(S2, OUTPUT); | ||
| + | pinMode(S3, OUTPUT); | ||
| + | pinMode(OUT, INPUT); | ||
| + | digitalWrite(S0, LOW); | ||
| + | digitalWrite(S1, HIGH); | ||
| + | } | ||
| + | void TSC_FilterColor(int Level01, int Level02) | ||
| + | { | ||
| + | if(Level01 != 0) | ||
| + | Level01 = HIGH; | ||
| + | if(Level02 != 0) | ||
| + | Level02 = HIGH; | ||
| + | digitalWrite(S2, Level01); | ||
| + | digitalWrite(S3, Level02); | ||
| + | } | ||
| + | void TSC_Count() | ||
| + | { | ||
| + | g_count ++ ; | ||
| + | } | ||
| + | void TSC_Callback() | ||
| + | { | ||
| + | switch(g_flag) | ||
| + | { | ||
| + | case 0: | ||
| + | Serial.println("->WB Start"); | ||
| + | TSC_WB(LOW, LOW); | ||
| + | |||
| + | break; | ||
| + | case 1: | ||
| + | Serial.print("->Frequency R="); | ||
| + | Serial.println(g_count); | ||
| + | g_array[0] = g_count; | ||
| + | TSC_WB(HIGH, HIGH); | ||
| + | |||
| + | break; | ||
| + | case 2: | ||
| + | Serial.print("->Frequency G="); | ||
| + | Serial.println(g_count); | ||
| + | g_array[1] = g_count; | ||
| + | TSC_WB(LOW, HIGH); | ||
| + | |||
| + | break; | ||
| + | case 3: | ||
| + | Serial.print("->Frequency B="); | ||
| + | Serial.println(g_count); | ||
| + | Serial.println("->WB End"); | ||
| + | g_array[2] = g_count; | ||
| + | TSC_WB(HIGH, LOW); | ||
| + | break; | ||
| + | default: | ||
| + | g_count = 0; | ||
| + | break; | ||
| + | } | ||
| + | } | ||
| + | void TSC_WB(int Level0, int Level1) | ||
| + | { | ||
| + | g_count = 0; | ||
| + | g_flag ++; | ||
| + | TSC_FilterColor(Level0, Level1); | ||
| + | Timer1.setPeriod(1000000); | ||
| + | } | ||
| + | void setup() | ||
| + | { | ||
| + | TSC_Init(); | ||
| + | Serial.begin(9600); | ||
| + | Timer1.initialize(); | ||
| + | Timer1.attachInterrupt(TSC_Callback); | ||
| + | |||
| + | attachInterrupt(0, TSC_Count, RISING); | ||
| + | delay(4000); | ||
| + | |||
| + | for(int i=0; i<3; i++) | ||
| + | Serial.println(g_array[i]); | ||
| + | g_SF[0] = 255.0/ g_array[0]; | ||
| + | g_SF[1] = 255.0/ g_array[1]; | ||
| + | g_SF[2] = 255.0/ g_array[2]; | ||
| + | |||
| + | Serial.println(g_SF[0]); | ||
| + | Serial.println(g_SF[1]); | ||
| + | Serial.println(g_SF[2]); | ||
| + | } | ||
| + | void loop() | ||
| + | { | ||
| + | g_flag = 0; | ||
| + | for(int i=0; i<3; i++) | ||
| + | Serial.println(int(g_array[i] * g_SF[i])); | ||
| + | delay(4000); | ||
| + | } | ||
| + | |||
| + | </pre> | ||
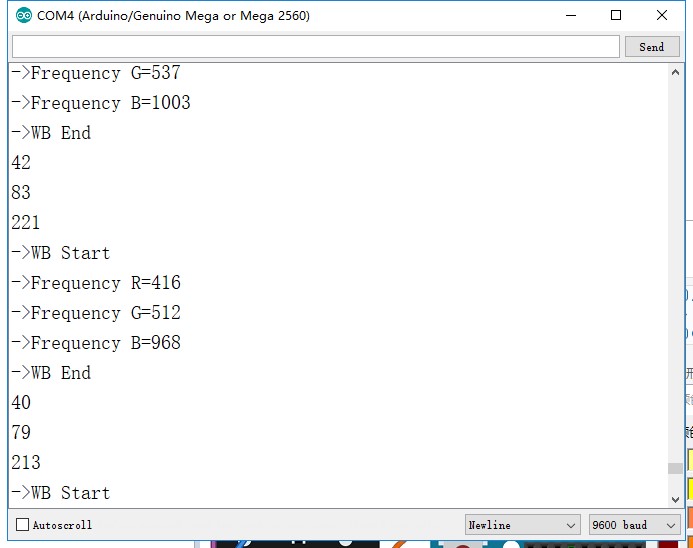
| + | [[File:TCS3200_5.jpg]] | ||
Latest revision as of 03:02, 9 October 2019
Contents
Introduction
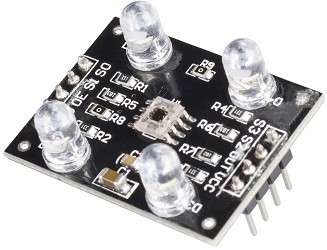
TCS3200 is the colorama-to-frequency programmable converter launched by TAOS company. As the first RGB color sensor in the industry, it has the single CMOS circuit integrated with configurable silicon photodiode and current frequency converter; also, it integrates three kinds of RGB light filters into the single chip. TCS3200 can be connected with microprocessor or logic circuit since it can drive standard TTL or CMOS logical input. The sensor outputs digital signal without the need of A/D conversion, so the circuit becomes simpler and can process more than 10 bits signal in each color channel.
Main Features
- TCS3200 is an upgraded version of TCS230
- Size: 3CM x 2.7CM (Length x width);
- Communication Interface: S0-S3 E0 OUT;
- On-board TCS3200 Color Sensor;
- Voltage Input Range: 3.3V~5V;
- Pin Specification: Standard 100mil (2.54mm); all pins of the chip are led out for the later connection into LED matrix panel;
- There exists much colour aberration during module testing, so if you have any special need for color testing, pay attention to it.
- Optimum Distance to Detected Object: Around 1cm.
Introduction of Pins
| Introduction of Pins | |
|---|---|
| GND | Power supply ground. All voltages are referenced to GND |
| OE | Enable pin (active low). |
| OUT | Output frequency. |
| S0,S1 | Output frequency scaling selection inputs. |
| S2,S3 | Photodiode type selection inputs. |
| VCC | Supply voltage |
Principle
Three-primary Colors
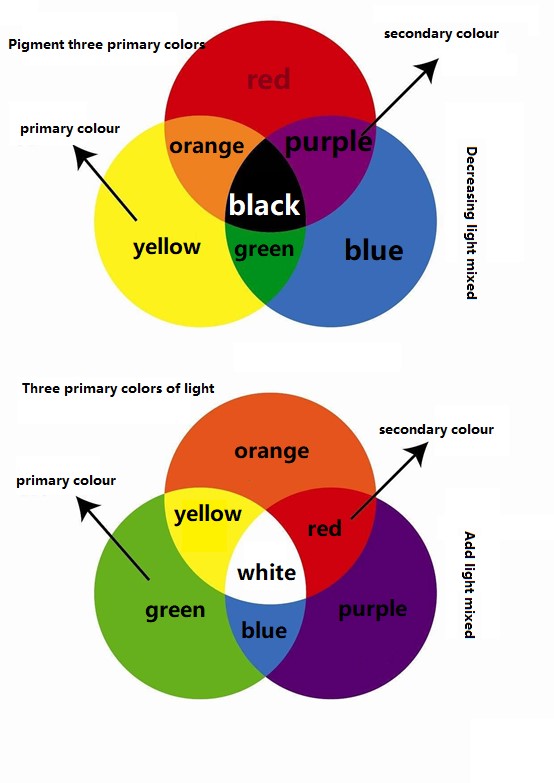
Three primary colors refer to three basic colors that can not be decomposed again. We usually say three primary colors, magenta, yellow, cyan (cyan is not blue, blue is the mixing color of magenta and cyan). The three primary colors can be mixed with all colors. If we mix them, we get black. Black, white, and gray are in the colorless system. The three primary colors of color and light refer to red, green and blue. The corresponding wavelengths are 700nm, 546.1nm and 435.8nm respectively. The primary colors of the light and the three primary colors of the object are different. The three primary colors of light can be mixed according to a certain proportion to present various light colors. According to Thomas Young and Helm Hauser's findings, these three primary colors are determined to be red, green and blue (equivalent to the color feeling of big red, medium green and group green (purple blue) in the pigment). The color TV screen is made up of three luminous color dots in red, green and blue. The three primary colors are mixed according to different proportions and intensity. Various color changes in natural world can be generated. The three primary colors of pigments and other non-luminous objects are fuchsin (equivalent to rose red, peach red), pint green (equivalent to deeper sky blue, lake blue), light yellow (equivalent to lemon yellow). The three primary colors selected by the British chemist Fubster (1781—1868) can be mixed into a variety of colors, but not black, only dark gray.
The Color Recognition Principle of TCS3200
As can be seen from the sensing principle of three primary colors above, it is possible to know the color of the object to be tested if the values of the three primary colors constituting the various colors are known.
For TCS3200, when a color filter is selected, it only allows a particular primary color to pass through, preventing other primary colors from passing through. For instance, when the red filter is selected, among the incident light, only red can pass through; blue and green are blocked, so that the light intensity of the red light can be obtained. By the same token, the light intensity of blue light and green light can be obtained by selecting other filters. With these three values, you can analyze the color of the light cast on the TCS3200 sensor.
Tcs3200, a programmable color light-to-frequency converter, is suitable for colorimeter measurement applications, such as color printing, medical diagnosis, computer color monitor calibration, and process control and color coordination of paints, textiles, cosmetics and printed materials.
Principle of White Balance and Color Recognition
White balance is to tell the system what white is. In theory, white is made up of the same amount of red, green and blue; but in fact, the three primary colors in white are not completely equal. For the TCS3200 light sensor, the sensitivity to these three basic colors is different, resulting in the RGB output of TCS3200 is not equal. So it is necessary to adjust the white balance before testing so that TCS3200 is equally sensitive to the three primary colors in the detected "white". White balance adjustment is made in preparation for subsequent color recognition. In the device, the specific steps and methods of white balance adjustment are as follows. Place the empty test tube above the sensor and a white light source above the test tube so that the incident light can shine through the test tube to the TCS3200. According to the method described above, the red, green and blue filters are selected in turn, and the values of red, green and blue are measured respectively, and then the three adjustment parameters can be calculated.
Experimental Procedures for Arduino
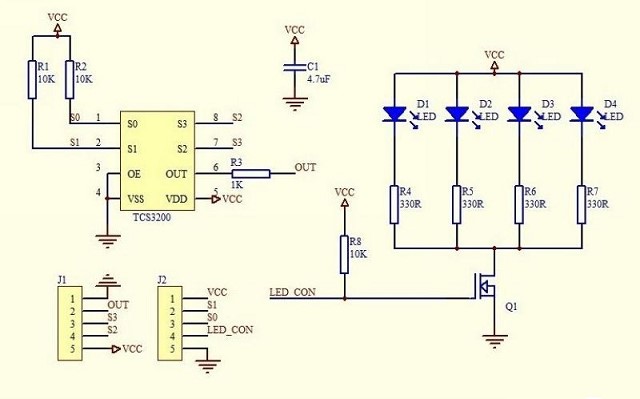
Step 1: Connect the circuit:
| GY-33 | Uno Board |
| VCC | VCC |
| CT | A5 |
| DR | A4 |
| GND | GND |
| SO | GND |
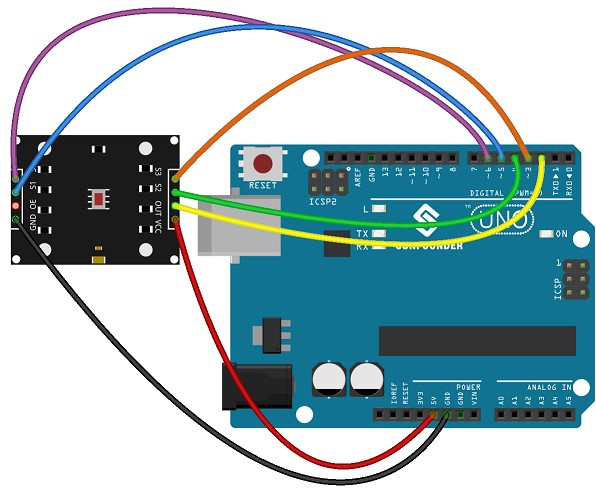
Step 2: Compile and upload the code.
#include <TimerOne.h>
#define S0     6
#define S1    5
#define S2     4
#define S3     3
#define OUT    2
int   g_count = 0;
int   g_array[3];
int   g_flag = 0;
float g_SF[3];
void TSC_Init()
{
   pinMode(S0, OUTPUT);
   pinMode(S1, OUTPUT);
   pinMode(S2, OUTPUT);
   pinMode(S3, OUTPUT);
   pinMode(OUT, INPUT);
   digitalWrite(S0, LOW);
  digitalWrite(S1, HIGH);
}
void TSC_FilterColor(int Level01, int Level02)
{
   if(Level01 != 0)
     Level01 = HIGH;
   if(Level02 != 0)
     Level02 = HIGH;
   digitalWrite(S2, Level01);
   digitalWrite(S3, Level02);
}
void TSC_Count()
{
   g_count ++ ;
}
void TSC_Callback()
{
   switch(g_flag)
   {
     case 0:
          Serial.println("->WB Start");
          TSC_WB(LOW, LOW);

          break;
     case 1:
          Serial.print("->Frequency R=");
          Serial.println(g_count);
          g_array[0] = g_count;
          TSC_WB(HIGH, HIGH);

          break;
     case 2:
          Serial.print("->Frequency G=");
          Serial.println(g_count);
          g_array[1] = g_count;
          TSC_WB(LOW, HIGH);

          break;
     case 3:
          Serial.print("->Frequency B=");
          Serial.println(g_count);
          Serial.println("->WB End");
          g_array[2] = g_count;
          TSC_WB(HIGH, LOW);
          break;
    default:
          g_count = 0;
          break;
   }
}
void TSC_WB(int Level0, int Level1)
{
   g_count = 0;
   g_flag ++;
   TSC_FilterColor(Level0, Level1);
   Timer1.setPeriod(1000000);
}
void setup()
{
   TSC_Init();
   Serial.begin(9600);
   Timer1.initialize();
   Timer1.attachInterrupt(TSC_Callback);

   attachInterrupt(0, TSC_Count, RISING);
   delay(4000);

   for(int i=0; i<3; i++)
     Serial.println(g_array[i]);
   g_SF[0] = 255.0/ g_array[0];
   g_SF[1] = 255.0/ g_array[1];
   g_SF[2] = 255.0/ g_array[2];

   Serial.println(g_SF[0]);
   Serial.println(g_SF[1]);
   Serial.println(g_SF[2]);
}
void loop()
{
    g_flag = 0;
    for(int i=0; i<3; i++)
     Serial.println(int(g_array[i] * g_SF[i]));
    delay(4000);
}
